AdminBase Customer Web Portal
Example View of the Customer Portal (CP)
Setup
1.IContact Ab Initio Support and ask them to activate your Customer Portal.
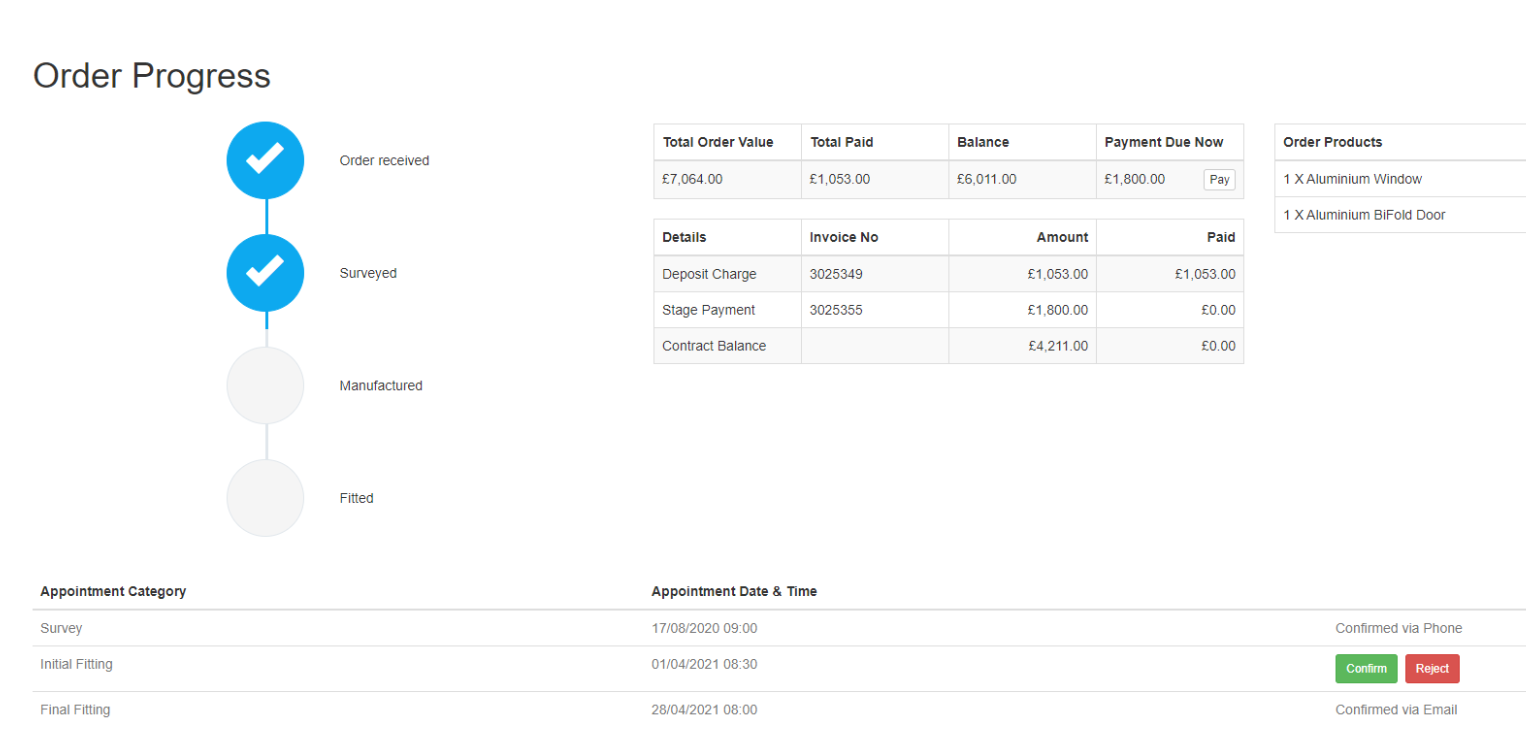
2. They will need to know if you want to show your customers a Summary Finance View or a Detailed View. This is an example of a summary view.

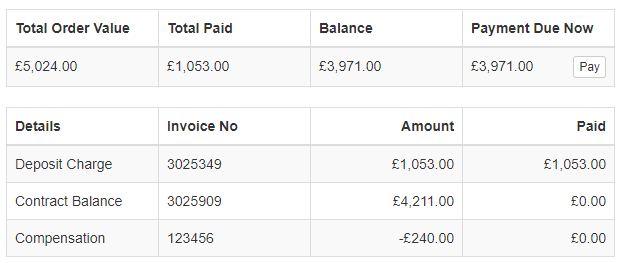
This is an example of a detailed view.
3. Taking payments in the CP. We have integrated with SagePay, Pay360 and Stripe to take payments and we will need to get details of your merchant account to get this set up. For information on the processing costs related to the different options please speak with us on 01283 551005 or by email to support@abinitiosoftware.co.uk
4. Customisations - various elements of the CP can be customised. See Customer Portal Customisations for what is available.
5. Linking your own website to the CP - see Order Updates Customer Website Integration
6. Once this is done you can email your customers a link to your web site and invite them to login using their contract number and postcode to see the progress of their order. The CP website has been carefully designed to hold no personal information that can identify a customer. They will know their own postcode so any email intercepted will not risk login by anyone other than the yourselves and the customer.
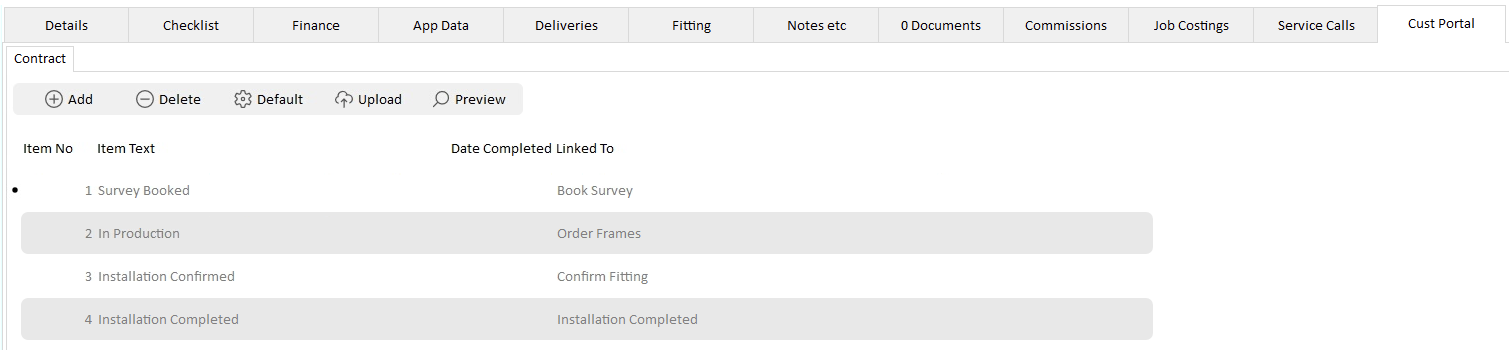
7. As edits are made in AdminBase to contracts the CP is updated. This happens on closing the contract details form or moving to a different contract - if you want it updated for the customer you are currently on you can go to the Cust Portal page and click Upload. You can also use Preview to see what the customer will see.
8. Order Updates - This is a list of stages on the contract for your customer to see. It can be linked to the checklist so that it will auto complete as checklist items are completed or if preferred can be completed manually.
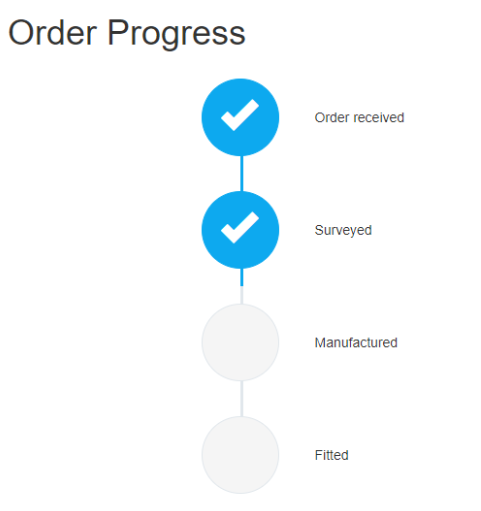
The list is set up in contract type defaults and can have as many or as few items as you wish and can be different for each contract type. The page with the list is called Cust Portal in Contract Type Defaults. Once happy with the list tick Enable Customer Portal for this Contract Type. This default is then ready in when new contracts are created.
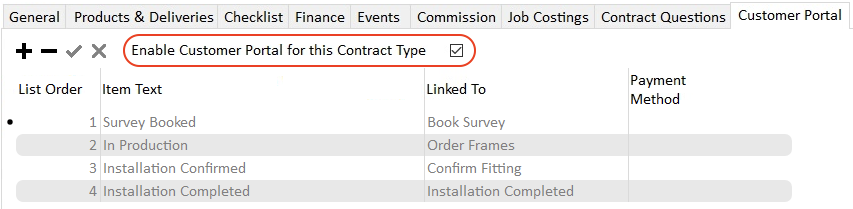
The Linked to field is a reference to the Action in the checklist not the Action No - this is so you can add items or reorder your checklists and so long as the text stays the same you don't need to go back over your existing contracts to make sure they work.
Once the list has been created in a contract each individual list can be edited if desired. You might wish to give your customer a little more or a little less information on certain contracts. Although the Date Completed against each action is shown in AdminBase this is not shown in the CP to the customer.
9. Products - Product information from the Product summary in AdminBase will only display in the CP if the field Web Text is completed. Not all need to be displayed to the customer. Also if required the description the customer sees in the CP can be different to the one you use internally. If a quantity is entered in the product summary this will also be shown in the CP.
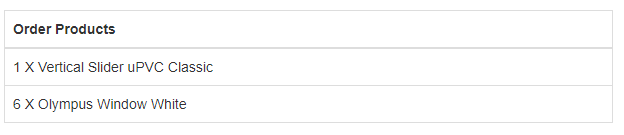
To make the setup of this all automatic there is now a Web Text field in your Products List. Any new entries here and the description will be automatically copied over to the new field. If you would like the Web Text field populated based on your existing descriptions of products send a request to Support and they will do this for you.
There is also a Web Text field in Default Products in the Contract Defaults if you use that default.
10. Finance - This is how finance amounts are displayed in the CP.
NOTE: All figures include VAT
i. Total Order Value - the total of all amounts charged in the finance lines of the contract as displayed here
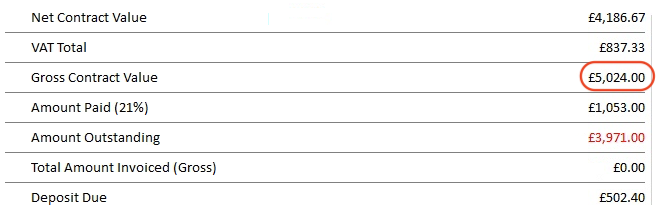
ii. Total Paid - the total of all amounts invoiced and ticked clear
iii. Balance - Total Order Value minus Total Paid
iv. Payment Due Now - total of invoiced amounts not ticked clear
For the detailed section only Amounts charged are listed and paid column is the amount of the invoice if clear is ticked. By using the clear button you can show what has been paid and what is due to be paid.
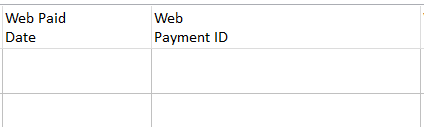
11. Payments - As payments are made through the CP these will be added to the contract in AdminBase with a payment ID and a date received.
These payments will not update in the CP until someone in AdminBase has ticked the invoice they relate to as clear. There are views to enable you to pick up these payments quickly and process them. We have not catered for your customers making part payments of an amount due. If this is required they need to speak to someone and agree this. You can then update the finance lines on the contract to reflect this and the Amount Due will update in the CP.
Use the New Web Payments view to see new payments - Mark Clear on the invoice and payment to remove from this view.
12. Appointments - An appointment needs to be Provisional and Web Confirm ticked to Allow Confirmation via the CP. It also needs a date AND time not just a date. However the Person1,2 &3 or Action By and Action By 3 can be blank. There is a new Confirm button on the Fitting page to allow you to record how appointments have been confirmed.
This is how appointments work in the CP.
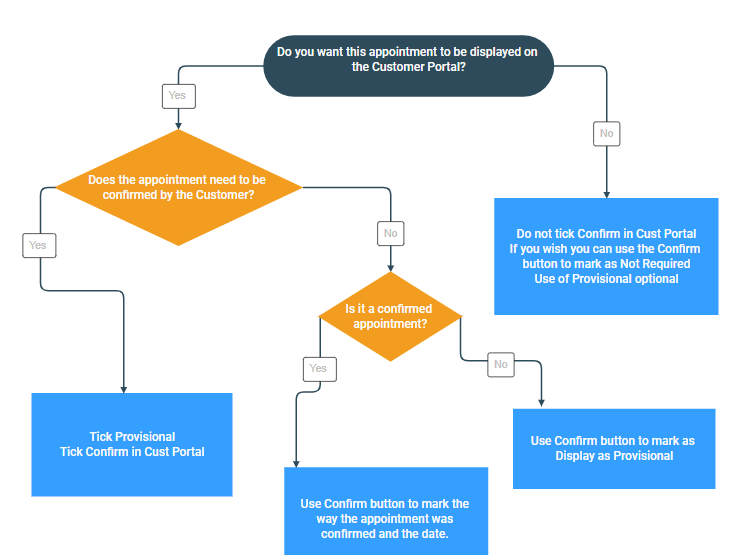
When confirmed by the customer in the CP Provisional is unticked and Do Not Move is ticked automatically in AdminBase but Confirm in Customer Portal isn't changed so that there can be a view of new appointment confirmations. If you forget to take the tick out on the fitting page it will not ask the customer to reconfirm - but the view of New Confirmations will not be reduced. It would be good practice to take the tick out Confirm in Customer Portal so that your view always contains just the new confirmations.
Appointments can be rejected by your customer in the CP. There is a view for these. Once rejected the appointment is removed from the CP. It is up to you if you want to delete these or not but once marked rejected they will not display in the CP again.
If you want to keep the rejected appointment on the fitting page but remove it from the Web Appt Rejects view just remove the tick from Confirm in Cust Portal.
NOTE: If you would like an appointment to show in the CP as Provisional you can also mark this using the Confirm button on the fitting page.
Also you can choose to show the appointment duration and AM/PM rather than a specific time. Just email support@abinitiosoftware.co.uk who till activate these options for you.
13. Service Calls - Once a contract has a Date Fitted entered and all the items in the Checklist (not the order updates list) list have been completed then the window company customer will now be able to use portal to raise a service call. Once the order is completed the order progress list is no longer visible. Instead there is a list for the service call. Once a contract is complete the finance section will show invoices raised after completion date (ie service call charges) and any balance from installation.
The customer will only be able to raise one service call at a time.
to be continued…..
New Cust Portal Contract Views
Current Contracts
New Payments Received
New payments through the CP where Clear hasn't been ticked - Mark Clear on the invoice and payment to remove from this view. This view will pick up payments received on chargeable service call because these are raised on the Finance page.
Web Appointment Confirmations Outstanding
Appointments ticked to be confirmed in the CP but that remain unconfirmed by customers.
New Web Appointment Confirmations
Appointments confirmed by customers in the CP but that haven't had their confirm marker unticked in AdminBase.
Web Appointment Rejections
Appointments that have been rejected in the CP and haven't had their confirm marker unticked in AdminBase.
Unassigned Web Appointment Confirmations
Confirmed appointments (CP or other methods) that have no personnel assigned to them - similar to Diary Unassigned lists.
Service Calls
New Service Calls
New service calls raised by customers via the CP.
Web Service Appointment Confirmations Outstanding
Service Appointments ticked to be confirmed in the CP but that remain unconfirmed by customers.
New Web Service Appointment Confirmations
Service Appointments confirmed by customers in the CP but that haven't had their confirm marker unticked in AdminBase.
Web Service Appointment Rejections
Service Appointments that have been rejected in the CP and haven't had their confirm marker unticked in AdminBase.
Unassigned Web Service Appointment Confirmations
Confirmed appointments (CP or other methods) that have no personnel assigned to them - similar to Diary Unassigned lists.
FAQ Section
Q: Can I use this on orders that have no fitting?
A: Yes just in the same way as you can use AdminBase for Supply Only orders you can do the same with the CP. Just set up your default items in the Contract Type defaults.
Q: How do I use this for chargeable service call contracts?
A: You no doubt have a contract type for this. You can choose whether to treat these as contracts / orders or as service calls. Note you would have to mark the contract as completed to activate the service call side of the CP and so we would recommend these are treated as contracts.
Q: I've changed my checklist - what do I need to do to sync my customer portal?
A: 1. Make sure the CP items are linked to the correct actions in your checklist.
2. Use the Default button on the CP page in the contract to reread in the list if this has changed.
Testing the Customer Portal
1.IFirst make sure you have completed the setup steps for Order Updates, Products, Finance and Appointments above.
2. Choose a current contract of the type you wish to test and open it.
3. On the Customer Portal page click Default. This will read in your Order Updates list that you created earlier.
4. Complete the items to match the stage the contract is at.
5. Now go to the Details page and the Products section.
6. Make sure that Cust Portal Text field to the far right has product description text for each line that you wish to display in the CP. Lines with empty text in this field will be ignored.
7. Now go to the Finance page
8. Make sure that charges that have been paid are marked clear - this is so that the Amount paid will be displayed correctly.
9. Make sure that any charge due to be paid has been invoices - this is so that that the Amount Due now is displayed correctly.
10. Now go to the Fitting page.
11. Any appointment that has already been confirmed with the Customer click the Confirm button and choose the method by which it was confirmed.
12. Any appointment that needs to be confirmed tick Confirm in Cust Portal and tick Provisional.
13. Any appointment that is Provisional but is not yet ready to be confirmed but that you want displayed in the CP click the confirm button and choose Display Provisional in Portal.
14. Note that CP displays future appointments that have a date and time.
15. Now go back to the Cust Portal page.
16. Click Preview and a web page should now open showing you how the CP will look when the customer logs in.
17. Make adjustments as needed until you are happy with the information displayed.
Ongoing Use of the Customer Portal
1.IOnce you have tested that you are happy with how the CP looks you can start using it on all your contracts. Choose a date to start with new contracts put on AdminBase.
2. If you wish to use it for any contracts you have already put on AdminBase then go through the test procedure above for each of them to bring it up to date according to the stage the contract is at.
3. Products - Cust Portal text will be set automatically so long as you have a Default Cust Portal Text against your products list - see Settings Products.
4. Order Updates - This list will be created automatically from your Contract Type Defaults → Cust Portal and will get automatically completed by the checklist via the Linked to Setting.
5. Invoices - Make sure you mark paid invoices as clear and that anything due for payment has an invoice number.
6. Payments made via the CP will appear automatically on the Finance page. Use the New Payments Received view to see all the contracts that have had a payment made via the CP. Work through them allocating the payment to the invoice ticking them both as clear. At this point the CP updates the Amount Paid.
7. Appointments - As appointments are made follow this flow chart to update them correctly in the CP.

8. You can see contracts with new appointments confirmations by using the New Appointment Confirmations view. The confirmations are applied automatically and Do Not Move is ticked and Provisional is unticked. To clear them off the view take out the Confirm in Cust Portal against the appointment and they will disappear from the view.
9. Make use of the Preview button to see exactly what the customer will see
How Does the Customer Login?
Method 1 - From a page on your website
This is the way we recommend because
a) the URL they use will be yours e.g. www.bestwindowco,com/orderupdates
and
b) you can use the page to notify your customer of special offers or any other information you need to tell them.
There are instructions mentioned above on how to link your website to the AdminBase CP.
Method 2 - Using our direct URL
This can be used until you have set up the link on your website.
The URL is https://orderupdates.abinitiosoftware.co.uk/login/9999
NOTE: Replace 9999 with your customer ID. You can find this in Settings → Company Settings → Company Details
With both methods the customer will be prompted to enter their Order Number (i.e. the contract number in AdminBase) and their postcode.
We recommend you only mention the contract number in any email. The customer should know their own postcode. The CP page has been carefully constructed to show no personally identifiable information.
When they login they will see exactly what you see when you use the CP Preview button.
Notifying Your Customer of Updates to their Order
The best way to do this is to make use of the checklist notifications. As any checklist item is completed an automatic SMS or email can be sent to the customer. This email can be set up to include the URL they need to use as well as their contract number.
Speak to support on 01283 551005 or watch the relevant videos on http://support.abinitiosoftware.co.uk