Diary Training Notes
Selecting Diary Type
Using the diary begins by making various selections from the diary ‘Request’ screen to choose the specific type of diary you wish to view. The diary ‘Request’ screen provides the following choices:
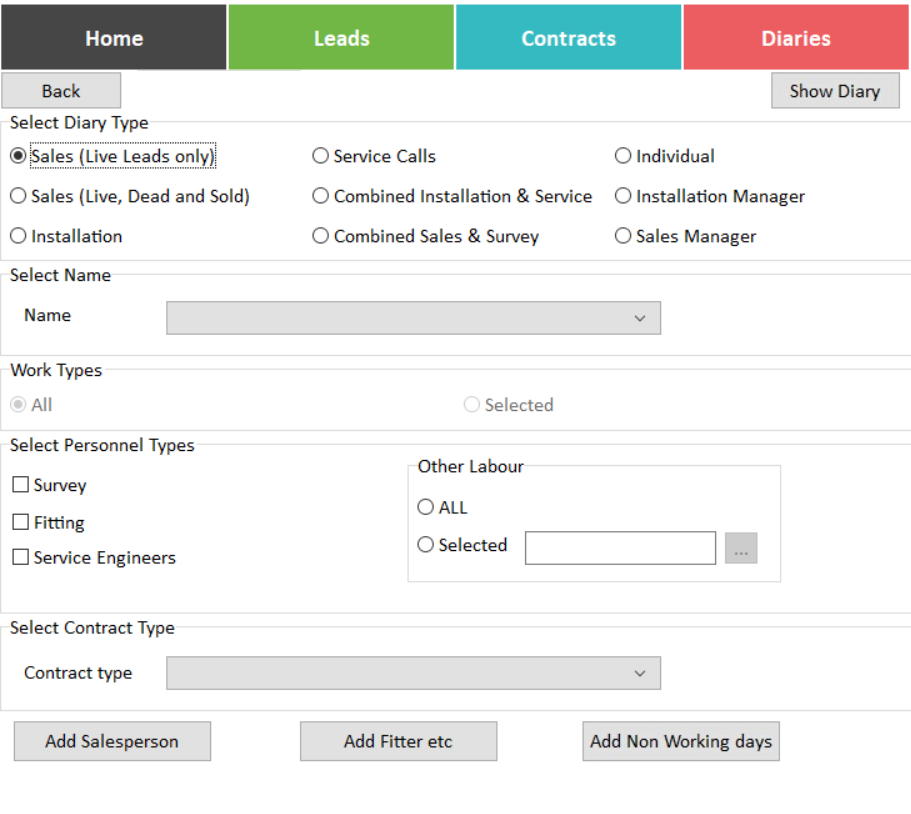
1. Select Diary Type, choose one of the predefined Diary types that can be viewed.
NOTE: Selecting an ‘Installation’ Diary will make available further options in this dialog for more specific options in this dialog for more specific diary type selection.
2. Select Name, to view a Diary for an individual, from the ‘Select Diary Type’ Select individual then select their name from the dropdown list.
3. Work Types, for ‘Installation’ diaries, select Installation from the ‘Select Diary Type’ choose whether to view all work categories or just selected ones.
4. Select Personnel Types, choose from the pre-defined ‘Personnel’ types. Clicking ‘Other Labour-Selected' will allow you to choose the ‘Other Labour’ work types you wish the diary to be confined to.
5. Select Contract Type, restrict the diary to show only appointments of certain ‘Contract Type’ by selecting from the dropdown list.
6. Add Salesperson/Add Fitter, buttons to Add/Edit/Delete Sales personnel and Fitters etc.
7. Add Non Working Days, button to define non-working days. Holidays etc. can be defined for individuals or everyone. (See ‘Setting Non-Working Days’ & ‘Adding Background Information’). NB Non Working events can also be added by selecting a time period in the diary, right clicking and selecting Add Non-working Day(s)
8. Show Diary, show the Diary based on the selections you have made. You can come back to this screen at any time by clicking on the ‘Change Diary’ button within the diary.
You can set the selected diary view to open as default by opening the required diary. Then open Settings → My Settings → Diary ->Diary Request Screen and selecting ‘Skip diary request type screen’.
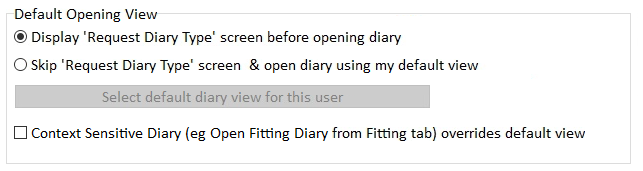
If you want the Change Diary options to always appear when you click on Diary switch it back on in Settings → My Settings → Diary ->Diary Request Screen
Views
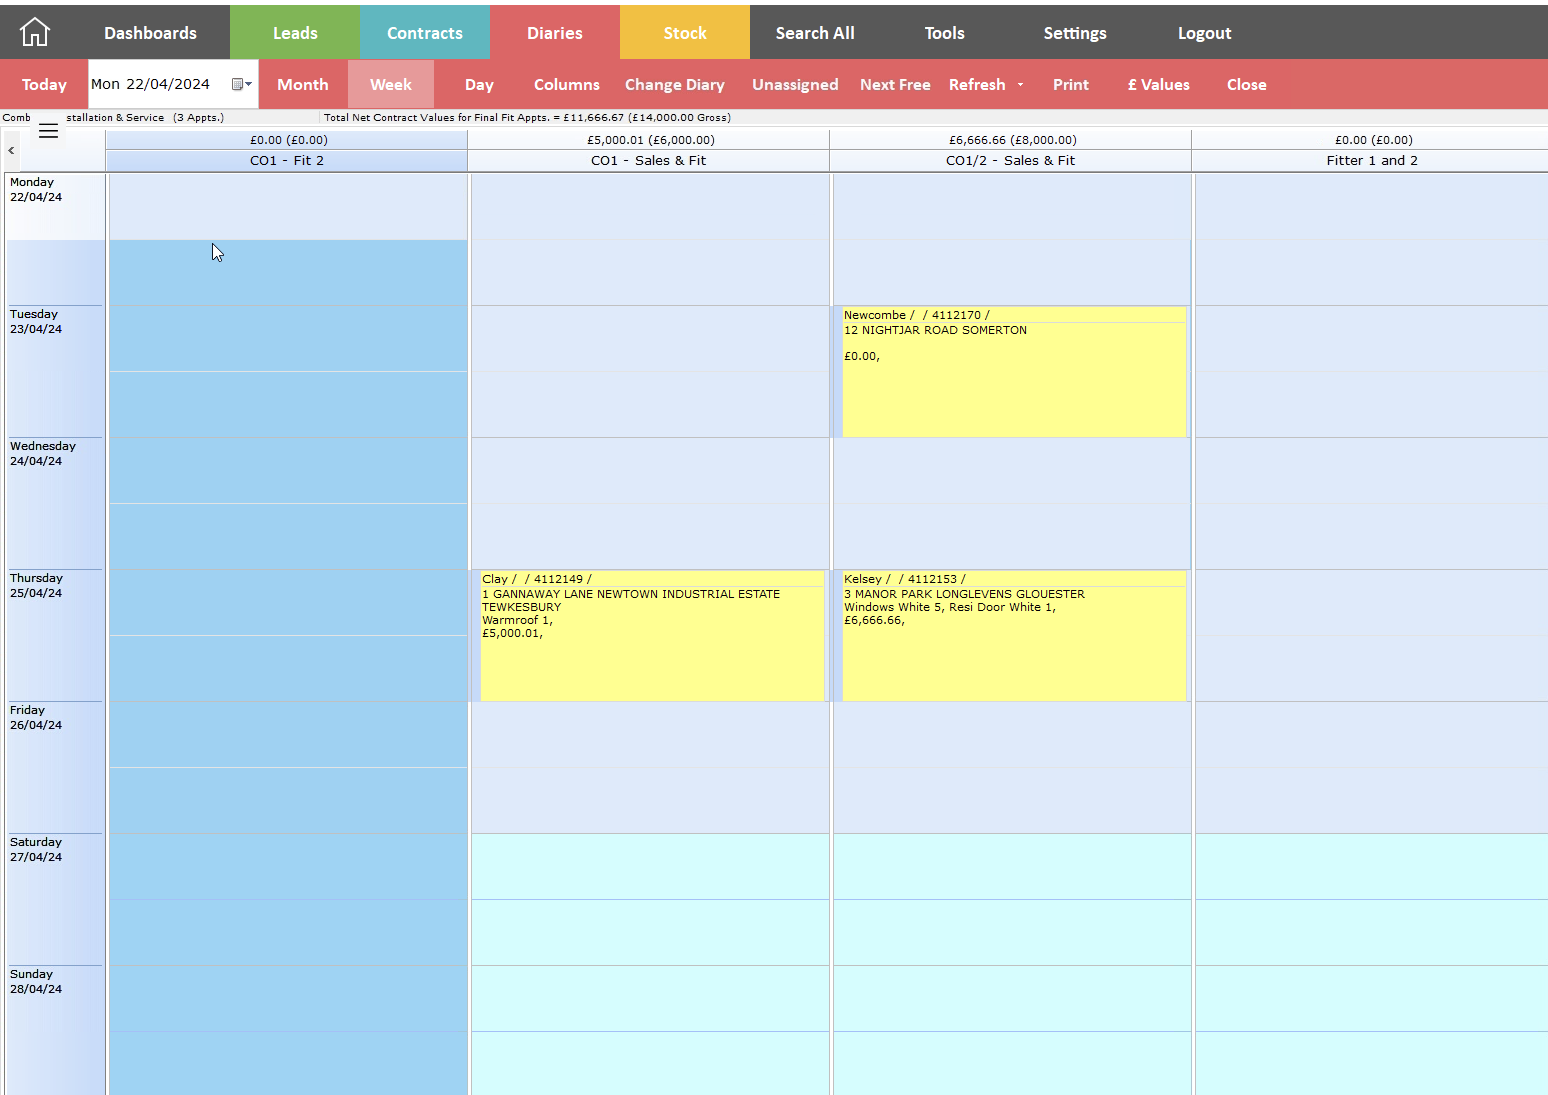
The Diary supports three main views, allowing the user to work with a single day, week or an entire month. Simply select the required view from the main tabs at the top of the Diary.

Month View
Month View provides the facility to work with an entire month of appointments. Move around using the provided date selectors (See Changing Date).
Week View
Week View provides the facility to work with an entire week of appointments. Move around using the provided date selectors (See Changing Date).
Day View
Day View provides the facility to work with a Single day, presenting hours and minutes for more detailed control or individual appointments. The current version presents a time-scale of 07:00am to 09:30pm.
Columns button - Fit to Page/Default Width
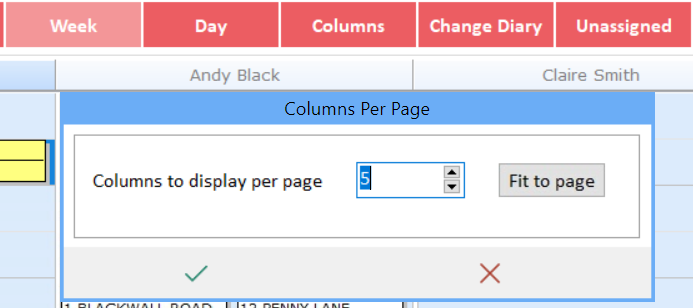
Applies to Week View and Day View
Clicking this button changes the width of all the columns. This provides the user with greater control over the amount of information visible at any one time. The button acts as a ‘toggle’ and will switch between:
Setting the columns to a default width. This allows more room for information to be displayed within an appointment (for easier reading). Simply use the horizontal scroll bar to see any appointments that are ‘off’ the screen.
Forcing all columns to be displayed at once. Space for information is more restricted, but the user has the advantage of an overview of all people/teams.
Expand Column Width
Click on the ‘Header’ of an individual/team.
Click in the header again to restore the previous column setting.
Changing Date
The following methods allow moving around in the Diary:
Date Selector

If the Diary is in Week View using the Date Selector will ‘open’ the Diary at the appropriate week.
Appointments for Monday – Sunday will be displayed.
If the Diary is in Day View the Date Selector will ‘open’ the Diary at the selected date.
Simply use the drop-down Date Selector to choose a date or manually type the desired date.
Previous/Next Button
Depending on whether the Diary is in Week View or Day View, these buttons at either end of the Personnel Header will ‘advance’ the Diary by exactly 1 week/day or ‘go back’ by exactly 1 week/day.
Today Button
A handy shortcut which takes the Diary back to current date regardless of where it is at present.
Unassigned Items

Click the ‘Unassigned’ button to summon a list of unassigned appointments. (See example below).
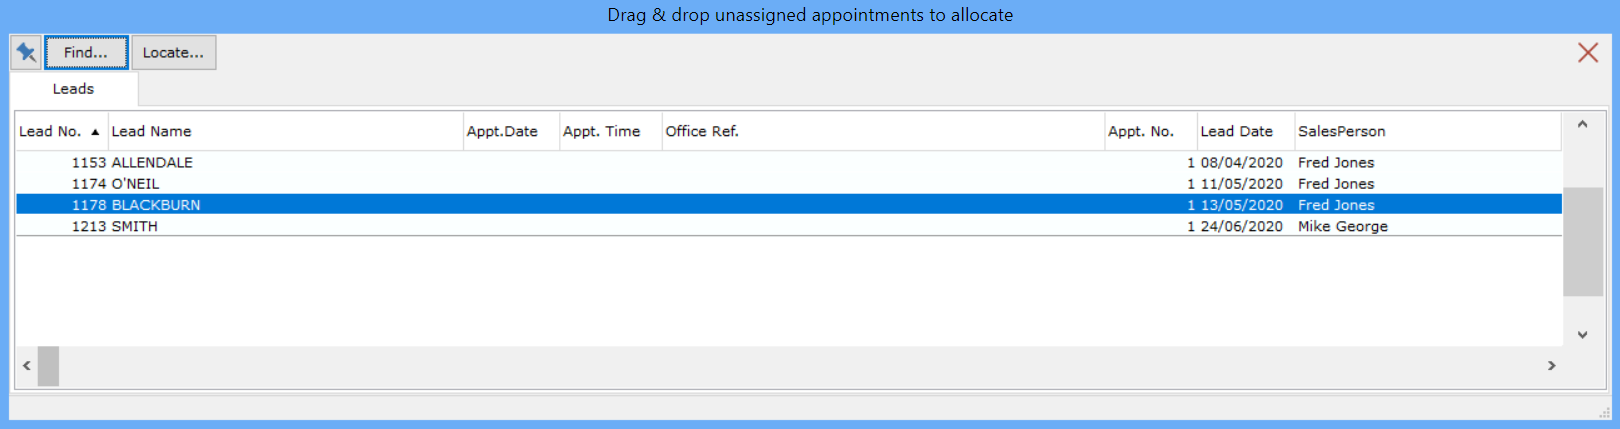
Left Click on an item in the list to select it, and then drag the item to the desired date/timeslot under the desired person/team.
NOTE: Clicking on an item either in the diary will hatch the personnel in red that can not be used for the work type of the selected appointment.
Clicking on an item either in the diary or in the unassigned list now gives a graphical display of where this item can/cannot be moved to.
Once the item has been dropped onto the diary the user will be presented with an ‘Edit’ dialog window which enables more specific control over the desired date/time. (See Editing an Item).
Clicking ‘Cancel’ here will allow the user to ‘back out’ of the appointment (i.e. if a mistake is made) and will put the item back into Unassigned.
Clicking ‘OK’ completes the adding of an appointment.
Editing an Item
Provides the facility to edit the Start Date & Time, and End Duration of an appointment.
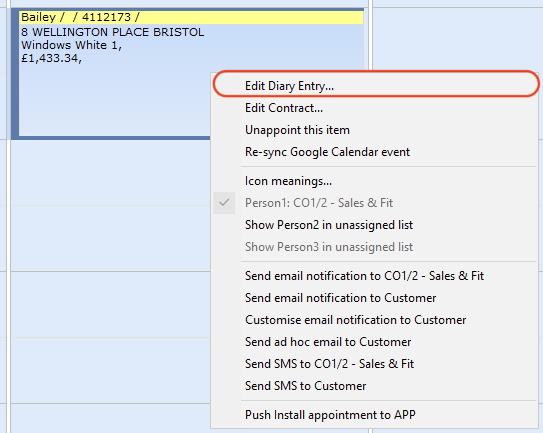
Left Click on an item to select it (A border will appear on the top, left and bottom of the item).
Right Click and select ‘Edit’ from the popup menu. (An Edit Window appears).
The various start/end times for the selected item can be edited using the drop-down boxes.
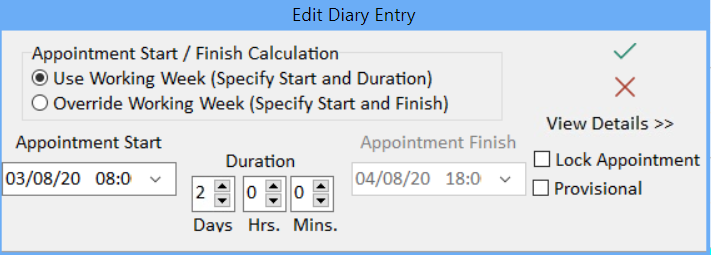
Appointment Start, Use the Date Time Picker to define a Start Date & Time.
Duration, Specify a duration for this appointment.
NOTE: As you specify a duration, the diary will automatically calculate when the appointment will end based on how you have set up your working week. (See Working Week).
View Details will expand the dialog display for more appointment details. (See Below).
Lock Appointment, will display a padlock symbol on the appointed item this is a visual indication that ‘Do Not Move’ has been set for this item in AdminBase. This appointment will not be able to be moved unless the item is unlocked first. Provisional will add a question mark symbol to the appointed item to indicate this is a provisional booking this appointment can still be moved without unmarking as provisional.
The Diary will automatically calculate the end time for the appointment based on your working week setup (See Defining the ‘Working Week’). For example, if you enter an appointment on Friday morning at 9am and your working week does not include Saturdays and Sundays, then a duration of 2 days will produce an end-time of 5pm on Monday. Note that as you alter the duration, the end-time will automatically be calculated and displayed before you commit to entering an appointment.
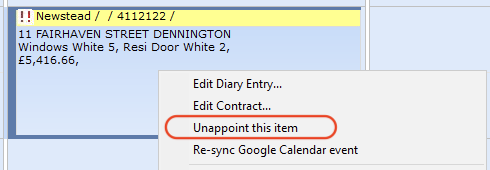
Unappointing an Item
Left click on an item to select it (a border will appear on the top, left and bottom of the item).
Right Clicking and selecting ‘Unappoint this item’ from the popup menu. After confirmation the item will be removed from the Diary and placed in the unappointed list.
Moving an Item
There are 2 recommended ways of moving an item:
Edit Window
Left click on the item to select it.
Use the Edit Window (See Editing an Item).
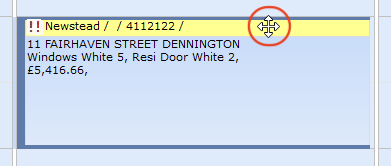
Drag & Drop
Left click on the item to select it.
Place the mouse pointer over the left hand border of the item (a cross-shaped ‘Move’ cursor appears).
Left Click and Drag & Drop the item to the desired location.
Resizing an Item
Left click to select it.
Then use the Edit Window (right click Edit..) to change the Start Time & Duration (See Editing an Item).
NOTE: In ‘day’ view an appointment length can also be changed by placing the mouse pointer over the top / bottom borders of the item (a double-arrowhead ‘Resize’ cursor appears). Left Click and Drag & Drop the item to the desired Size.
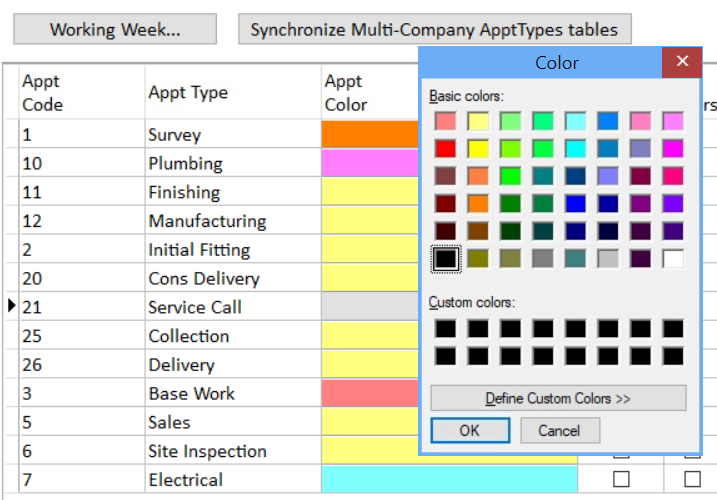
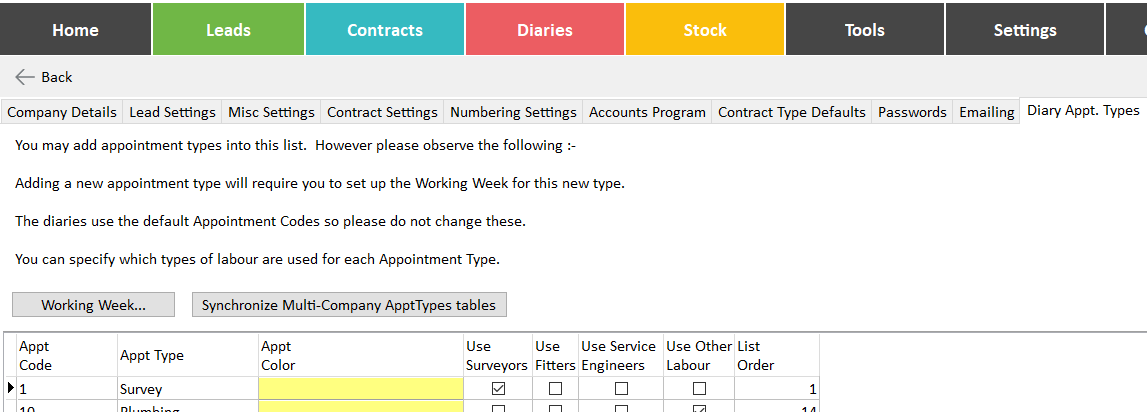
Appointment Type Colours
A facility for changing the colours of appointment types can be found in Settings → Company Settings → Diary Appt Types
Right click the ‘Appt Colour’ field next to the ‘Appt Type’ choose ‘Standard Colours’ this will open the familiar Windows Colour Dialog Box.
Select a new colour and click ‘OK’.
Printing

Clicking on the ‘Print’ button brings up the familiar Windows Print Dialog Box.
Select your Print Properties and click ‘OK’ to begin printing the active Diary view (i.e. Week View / Day View).
Adding Background Information
Background information can be set when adding ‘Non Working’ events
1.ITo access the ‘AdminBase Diary’ dialog, click on the ‘Change Diary’ button on the main toolbar.
2. Click on ‘Add non-working days’ and enter the relevant details, including whether the background information applies to just one person or everyone. Make sure to tick the ‘Background information’ checkbox.
NOTE: Because background information items are purely informational, they can overlap with ‘Proper’ appointments as they do not cause a timing conflict.
Find ‘Next Free Period’ Function

The Diary has the ability to search for the next free period for an individual or group of people.
Click on the ‘Next Free’ button to bring up the ‘Find Next Free Period’ dialog.
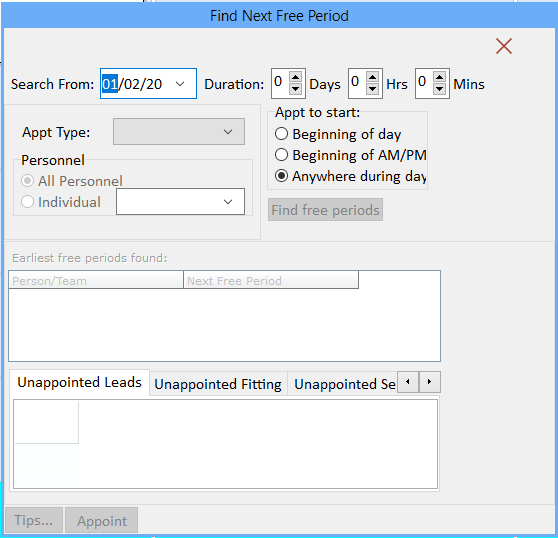
Search From, enter the date you wish to search from.
Duration, select a duration for the appointment.
Personnel, select an appointment type (this is important as the Working Week is set up based on appointment type). Choose whether to run your search using all personnel that are used for this appointment type, or find the next free period for an individual.
Appt to Start, You now have the option to control when you want your free period to start.
At the beginning of the day
At the beginning of AM or PM
Anywhere during the day (ie this will locate a free period starting immediately following a used period).
Click on the ‘Find Free Periods’ button to run the search. The results will be displayed in the first grid with the earliest at the top, although these can be ordered by clicking on the column header.
Double-clicking on a row will highlight the ‘found’ cell in the diary.
Alternatively you can make use of the list of un-appointed items in the bottom grid to appoint an item right now.
To do this:
Select a person/team in the first grid.
Select an un-appointed item in the second grid.
Click on the ‘Appoint’ button.
Defining the ‘Working Week’
For the diary to work correctly you will need to define your working week. Go to Settings → Company Settings → Diary Appointment Types
Click on the ‘Working Week’ button and the following screen will be presented, as below.
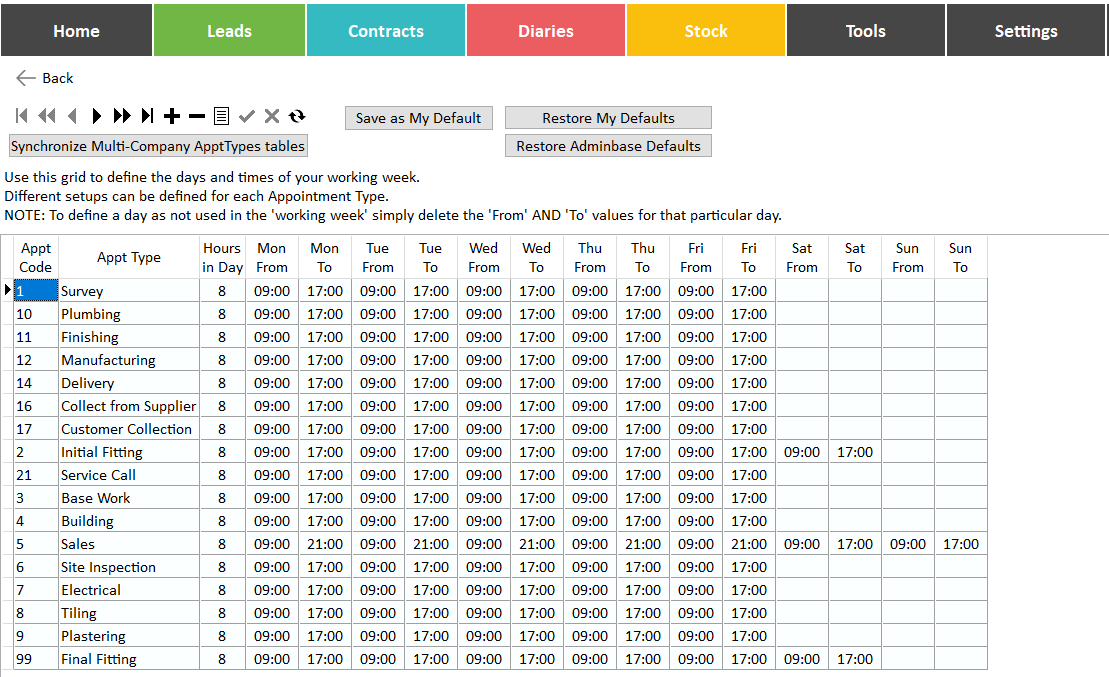
Follow the instructions provided at the top of the ‘Working Week’ setup dialog.
Set default Working Day Length
Enter default Start/End times for each day per Work Types.
Clicking the ‘Restore Defaults’ button will use the default Working Week
NOTE: Different week setups can be defined for each appointment type.
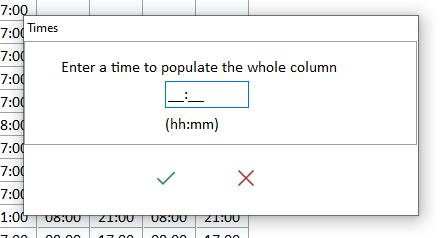
The Diary allows the user to define a default working day length. This can be set to any integer value. Enter the desired default day length in the ‘Hours in Day’ column. This can be set differently for each appointment type. Alternatively, populate the whole column in one go by double-clicking on the column header to enter a value in the prompt which appears….
Once your working week has been defined, the Diary will use this information when adding and editing appointments.