Leads Training Notes
Entering Customer Details
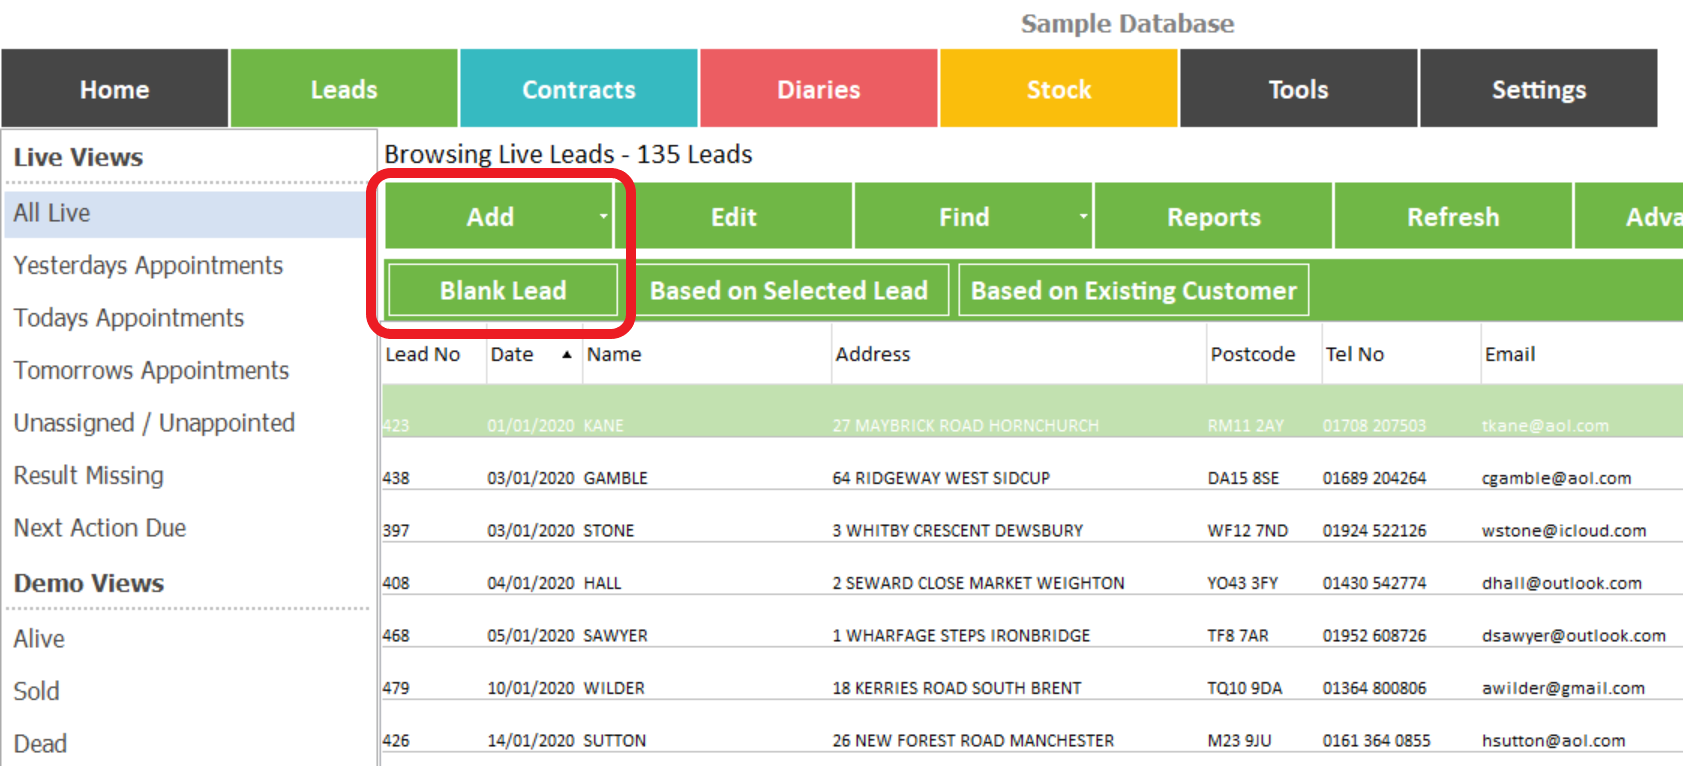
1.IIn Leads left click the ‘Add’ and the ‘Blank Lead’ button this will open a new lead record with the next lead number & today’s date also the current week number & the year.
FAQ
Q: Which button is the ‘Blank Lead’ button?
A: The button will appear after selecting ‘Add’ under the Leads view (marked below).
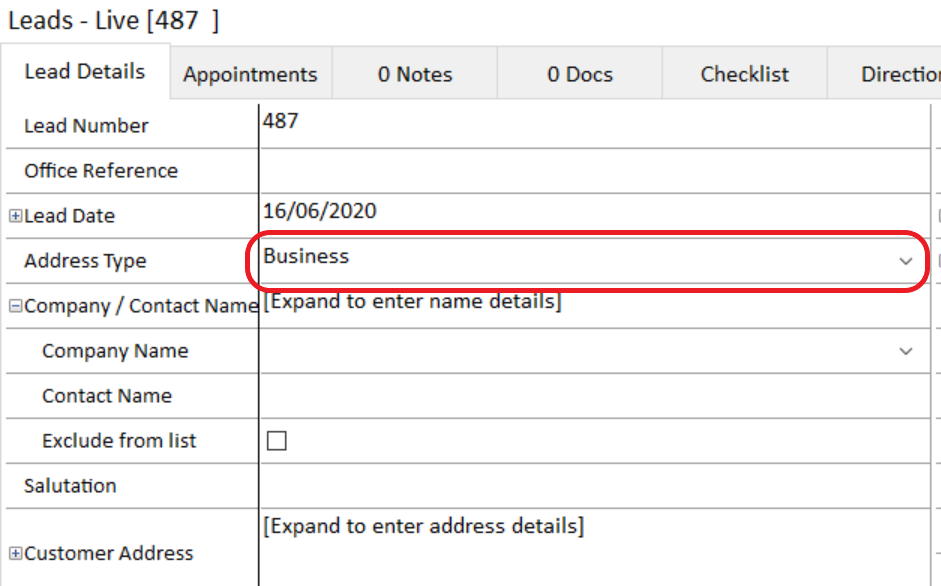
2. Expand the Customer Name fields by left clicking the ‘+’ sign marked below.

3. Left click on the drop down arrow on the right hand side of the ‘Title 1’ field, a list of titles will appear, left click the title you require to select it.
4. Move to the next field & enter the initial or the customer’s first name if you have it.
FAQ
Q: Which is the best way to move through the fields?
A: You can use the mouse, the tab key, or the enter key to advance through the fields.
5. Type in the customer’s surname. In the ‘Surname 1’ field shown below.

TOP TIP: When entering the customers details you should enter the information using upper & lower case letters, as the information typed here will be reused on correspondence throughout AdminBase. However there is no need to use the shift key or caps lock to achieve this, all you need to do is type in lower case & AdminBase will automatically put an uppercase letter at the start of each word.
6. The ‘Title, Initials and Surname 2’ fields are for entering the name of a second client with a different surname sharing the same address e.g. Mr A Jones. Miss B Brown.
FAQ
Q: What should I do if the enquiry is from a company not an individual?
A: Left click the ‘Address Type’ drop down menu shown below and change the address type to business. The First & Second name fields will change to Company and Contact name.
FAQ
Q: Why will AdminBase not let me type in the postcode?
A: You must enter the postcode in the correct format e.g. SP5 2LG , leaving a space between the two sets of characters. If you try to enter a postcode incorrectly AdminBase will not accept the entry.
TOP TIP: People often are not clear about their own postcode often confusing a zero with the letter ‘O’ for example if you try to enter a postcode using a number where a letter should be AdminBase will not accept the entry.
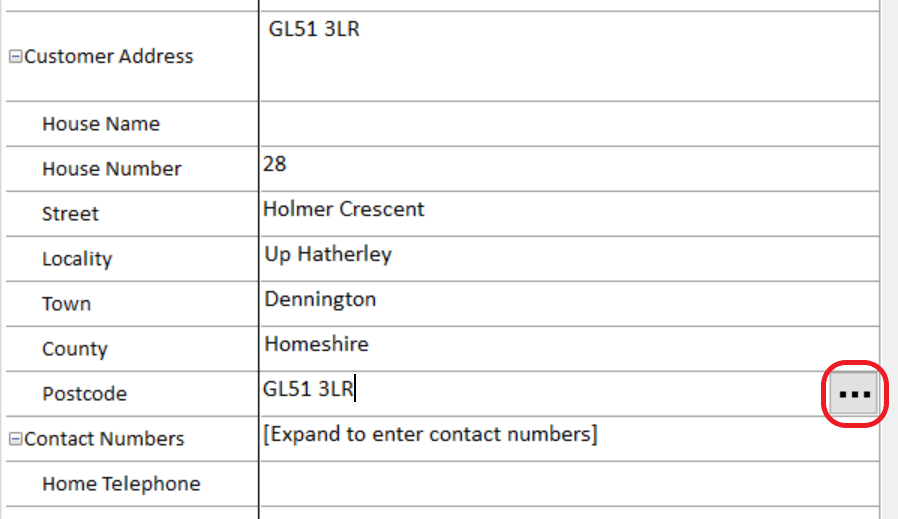
7. Enter the house name & or number
8. The street or road name
9. The locality (if applicable)
10. The town
11. The county
12. The postcode
13. The phone numbers and Email address
Postcode Search
If you have purchased postcode credits to use with AdminBase you can skip most of the previous steps and simply enter the customers name/s and then move straight to the postcode field ,If you then enter the postcode and left click the search button (highlighted below) AdminBase will complete the address for you automatically. You do however need to enter the house number and / or house name.
You should always ask the customer to confirm the first line of the address for you just in case they have given you the wrong postcode in error.
Site Address Fields
Site address fields are provided for you to record a separate site address should this be necessary. These are located in the ‘Installation Address’ fields. To enter details into these fields expand the fields in the same manner as the customer address fields. Complete the fields including the site phone number a postcode search button is also available here if applicable. This information will be printed on the lead details sheet & retained on the lead record; & later transferred to the contract record as the installation address.
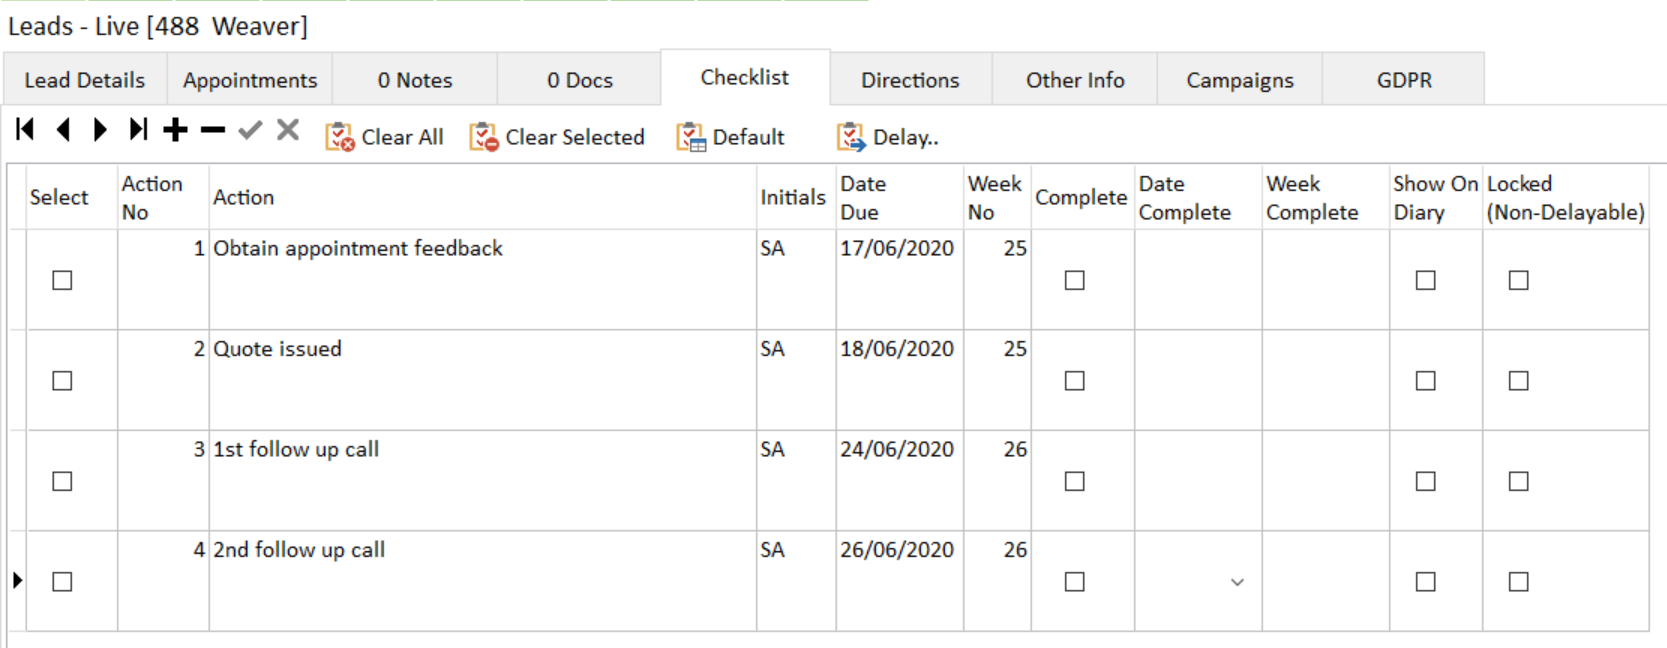
Checklist Tab
The Checklist Tab allows the automatic generation of administrative step reminders to be automatically created for every new lead record. A report and a data view of items due in a date range and overdue can be generated from the checklist. This feature can be covered in detail during training.
Notes Tab
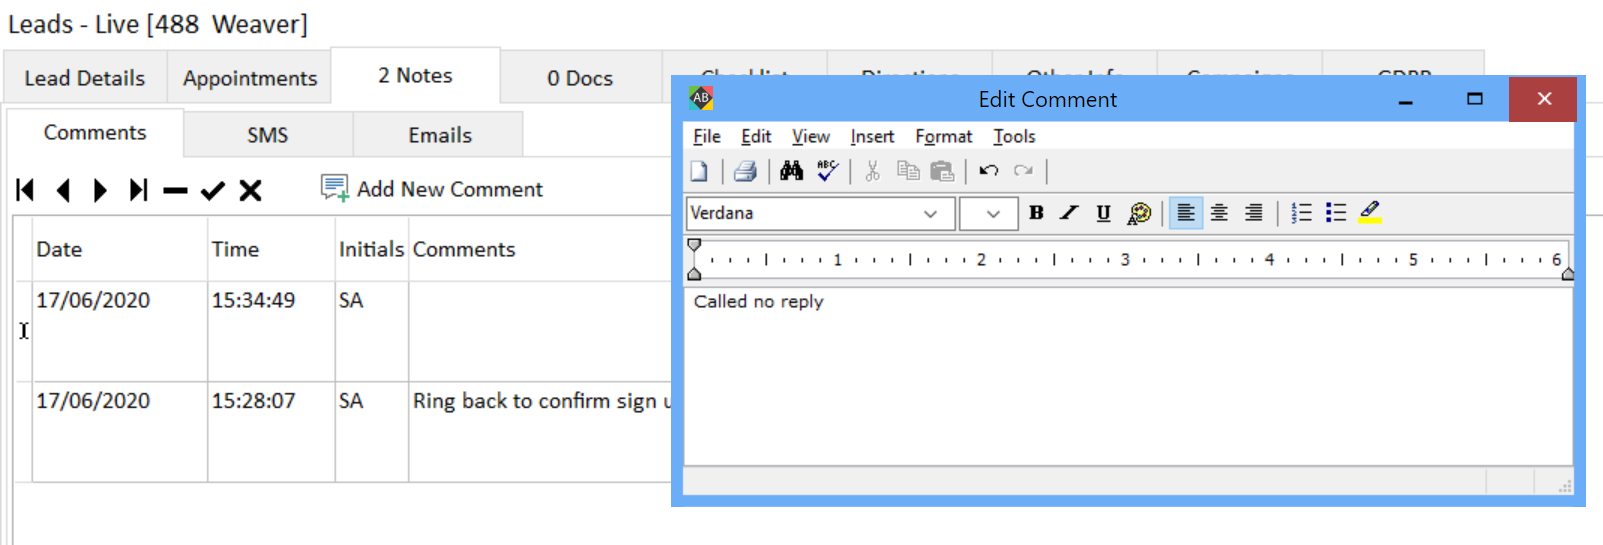
1.IThe ‘Notes Tab’ as shown below, is used to record information relating to the lead record. These notes are stored in the lead record. To add a note left click the ‘Add New Comment’ button highlighted below.

2. Left clicking this button will open a window in which you can record any information the customer gives you that will not fit any of the other fields on the lead form. AdminBase will date & time the note for you.
NOTE: If you have the ‘Log in Module’ installed the users initials will also automatically be added.
3. Type in the note, when completed; close the note by left clicking the cross in the top right hand corner of the window or by pressing the Ctrl + S keys on your keyboard simultaneously. The information recorded here will be printed on the lead details sheet for the salespersons information, & will be recorded on the lead record for future reference. When you close the record you will notice that the counter on the notes tab will indicate the number of notes, this is a visual reminder that there are notes attached to the lead.
FAQ
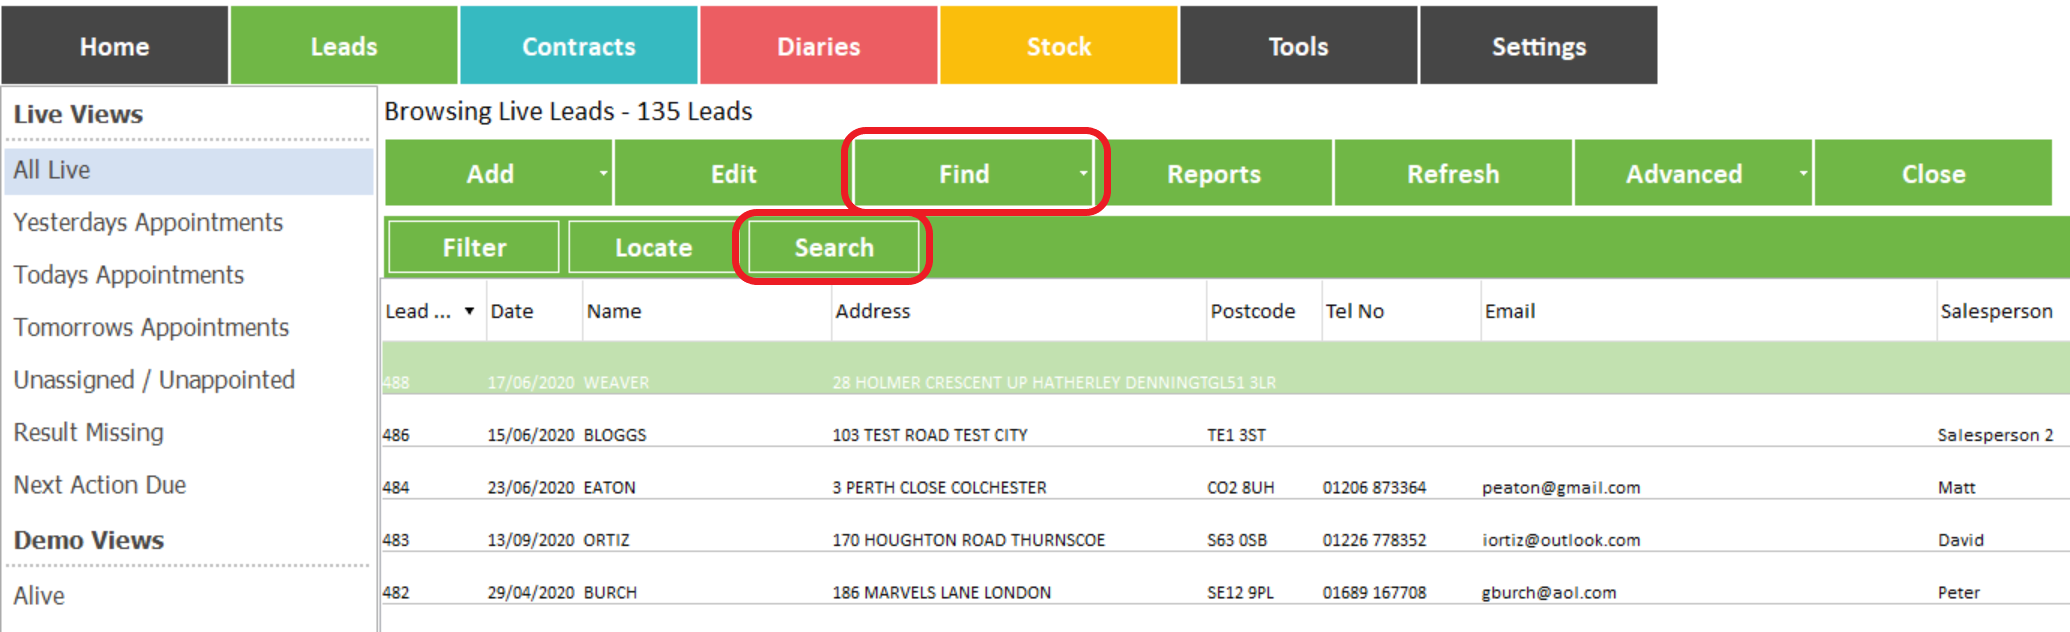
Q: How do I find a specific lead without scrolling through every record?
A: The search button is used for finding leads within the leads database, to use the function first decide how you want search.
4. To set the search criteria you need to left click the browser heading, this will sort the data into order based on the criteria you have chosen. For example clicking the name heading will sort the records by name, click ‘Find’ and then the ‘Search’ button highlighted below.
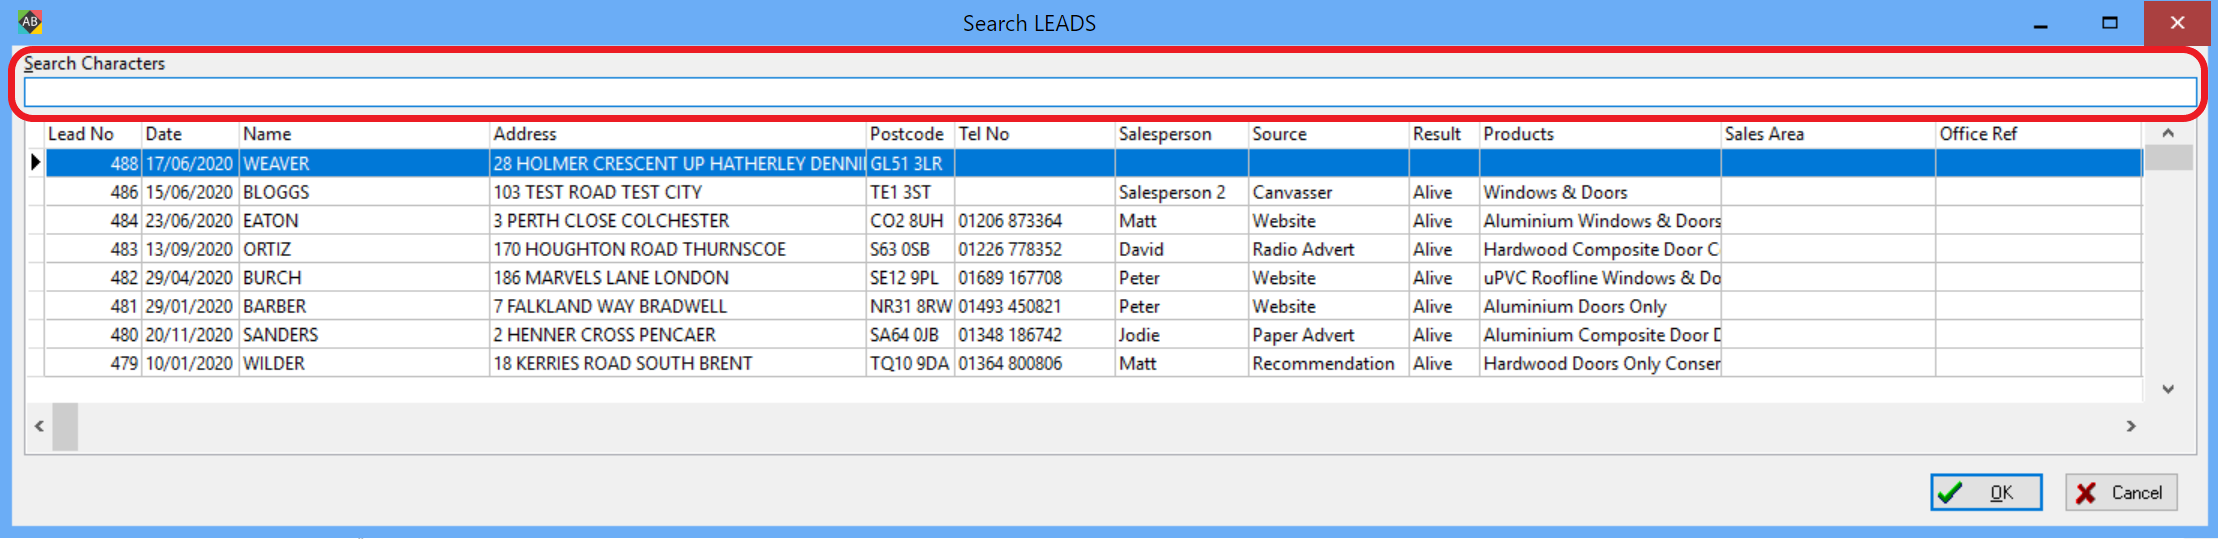
5. The search window will open. You will see that the cursor is flashing in the search characters field (at the top) type the name you require check the address line to ensure you have the correct person, press return & the record will be displayed.
TOP TIP: The locate button can be used to perform a similar function.
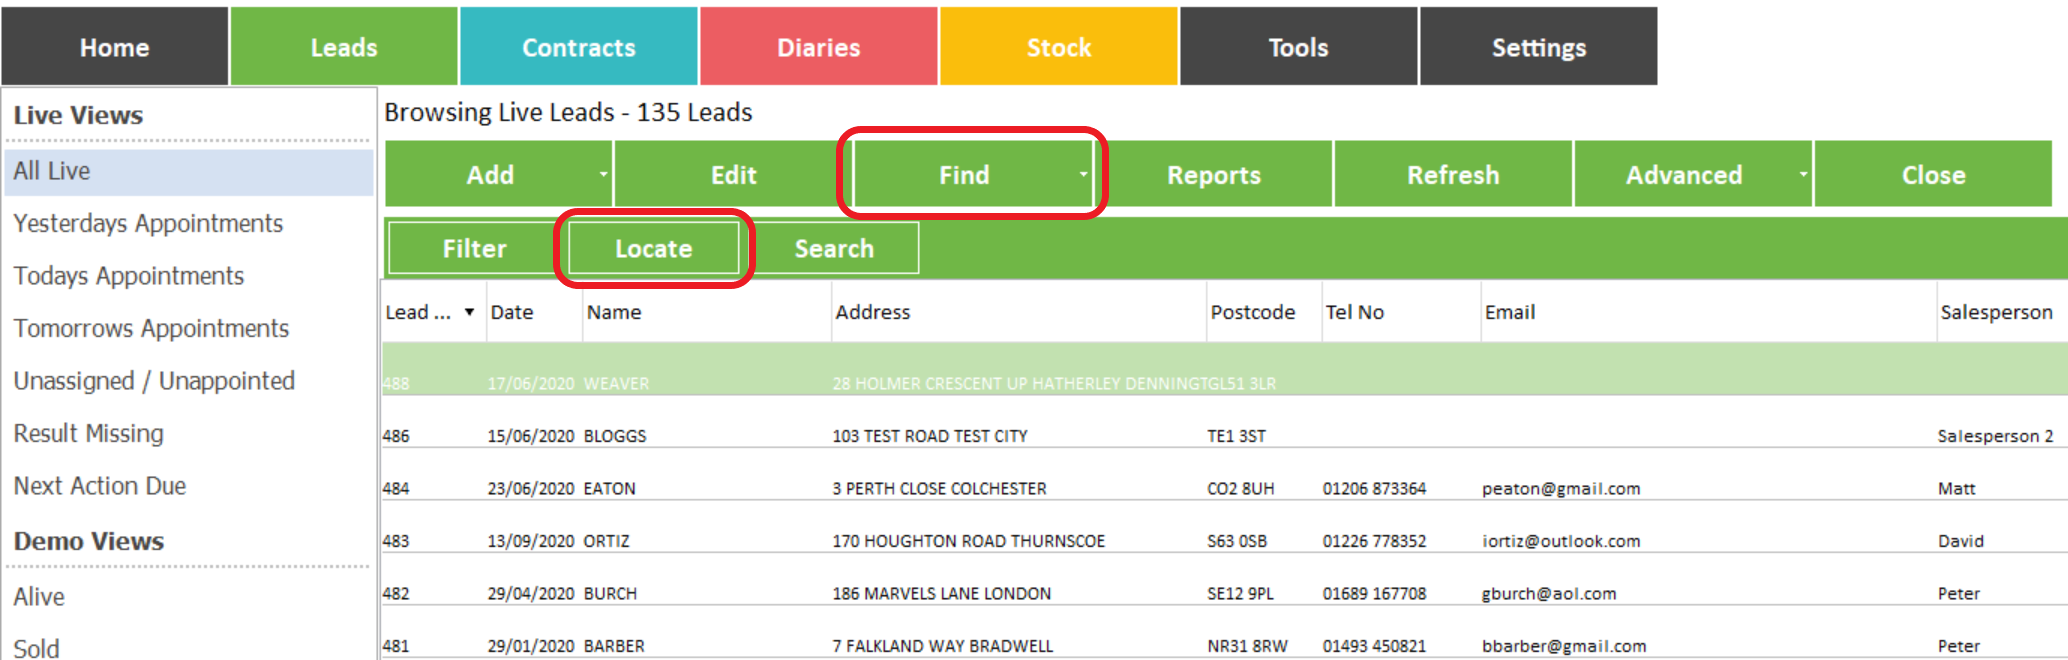
6. Left click the ‘Find’ button on the top toolbar in the Leads window, then click ‘Locate’ and the locate window will open.
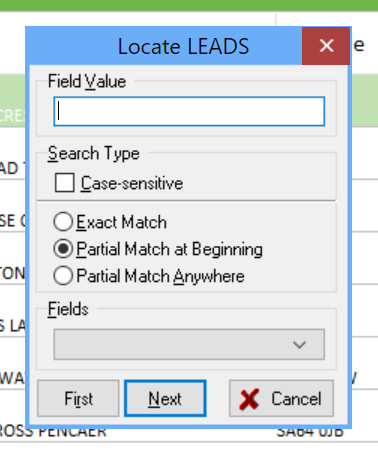
7. Left click the drop down box at the bottom of the window & select the field from the list that you want to search left click the field value field at the top of the window & enter the value you need to locate e.g. In ‘Field’ select postcode, then in ‘Field Value’ enter the postcode of a record you have in live leads. Left click the ‘First’ button, AdminBase will display the record that matches the search criteria, if you then click the ‘Next’ button AdminBase will display the next record (if any) that matches the search criteria,
Filter
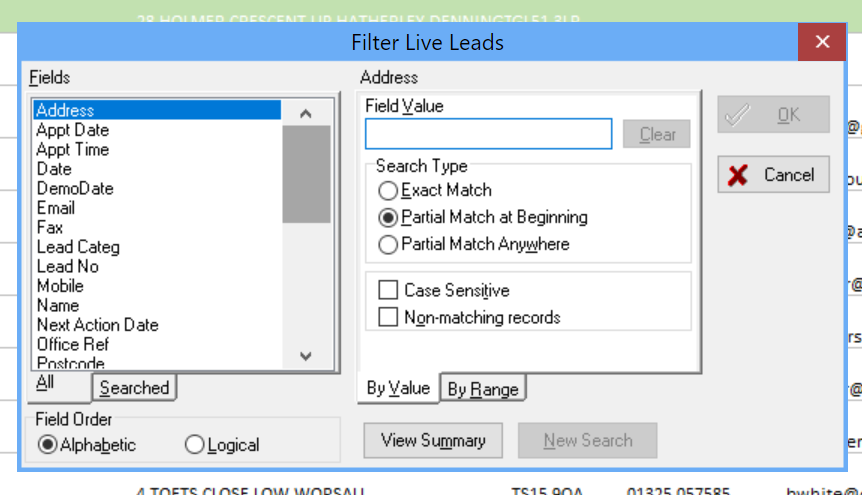
The filter button provides a method of selecting (or filtering) out all of the records that fit specific criteria e.g. Town. If you select ‘Town in the fields section then enter the name of the town in the ‘Field Value’ section, then left click OK. AdminBase will now filter the lead section you are in & only display the leads that fit the criteria you have chosen. You can either scroll through the records or print them using the ‘Filter report’ in the leads reports menu (see Recording Lead Results). You are able to set multiple filters e.g. town / salesperson, to see how many leads a person has live in one town for example.
Sales Information
The top right-hand section of the leads window is used to record information about the customer’s requirements & other important lead information as shown below. This information is especially important, as AdminBase uses the records in these fields to provide sales & marketing reports which depend on its accuracy. Also, information from here is passed to the salesperson on the lead details report or appointment email.

Taken By | This field is used to record the name of the operator who input the lead onto AdminBase. |
|---|---|
Sales Area | This field will only normally be required if you sell from more than 1 location. e.g. you have separate sales branches. |
Salesperson | This field is used to record the salesperson that is going to work the lead and will complete automatically as the appointment is made in the diary. |
Sales Manager | This field is used to record the name of the sales manager and will complete automatically on entry of the salespersons name. |
Sales Director | This field is used to record the name of the sales director and will complete automatically on entry of the salespersons name. |
Lead Source | This field is used to record the primary lead source & must always be completed. |
Sub Source | This field is used to sub divide the lead source information e.g. the name of the canvasser who took the lead in the store for example, using this will give you the ability to measure the performance of your canvassers, using the sub source report. |
Sub Sub Source | This field is used to further sub divide the lead source information e.g. the name of the canvass manager who manages the individual canvassers. |
Product Type | This field is used to record the material type the customer requires e.g. ‘White uPVC’, & should be used in conjunction with the product interest field to produce as good a description as possible for the salespersons information. The information in this field should be updated when the lead is resulted if found to be missing or incorrect. |
Product Interest | This field is used in conjunction with the ‘Product Type’ field & should contain a description of the items the customer requires e.g. Conservatory. There are two product interest fields provided so that you are able to enter multiple interests. The information in this field should be updated when the lead is resulted if found to be incorrect. NOTE: Always use ‘Product Interest 1’ first. |
Payment Method | This field is used to record the payment method if the customer indicates this at this time. The information in this field should be updated when the lead is resulted. |
FAQ
Q: The definitions in the drop down boxes are not what we need, can they be changed?
A: Yes, to add to a drop down menu you need to right click on the field you wish to add to, a menu will appear saying ‘Add New Items’ left click this and a window like this will be displayed.
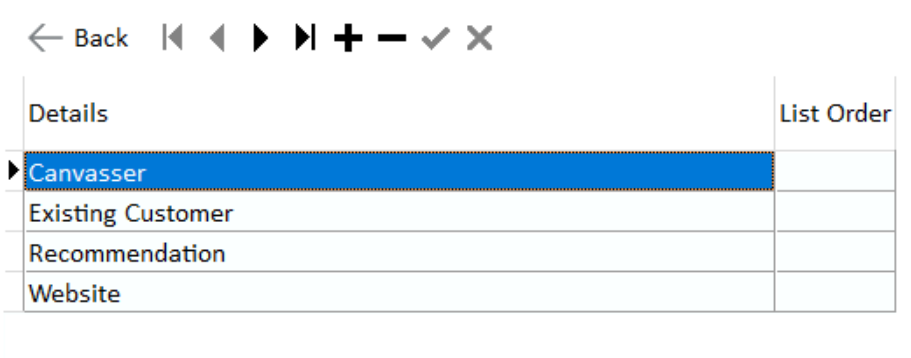
Left click the + to add a new item and type into the new blank field. Press the enter key and close the window with the cross in the top right-hand corner. The item you added will then appear in the drop down menu when you next open it.
Recording Appointments
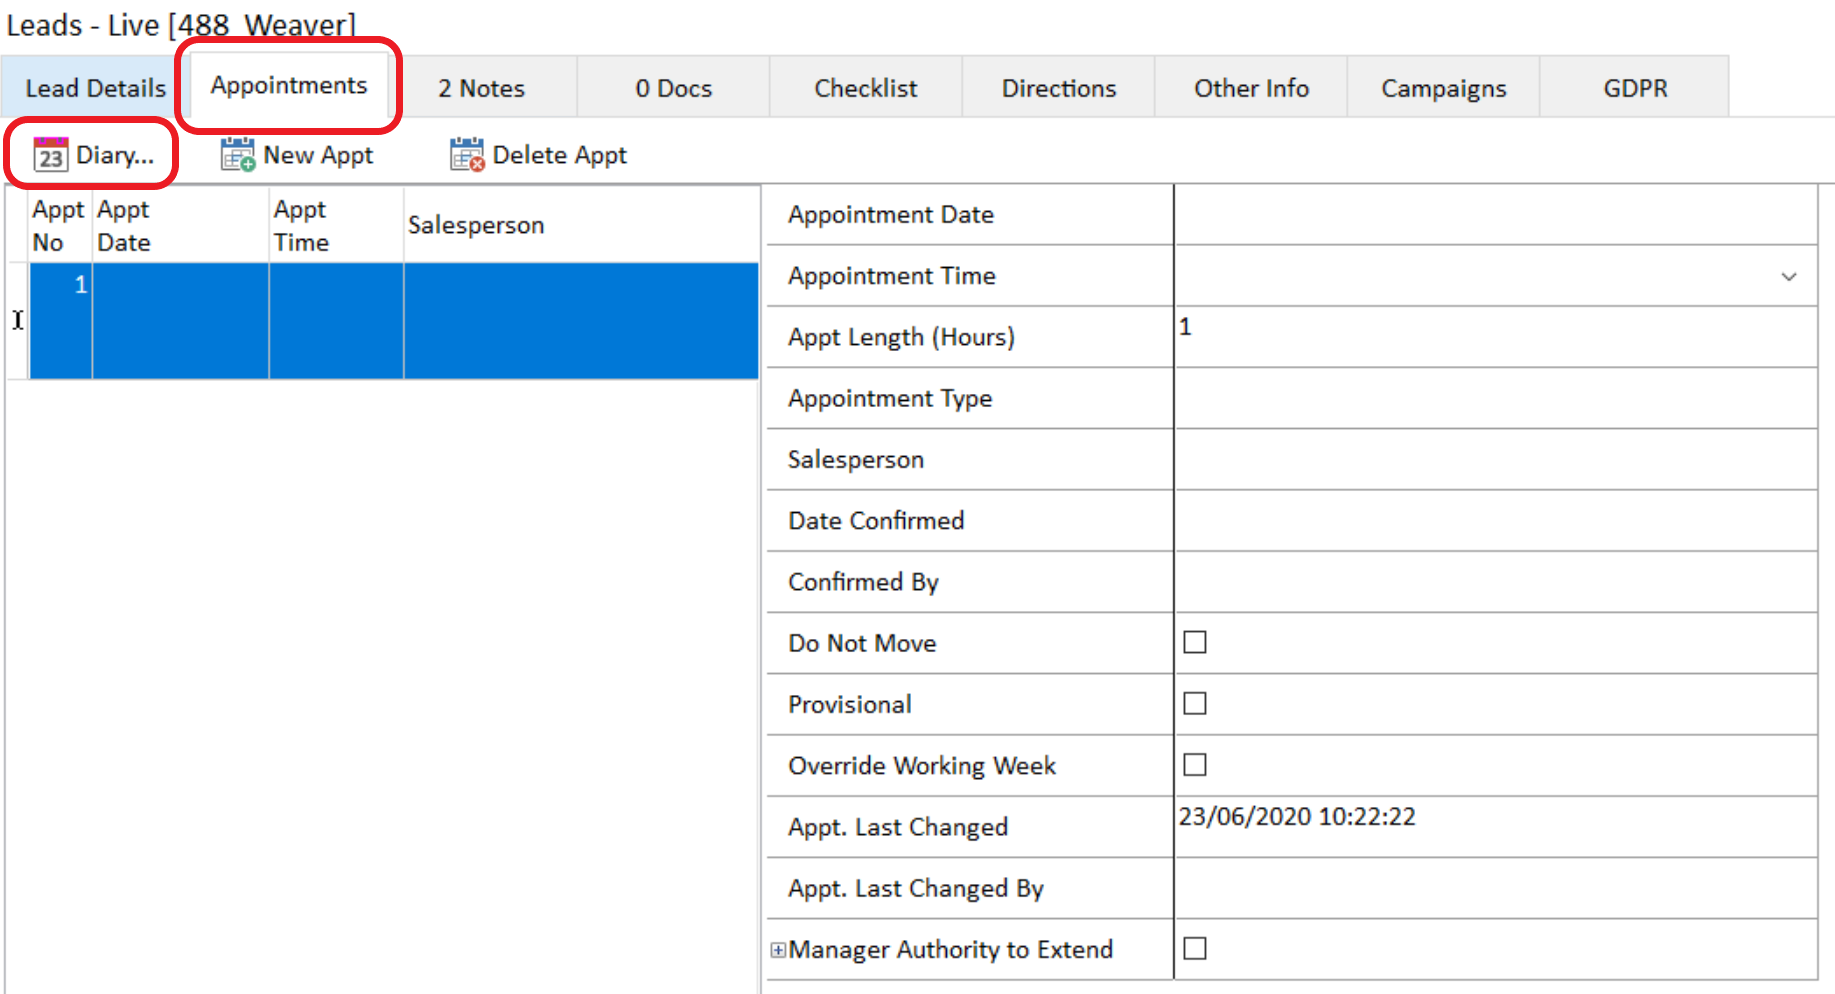
1.IFrom within the new lead record select the ‘Appointments’ tab then left click the ‘Diary’ button both highlighted below.
2. This will open the AdminBase diary shown below, to make the appointment select the day you want to make the appointment then left click the unassigned button highlighted below.
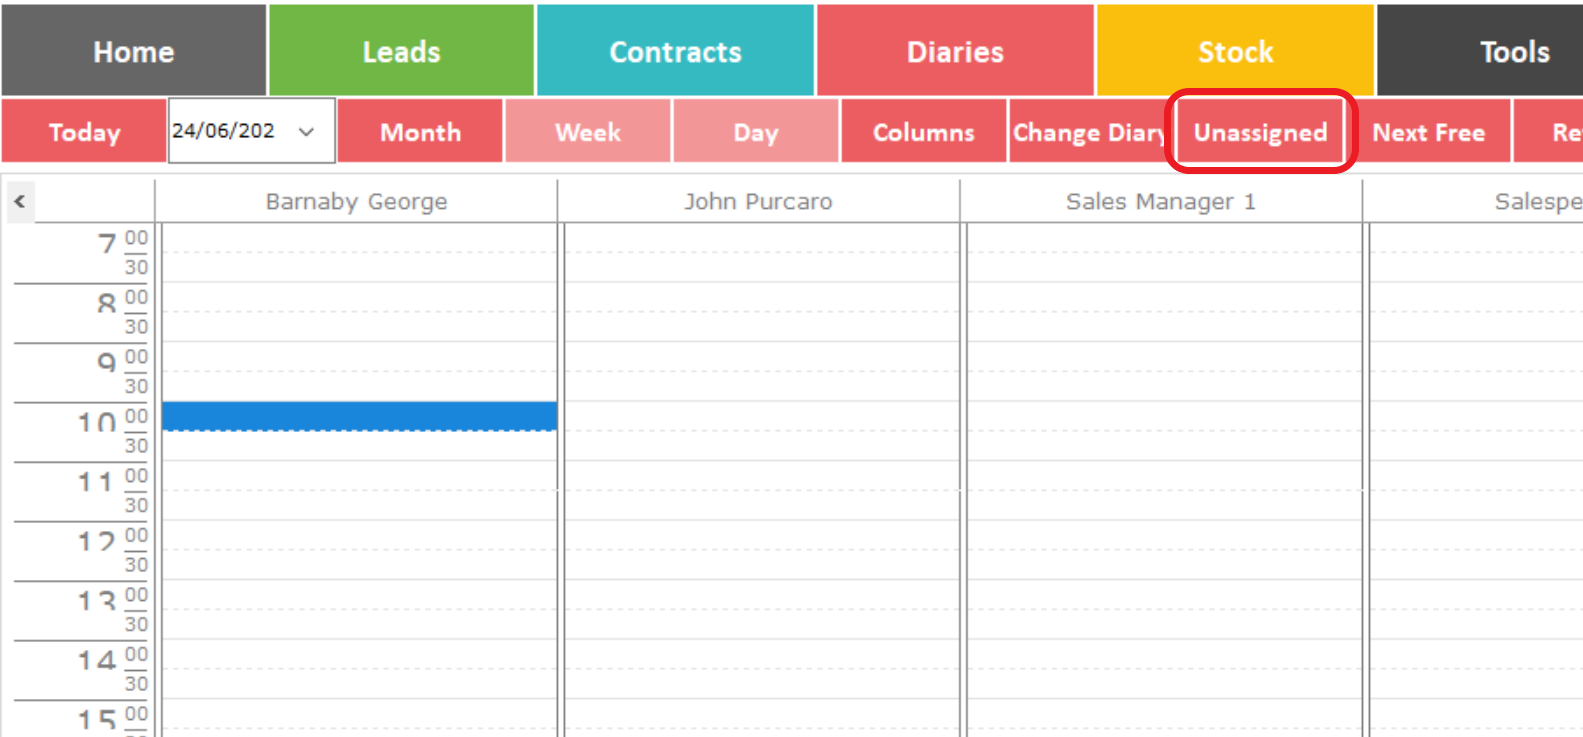
3. The ‘Drag & Drop’ window will open with your unassigned leads in as shown below.
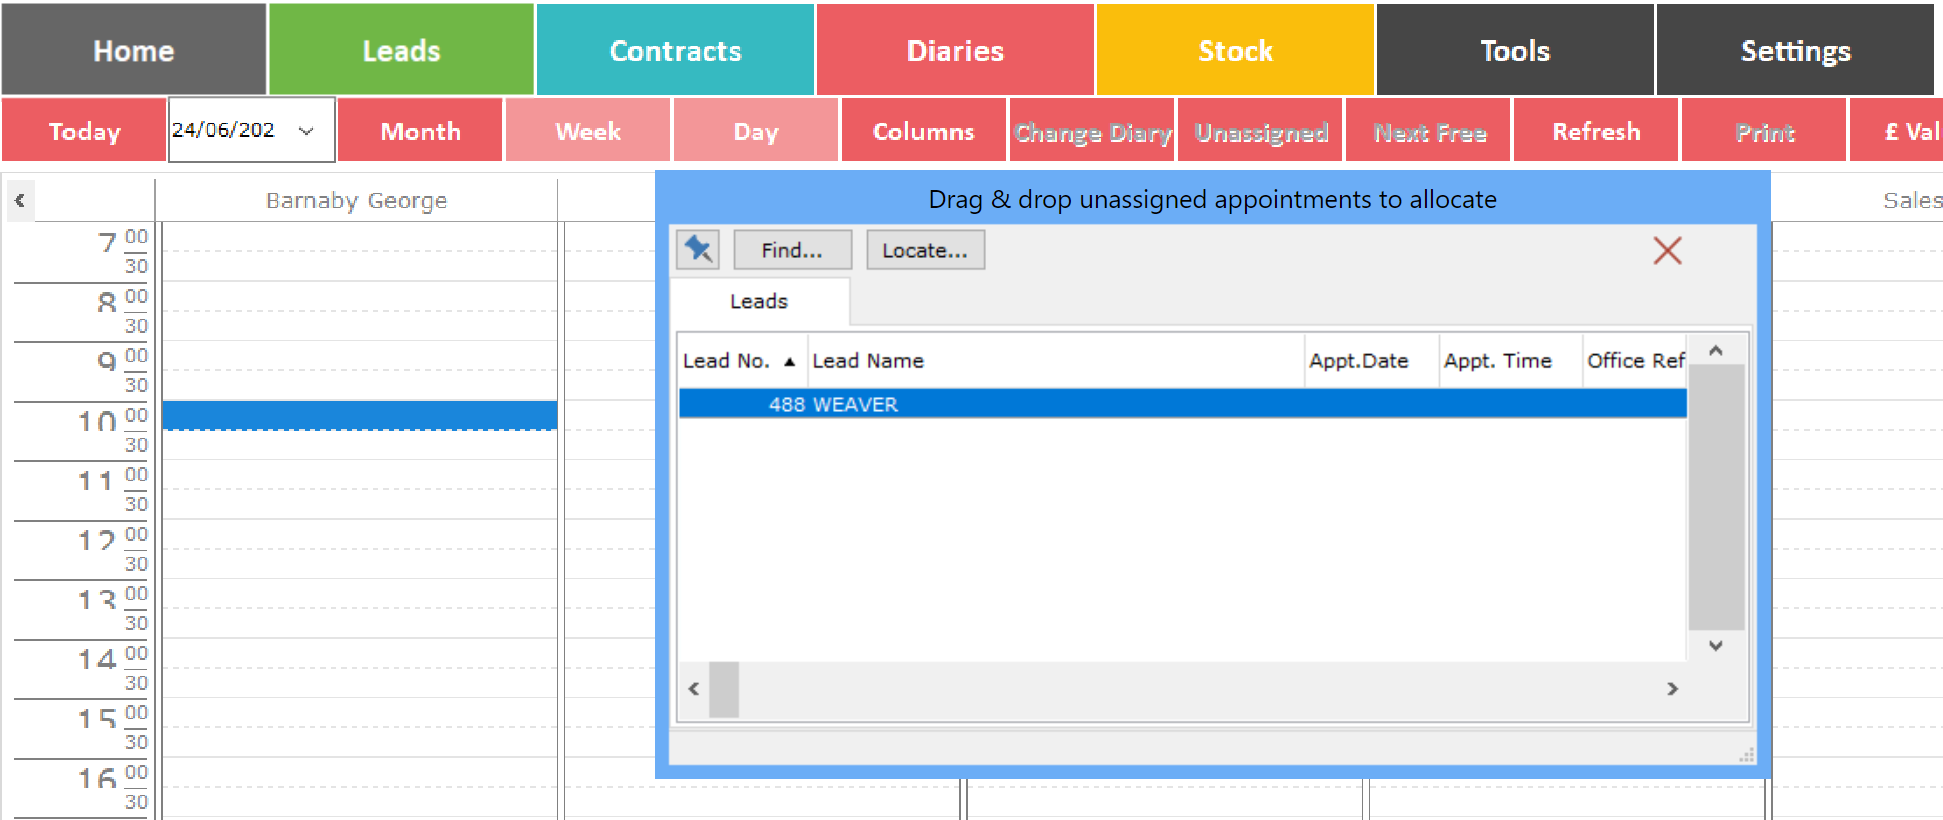
4. Left click the lead you want to appoint, while holding the mouse key down drag the lead to the appointment time and salesperson required then release the mouse key the following window will be displayed.
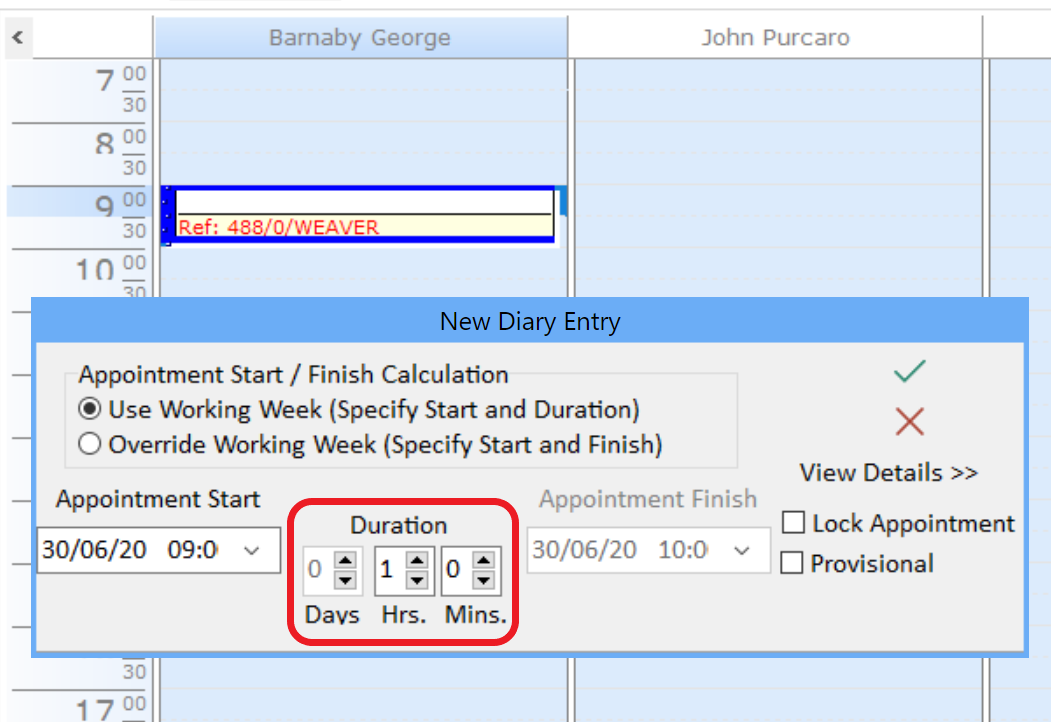
5. If you want to change the default duration of the appointment use the up-down arrows to the right of the hours – minutes fields to do so when correct left click ‘OK’ your appointment will then be displayed on the diary.
TOP TIP: You can now switch back to the leads view by clicking on “Leads” or by holding down the Ctrl key and pressing A on your keyboard simultaneously.
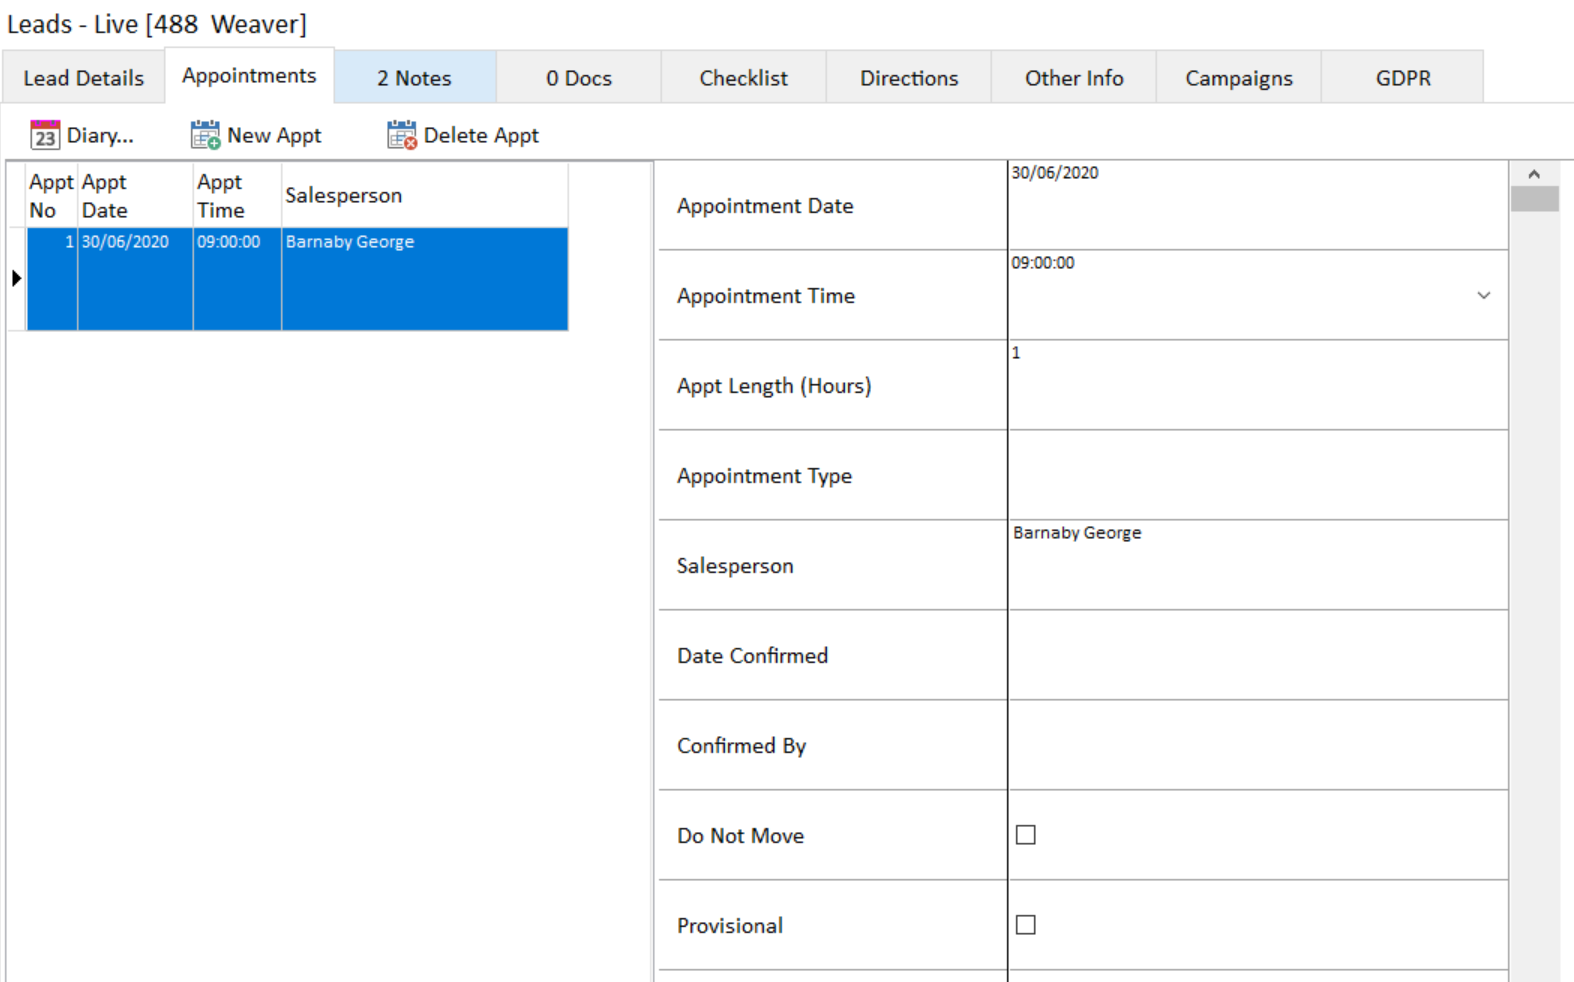
6. The ‘Appointments’ tab in the lead record will now contain the appointment information from the diary entry as shown below.
NOTE: The diary is the preferred method of booking an appointment as this way it is not possible to double book a salesperson and also means you do not have to maintain a secondary booking system. This is also necessary to ensure correct diary synchronization with external calendars and devices.
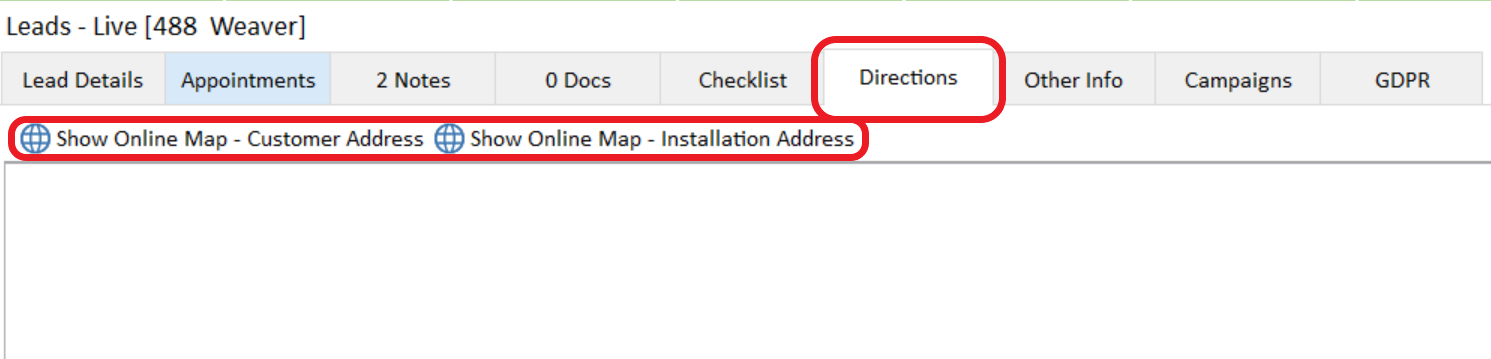
Directions Tab
The ‘Directions’ tab is provided for you to record directions to the customer address, or site address if required. In addition, the buttons highlighted at the bottom of the window will display a map of the customer address or site address in your web browser when left clicked.
TOP TIP: It is important that care is taken to make sure that the information entered is correct and completed in a uniform manner, as the customer details, site address & directions entered in leads are copied into other parts of the system if the Lead becomes a Contract.
FAQ
Q: Can I print the lead for the salesperson?
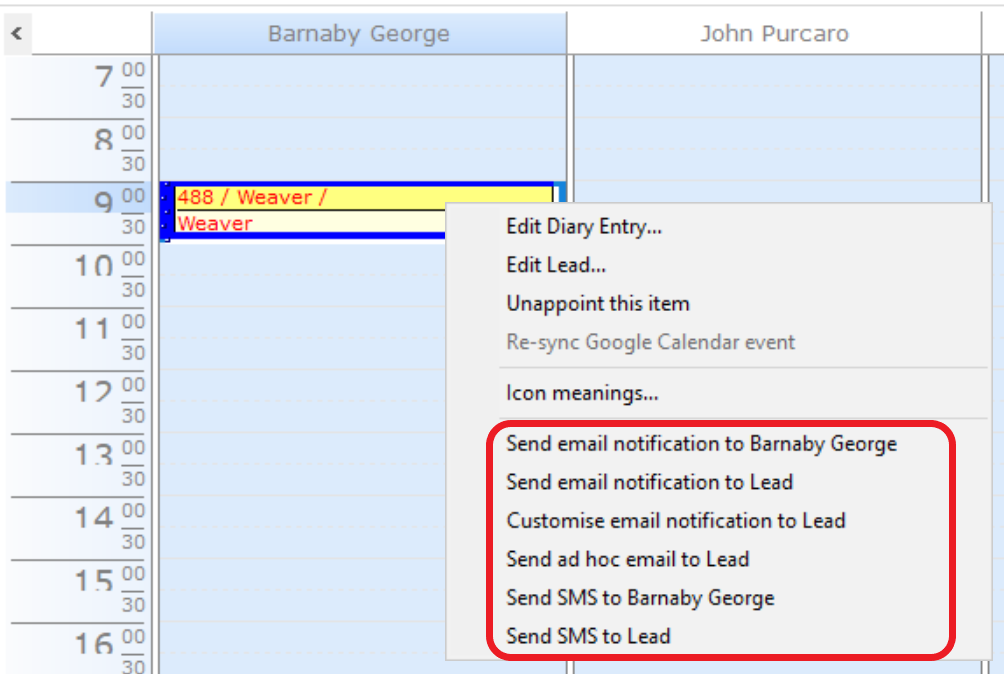
A: Yes you can, by left clicking the reports button within the lead record, selecting Lead Details, and clicking the print button. You are also able to email or text the salesperson and the customer from the diary by right clicking the appointment and using one of the options highlighted below.
Recording Lead Results
NOTE: Please bear in mind that for AdminBase to be used to its full potential the person who books the sales appointments should be entering the information directly onto the diary - lead record in AdminBase. This way the information contained on the record is always up to date, which in turn will make it easy to result the lead the following day. Also, if your potential customer should ring in to confirm the appointment anyone who has access to the record will be able to do so. It is vital that every lead is:
Recorded
Appointed or Blown Out
Resulted
Without Exception
Only if this is done will the sales reporting be accurate & complete.
To make the resulting of previous appointments simpler AdminBase Leads browser offers several views of the lead data.
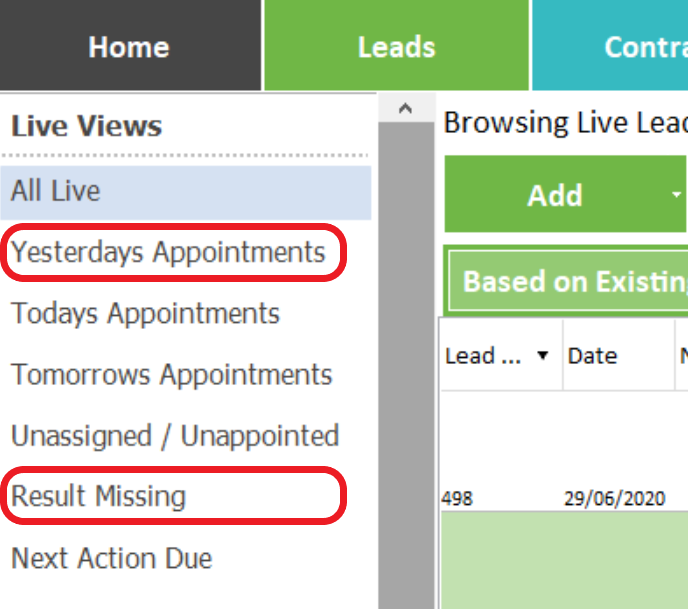
Views - Live Leads – Yesterdays Appointments This view will display all appointments from the previous day.
Views – Live Leads – Result Missing This view will display all previous appointed leads that do not have a result.
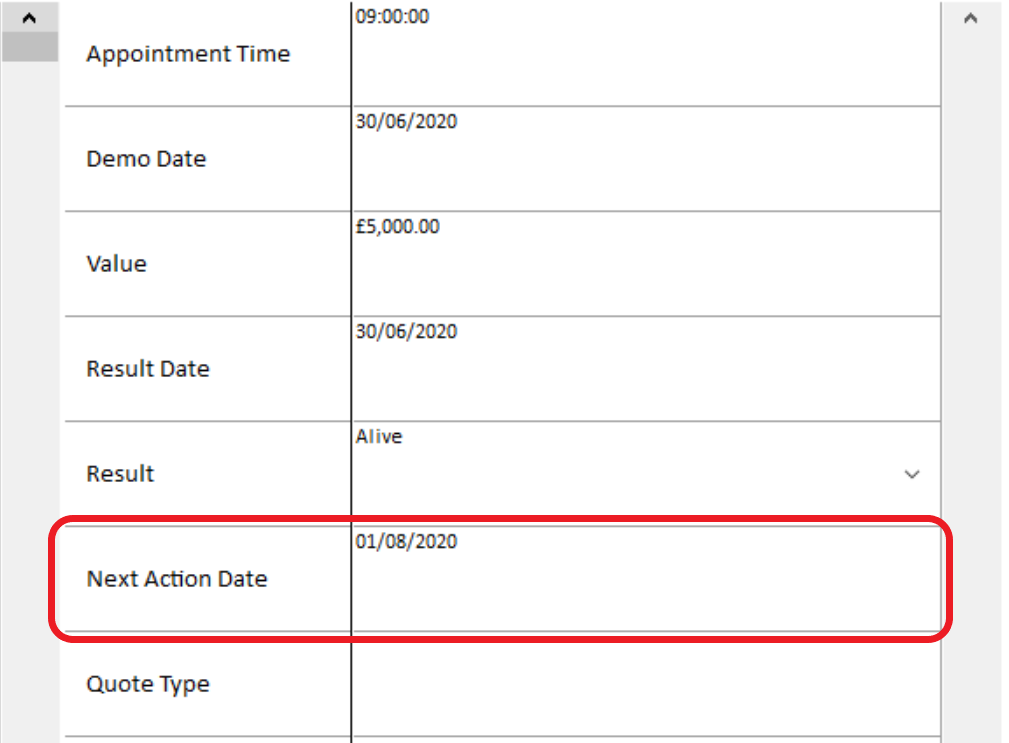
From either of the above views record the following information in the results fields in the lead record:
Demo Date | This should confirm that the appointment was attended on the appointed date. |
|---|---|
Demo Value | This should confirm the value quoted. |
Result Date | This is the date that the result is recorded on AdminBase. |
Result | This field records the result. Left click the drop down arrow to display the options. Remember once a lead has been sat, it must be resulted as ‘Alive’ if not concluded as Sold or Dead, or the lead will not be reported correctly. |
‘Alive’ Result | This should be used to record a lead that has been worked and has been inconclusive. |
‘Sold’ Result | A lead should be resulted as sold once the company has received confirmation that a lead has been sold, normally on receipt of a signed contract. A lead resulted as sold, should always have a salesperson, a demo date, result date and a gross value. |
‘Dead’ Result | This should be used to record a lead that has had an appointment worked but is not going ahead. A lead resulted as dead, should always have a salesperson, a demo date, result date and a gross value. |
‘Blow Out’ Result | This should be used to record a lead that has proved impossible to appoint or attend. A ‘Blow Out’ lead should never have a value as it has by definition not been worked. |
Next Action Date | If the salesperson has to return or the customer re-contacted the date should be indicated here, & usually a corresponding note would be attached to the lead. |
NOTE: When a lead is resulted as Sold the value field should to be updated to reflect the actual total gross contract value.
FAQ
Q: The salesperson quoted several different prices which one do I record?
A: All of them, enter the value the salesperson indicates is the most likely value in the results value field, then record the other figures in the notes tab of the lead record.
FAQ
Q: How do I know which result to give the lead.
A: The ‘Sold’ result should be used to record a lead that has produced a sale.
In addition, if a firm appointment has been made for the salesperson to attend this should be recorded as described below. In the lead record ‘Appointment’ tab left clicking the ‘New Appt’ button highlighted below, will produce another appointment line in the left-hand pane.
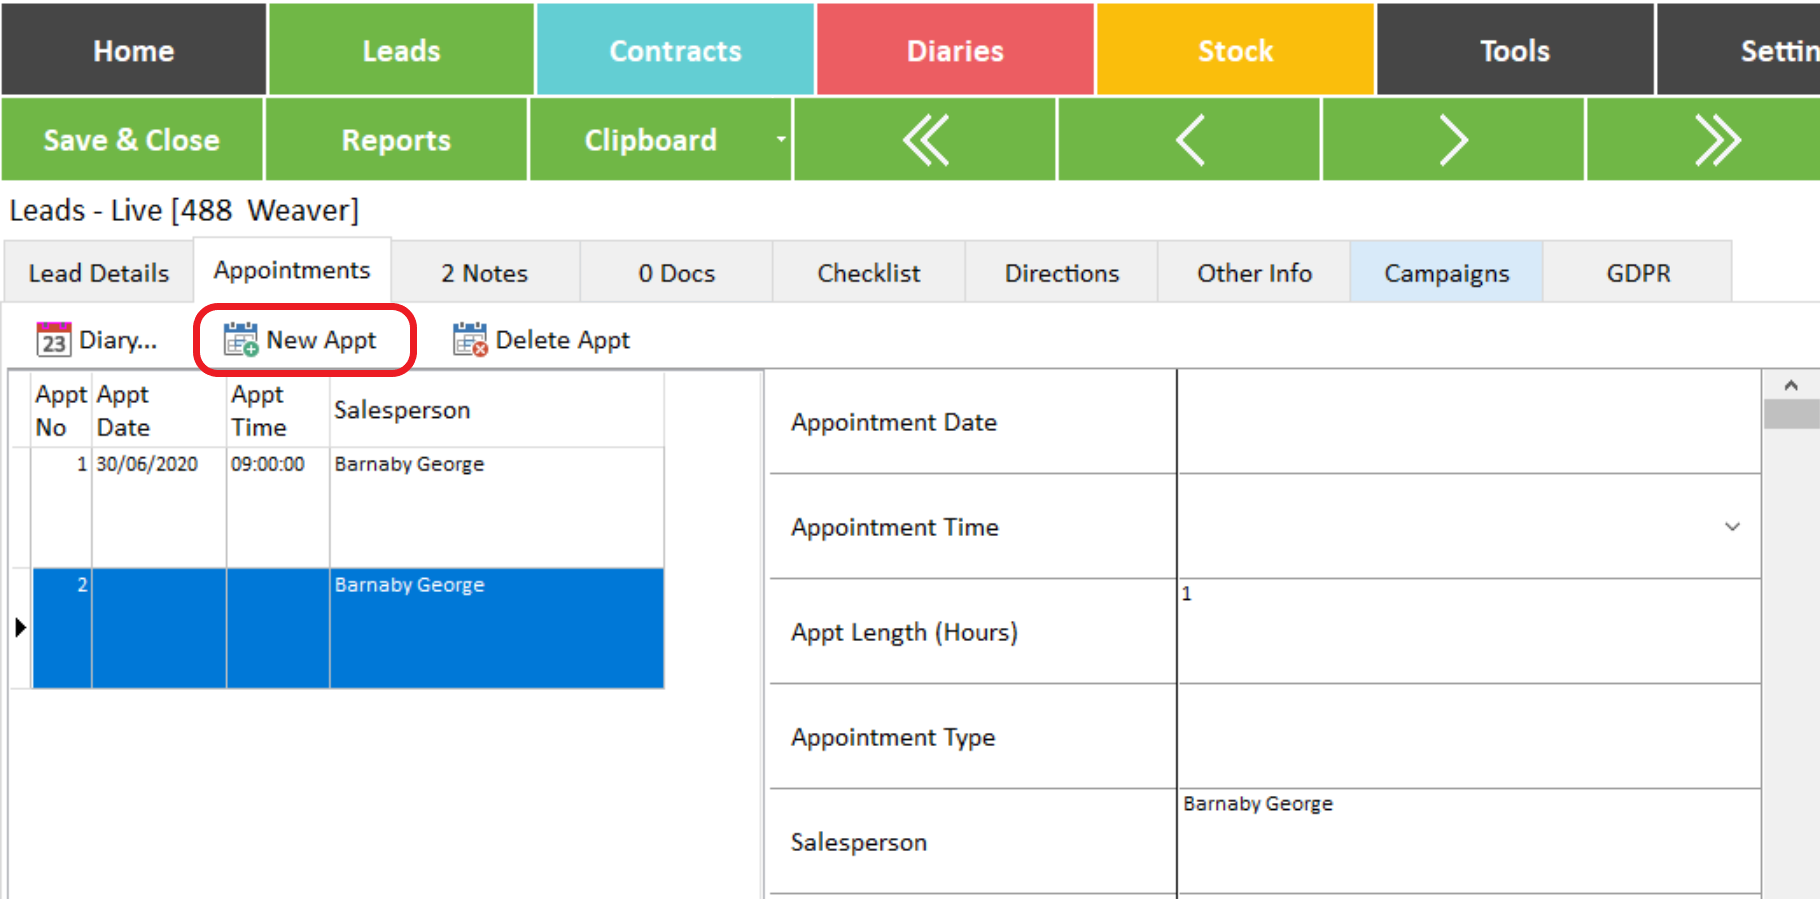
You can then open the diary as described previously and appoint this event as before. AdminBase will retain both events in the lead record. Further events can be added in the same way if needed.
FAQ
Q: After saving the result I cannot find some of the leads where have they gone?
A: When you result a lead, AdminBase files it in the relevant place e.g. when the result is ‘Alive’ the lead will stay in the ‘Live Leads’ section. If, however the result is recorded as ‘Sold’ it will be filed in the sold section. To find a sold, dead, or blowout lead select the sold ,dead or blowout view from the left had views pane.
Live Lead Views
Accessed from - Views – Live Leads
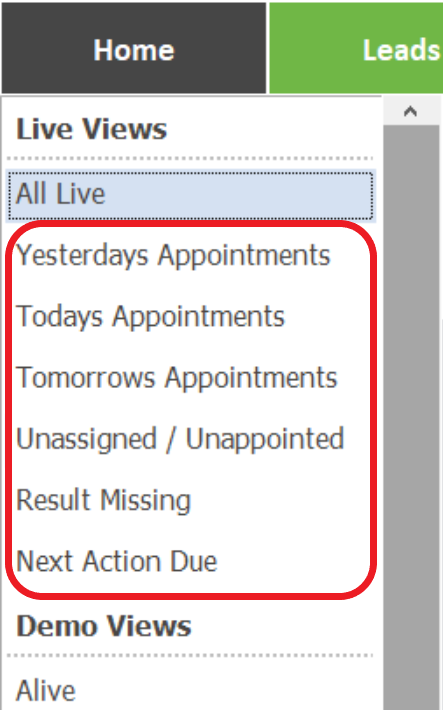
Yesterdays Appointments | This view will display all leads appointed for the previous day. |
|---|---|
Todays Appointments | This view will display all leads appointed for today. |
Tomorrows Appointments | This view will display all leads appointed tomorrow. |
Unassigned / Unappointed | This view will display all leads that have either no salesperson & or no appointment date assigned. This view should be run daily to ensure that all enquiries are dealt with promptly, if a lead appears in this view, efforts should be made to appoint it as soon as possible. Leads arriving into AdminBase from the Web Lead Link will show in this view ready to appoint |
Results Missing | This view displays all lead records that have an appointment date prior to today, and do not have a result recorded. This view should be run daily and is used to ensure that you have results recorded for every lead. |
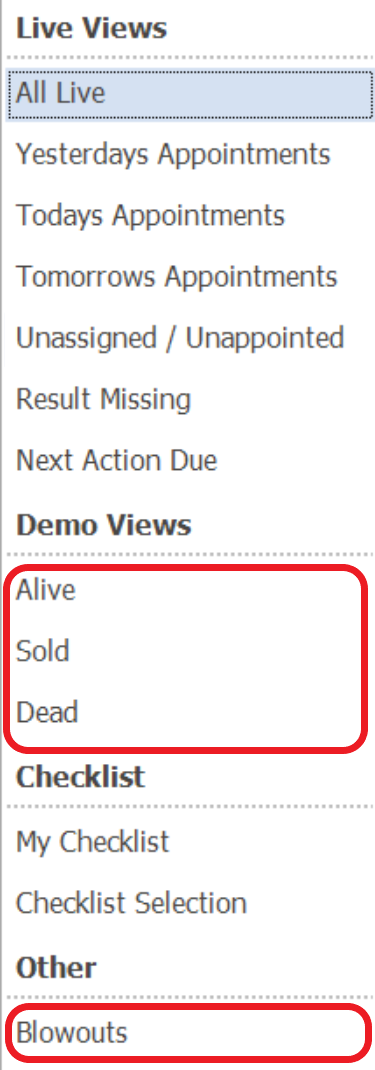
Alive | This view will display all leads resulted as ‘Alive’ or all leads resulted as ‘Alive’ by ‘Demo Date’ range. |
Next Action Due | The next action due view will show either all leads that have been given a ‘Next Action’ date, or all leads by ‘Next Action’ date range. |
AdminBase Lead Reporting
In order for AdminBase lead reporting to produce accurate results, all your lead records need to be up to date before running any reporting. Specifically, all worked leads must at least have accurate values in the following fields.
Salesperson
Lead Source
Product interest
Appointment Date Demo Date
Value (Even if 0.00)
Result
Result Date
Without this information in every worked lead record, the analysis reporting will not be correct.
Lead Management Reports
1.IAll lead Management Reports are accessed from the ‘Reports’ button in the leads browser highlighted below.

2. From the ‘Select Report’ window left click the report you require then left click the print option. You will be asked to select a start & end date for most reports.
3. Once you have specified the report date range and other criteria click OK. The report will now be previewed with the option to print
Filter Report | After applying a filter to your lead records the filter report can be used to print the resulting records. |
|---|---|
Unassigned Unappointed Report | This report will allow you to print a listing of all ‘Unassigned Unappointed’ lead records. |
Results Reports | Results reports use the lead ‘Appointment Date’ field so will not include leads without this date. These reports will display all leads with an appointment date in the range specified along with a summary of the number of leads and their current status by Salesperson, Lead Source or Sub Source. |
Alive Report | Alive report uses the Lead ‘Demo Date’ so will not include leads without this date. This report will display either all ‘Alive’ leads or only alive leads within the parameters selected in the dialogue below. This information is also available as a lead browser view. 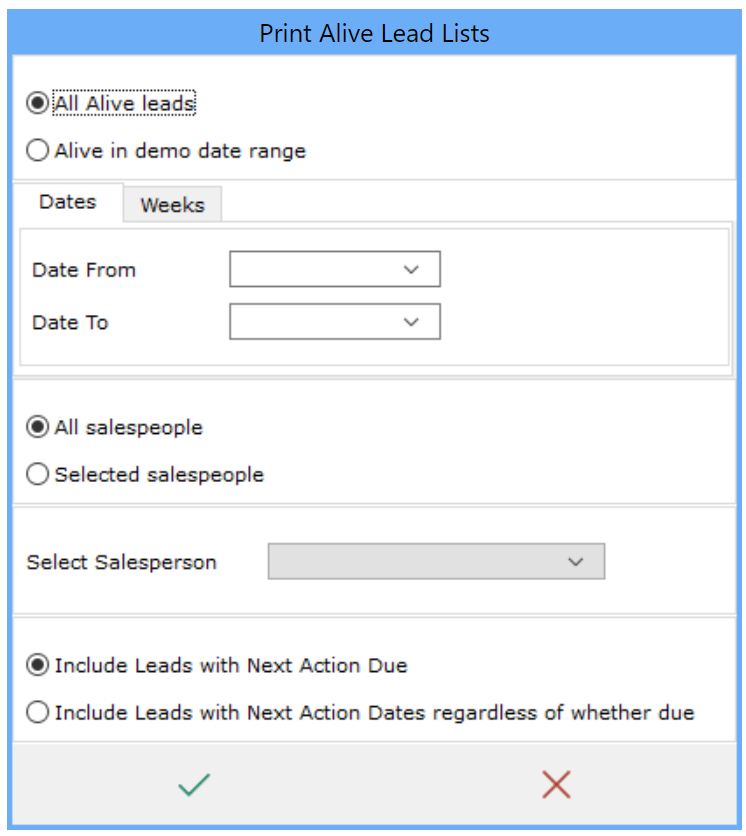 |
Next Action Due Report | Next Action Due report uses the Lead ‘Next Action Date’ so will not include leads without this date. This report will display either all leads with a ‘Next Action’ date or only next action leads within the date range selected in the dialogue below. This information is also available as a lead browser view. 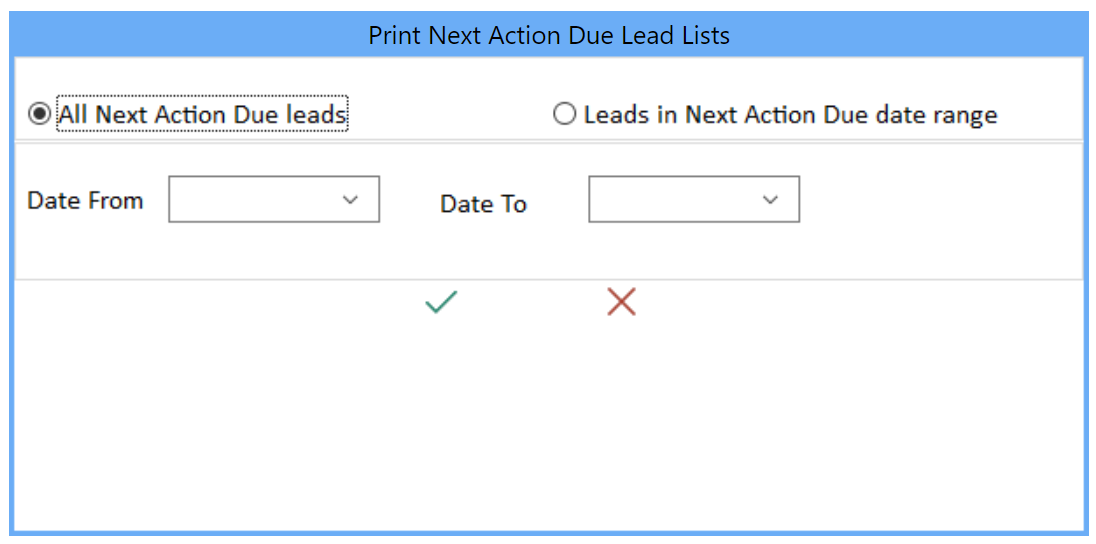 |
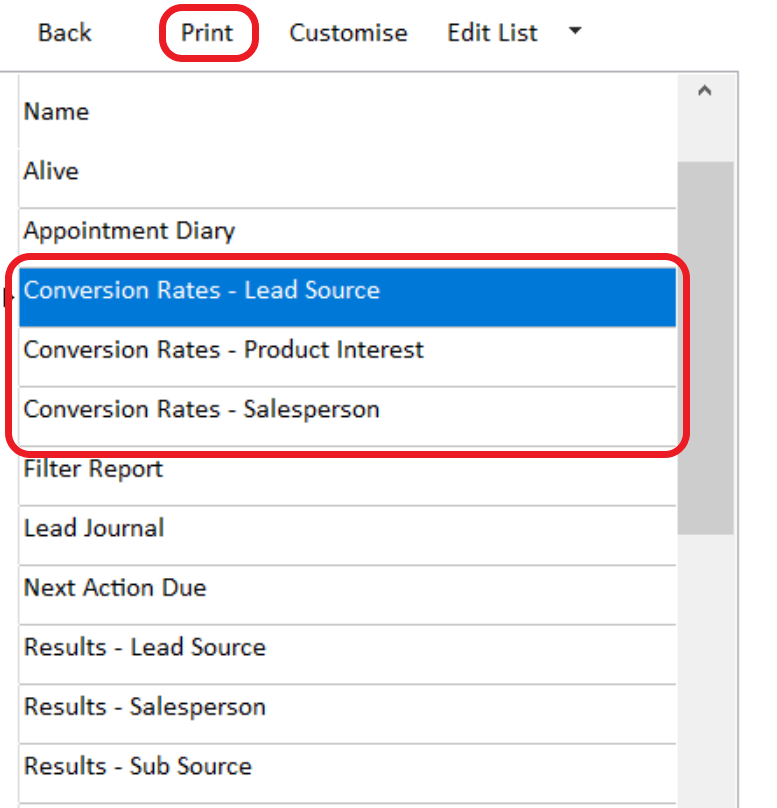
Conversion Rates Reports | Conversion rate reports use the Lead ‘Demo Date’ so will not include leads without this date. These reports are used to calculate and produce conversion rate figures for your, salespeople, lead sources, & the products you sell. |
Statistics Reports | Statistics reports use the ‘Lead Date’ therefore results will be different from conversion rate reports as they specifically measure your lead generation performance. |
Statistics Salesperson | This report will display all the leads allocated to the salesperson including the blowouts. This report will display all of leads issued to the salesperson within the report period, not just the resulted ones. |
Statistics Lead Source | This report will display the lead source analysis and providing you have recorded the lead costs, the cost of lead generation and sales of each lead source. |
Appointment Diary | This report will provide a listing of all sales appointments booked within the selected date range. |
Sales Report | Sales report uses the Lead ‘Result Date’ so will not include leads without this date. The sales report will list all sales in the result date range selected, grouping the sales by salesperson. NOTE: The leads sales report will report the lead value at the point of sale. There is also a Sales Report in Contracts that will include any additions or deductions from the contract value the final value in the contract record is the value used in commission calculations etc. |
Lead Listing | The lead listing report will produce a list of all the leads in the live leads section. |
Documents
The ‘Docs’ tab in the lead record is where documents relating to the record can be viewed.
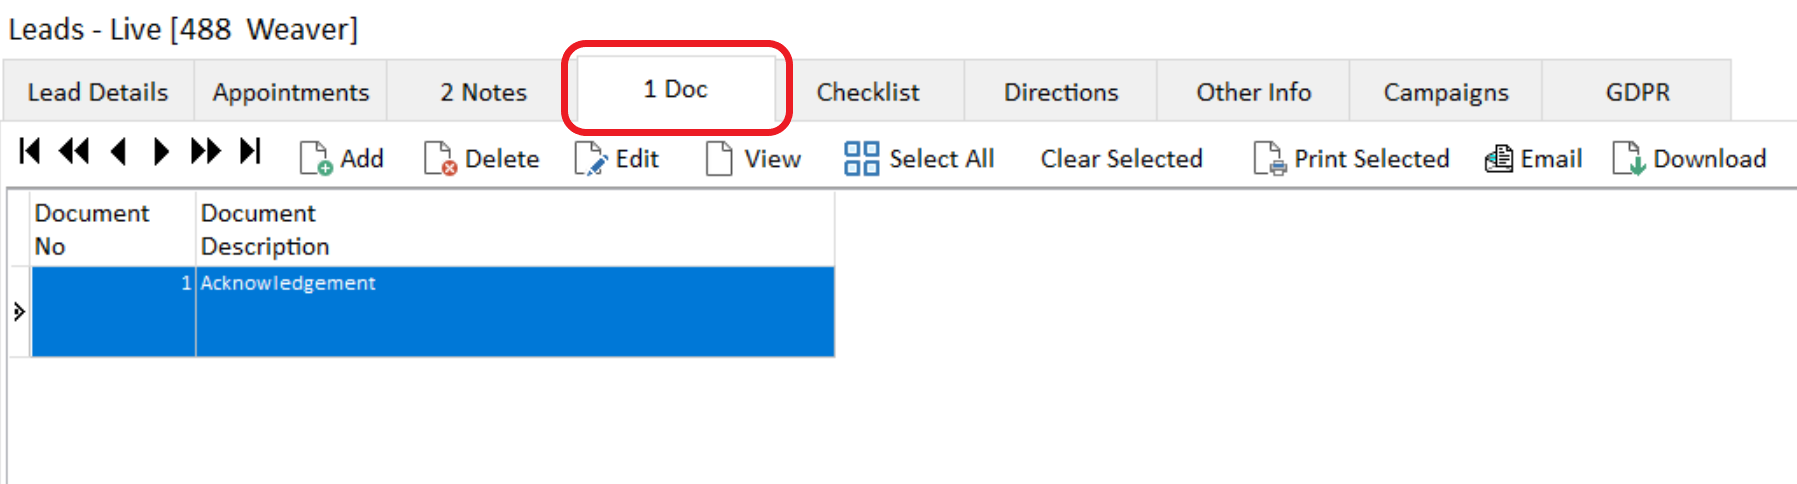
There is the ability to attach documents manually from the ‘Docs’ tab or you can use one of several batching methods allowing you to attach documents in bulk. See the separate help page on this - Document Uploading
1. Documents can also be added by using Upload from the main leads toolbar this will display
the drag and drop window shown below. Correctly named documents can be automatically
added to lead and contract records by dragging and dropping into the left hand pane.
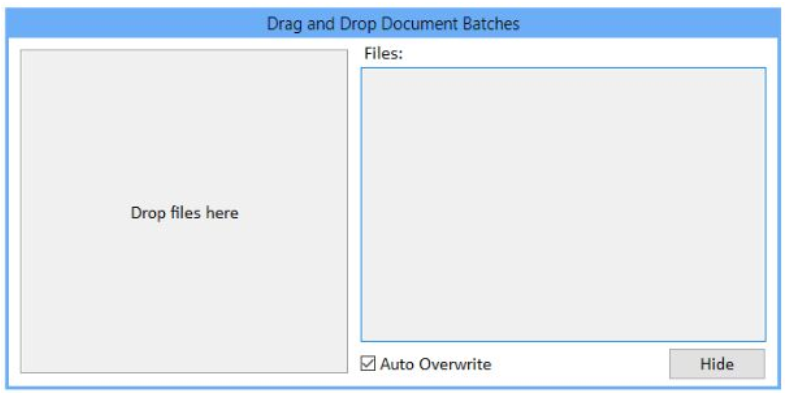
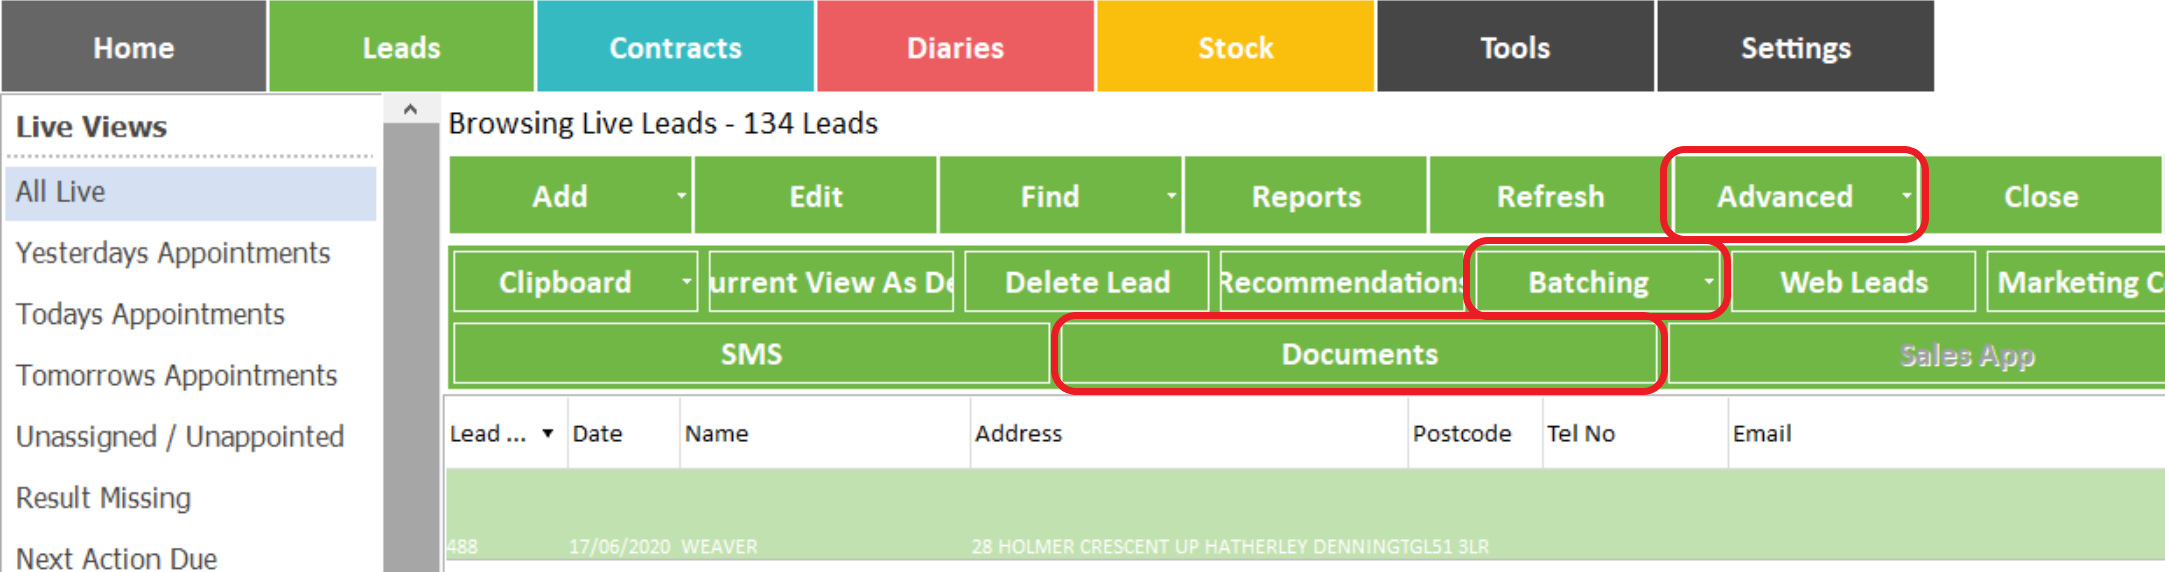
2. Advanced → Batching → Documents
3. Documents can also be added by staff without direct access to AdminBase from the support
webpage https://support.abinitiosoftware.co.uk/#!/login Once the user has logged in there is
a ‘Document Batching’ link in the left hand pane where correctly named documents can be
dragged and dropped or uploaded. On the Document Batching page there are full details of
how to name documents for upload
Any documents attached to the lead record are transferred when the lead is used to create a contract record.
Summary
Below is a list of the main points you need to observe to use leads correctly
1.IRecord every lead as soon as it comes in (wherever a lead comes from it is a lead).
2. Record as much information as possible on every lead.
3. Use the ‘Unassigned / Unappointed’ view every day to ensure you do not miss any leads.
4. Appoint every lead on AdminBase.
5. Record a result for every lead (no later than the day after it was worked)
6. Use the ‘Result Missing’ view daily to help keep records up to date.
7. Always update your lead results before running reports.
8. REMEMBER if you put poor quality information in you will get poor quality information out.