Contract Training Notes
Once a lead has been recorded as ‘Sold’ in the leads section, AdminBase will allow you to create a record for the contract in the contracts section. The contract record you create will enable you to store all of the information about a contract & allow you to produce all of the correspondence needed during the course of the contract. The first section below deals with the various actions you need to take to create these records.
NOTE: The browser in contracts works in much the same way as the leads browser e.g. you define your search criteria by clicking the heading of the column you wish to search using. Then you click the search button on the toolbar & enter a value; AdminBase will then locate the record for you. As in leads there is the means of changing the view you have of the data. For example, in leads you are able to change between Live, Dead, Blown Out, & Sold. In Contracts you can choose many different views showing records that match specific criteria, for example ‘Deliveries This Week’, ‘Installations This Week’ which will show only contracts that match that criteria
Creating a New Customer & Contract Record
1.IIn AdminBase left click the contracts button on the top toolbar, AdminBase will open
the contracts view.
Please ensure the contract view is set to ‘Customers’ when creating new records
2. Select Add and then Customer & Contract as shown below.
3. The window shown below will appear, the ‘Contract the date the contract was signed should be entered here. Left click the ‘Copy from Lead’ dropdown highlighted below then select the sold lead from the list.
4. Next select the ‘Contract Type’ drop down menu and select the ‘Contract Type’ the contract number will be automatically allocated.
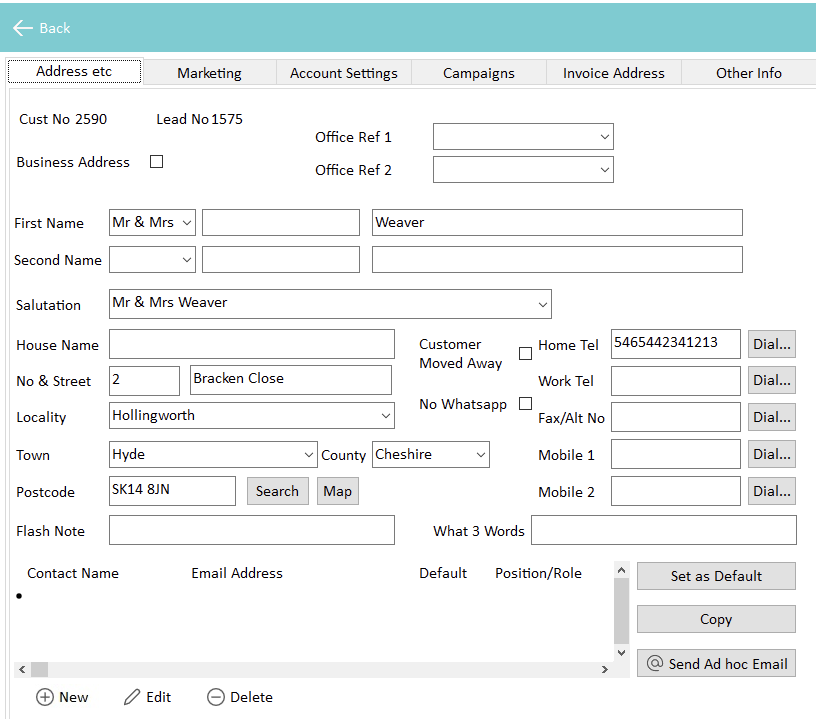
5. Once the fields are completed click ‘OK’ AdminBase will then create a new Customer record (shown below) using a combination of the lead information & the information you entered into the ‘New Customer & Contract’ window.
FAQ
Q: We don’t use a customer numbering system why do we have a customer number?
A: When you create a new customer & contract, AdminBase creates two records, the first being the Customer Details record as shown above. This record stores the customer’s address & phone numbers etc. AdminBase also creates a new contract record which you will use to record the contract details. This will allow you to retrieve records either by using the customers name or number or by their contract number in the future. Many users choose never to refer to the customer number.
NOTE: A Customer record should be unique; however, a customer can have multiple contract records.
FAQ
Q: The customer I want to create a record for does not appear in the drop down list, why not?
A: There are two reasons that a customer will not appear in the list, the first being that the lead has not been resulted as sold in leads. The second is that the lead has had the ‘Contract Created’ tick box ticked in the lead. To check if this is the case cancel the new customer & contract record window, find the lead that relates to the customer & check that it has been resulted correctly & that the ‘Contract Created’ tick box has not been used.
6. Check that the customer record is complete & correct, once you are happy that this is the case close the customer record by pressing “Back”. Details in this record are copied directly from the lead record and may differ from the contract record.
NOTE: The use of the ‘Office Ref’ & other fields in the customer record are optional. If you consider any of these fields may be of use, please contact Support before using them. Some have additional uses you may be unaware of.
7. Once you close the customer record the contract record will be displayed. You will notice that much of the information already exists in the contract details tab as shown below.
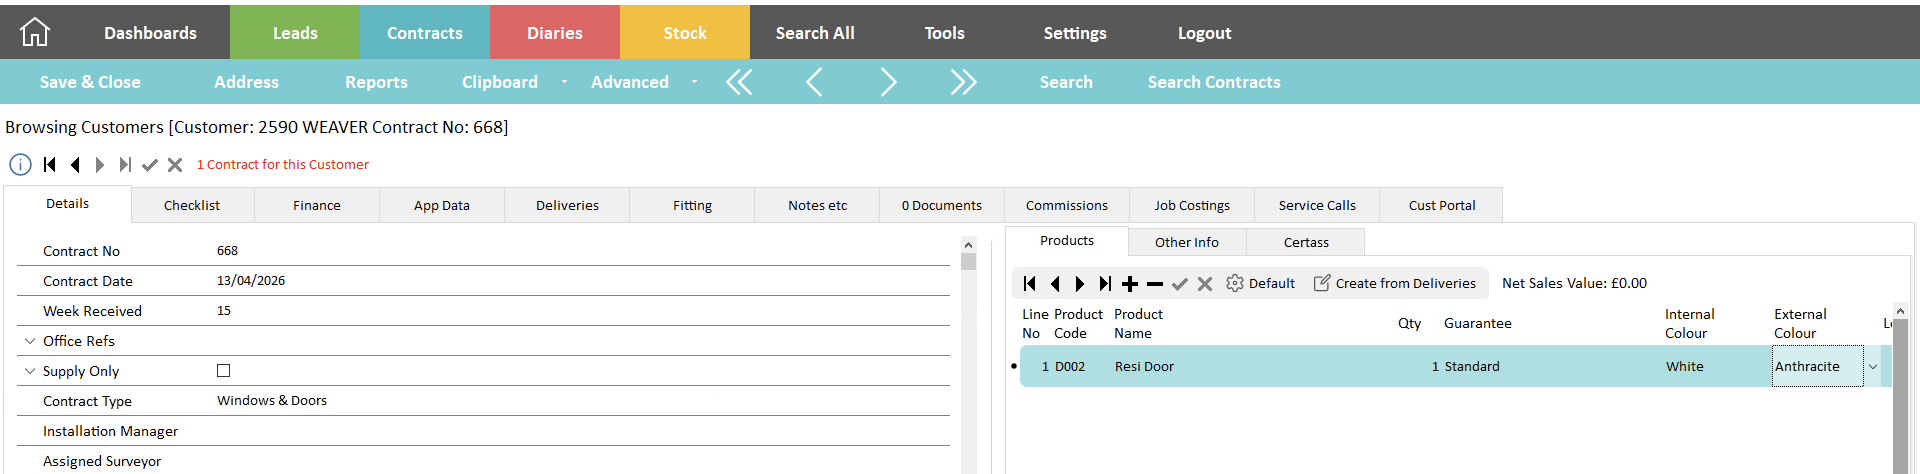
8. Left click the products field in the top right hand pane, select the products that relate to this contract & enter a value into the quantity field. To add more lines to the product table, press the down arrow on your keyboard or the Plus sign above the Product Name heading & another blank line will appear.
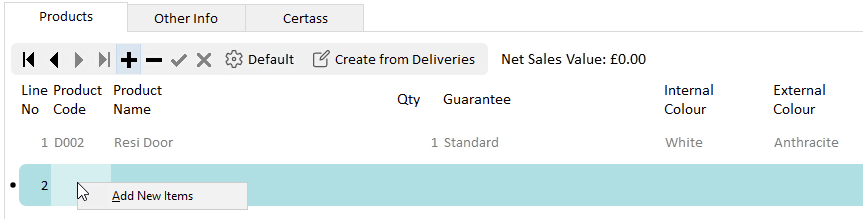
NOTE: You can add additional products to the Products list. To do so you need to right click the ‘Products’ field as indicated in the image below. An ‘Add New Items’ button will appear, left click this and the ‘Products Codes’ window will open.
9. In the product codes window, you add a new product by left clicking the plus sign (circled below) this will add a new blank line. Enter your product, then press enter and close the record. Your new product will be visible when you next open the drop down menu. NOTE When setting up a product you can specify the guarantee details of that particular product If they have previously been set up in Settings - Contract Settings Service Calls (See Warranty Setup)

10. Next select the Finance tab, this is the area in which you can record the financial detail of each contract.
11. Left click the ‘Payment Method’ drop down list & select the payment method that will apply to this contract. This may already be pre-populated, if so check the payment method is correct
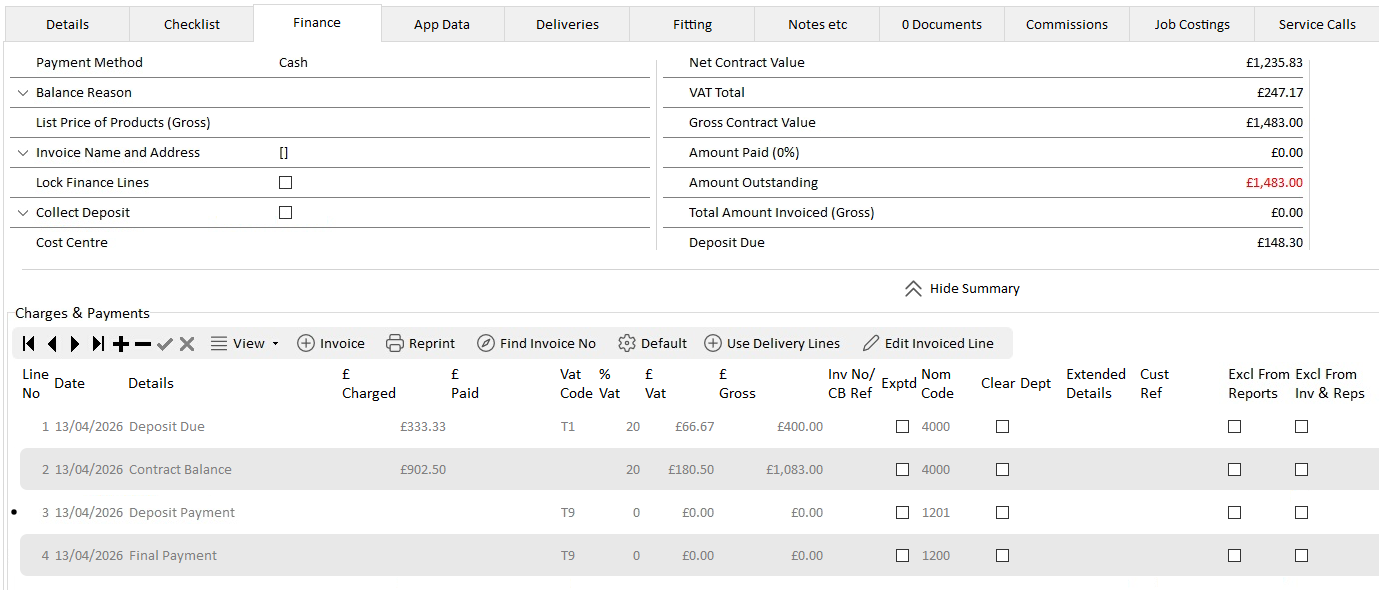
12. Finance lines relating to each contract type can be pre-defined and set up as defaults, so you will see detail similar to the picture below.
13. To enter a charge, type the gross value into the corresponding line in the ’Charged’ Column hold down the Ctrl key on your keyboard and press ‘S’ once this will net the figure for you. If you enter a net figure in the charged column, when you move off the line VAT will be added.
NOTE: AdminBase will allow you to record all sorts of financial transactions within this record, you must be careful however to ensure that the values for each item are entered into the correct columns. e.g. charges made by the company must be entered into the ‘Charged Net’ column. Payments must be entered into the ‘Paid Net’ column.
14. When you have entered all of the detail in the finance table if you left click the black tick just above the charge lines AdminBase will post the last entry to the record & the values will be displayed in the top right hand pane of the finance window. Please note if you fail to post the change you have made, AdminBase will automatically update the record when you close the record or move to a different page within the contract.
In the area above the details area there are a number of other fields these are listed in order below:
Balance Reason | The Balance reason field is used to record the reason for an outstanding balance on an account. Information recorded in this field will appear on the ‘Balances Outstanding’ report. |
|---|---|
List Price of Products (Gross) | This field should be used to record the price that the contract should have been sold at. The information in this field will then produce values in the ‘Discount Given’ & ‘Discount %’ fields in the commissions tab. |
Invoice Name and Address | This field should be used if the invoice name and address is different to the customer details. |
Collect Deposit | This tick box can be used to remind the user that a deposit needs to be collected. Clicking the ‘+’ sign to the left of the field will expand the field to allow entry of a figure. |
NOTE: The above steps will be common to all companies that use AdminBase, as these are the basic steps required to produce a contract record. After this point the order in which the various functions are used will depend on the way that each individual company processes their contracts. From this point the tabs will be described individually in the order that they appear.
Checklist
The Contract Checklist is an important part of AdminBase that can be used to ensure that no
step in the life of a contract can be missed. The checklist can be set to trigger automatic
email and SMS messages when events are marked as completed. It drives views of the
contract records that show due and overdue Items; and also drives the contracts dashboard.
Information of how to set up the dashboard can be found here. Dashboard Instructions
Deliveries
The ‘Deliveries’ tab can be used to record all of the orders placed with your suppliers, their order & delivery dates, quantities & purchase order No’s can be detailed.
1.IFrom within a contract record select the ‘Deliveries’ tab the screen below will be displayed.
2. Left click the ‘New’ button (circled) and the ‘Delivery information’ window will be displayed You are then able to enter details relating to the product you are ordering.
3. Left click the ‘Product Type’ drop down menu and select the product you are ordering. Alternatively this information can be pulled from the Products Section of the contract details screen by clicking the “Create from Prods” button highlighted below .

4. In the ‘Supplier Name’ field, enter the name of the supplier of the item ordered from the drop down list.
5. Then complete at least, the ‘Quantity’ ‘Date Ordered Field’ and the ‘Delivery Due’
Fields. Adminbase will then have sufficient information to drive the ‘Deliveries Due
Report’ and the Deliveries Due’ Views.
NOTE: Additional suppliers can be set up by right clicking the ‘Supplier Name’ field and
using ‘Add New Items’ or in Settings - Suppliers.
6. If you know the net value of the items ordered, you may want to enter this information in the ‘Net Value’ field.
7. In the ‘Delivery Date’ field, enter the date that the delivery is due to arrive.
8. Once the ordering information has been recorded it may be used in a variety of different ways. The information can be reported by use of the ‘Deliveries Due’ report which can be run from the report’s menu in the contracts browser. Also Purchase order covering sheets can be produced by clicking ‘Create Form’ on the deliveries page.
9. On receipt of the items a received date should be entered in the ‘Date Received’ field. This expands after clicking the plus sign circled below.

10. The date received and the delivered quantity should be confirmed in the ’Date Rec’d’ and ‘Qty Rec’d’ fields. The ‘Balance OS’ field will complete itself by deducting the quantity received from the quantity ordered.
NOTE : Unused fields in the Deliveries tab can be hidden from view by selecting the field below
the field you want to hide, then right clicking the field heading and selecting ‘Hide’. Right
clicking the field header and selecting ‘Show Columns’ will allow you to show any of the
hidden columns.
Fitting
The Fitting tab is the area where you can record any site visits and is normally used in conjunction with the AdminBase diary.
1.IFrom within a contract record select the ‘Fitting’ tab the screen below will be displayed. Enter the event type you need to book into the field circled below from the drop down menu.
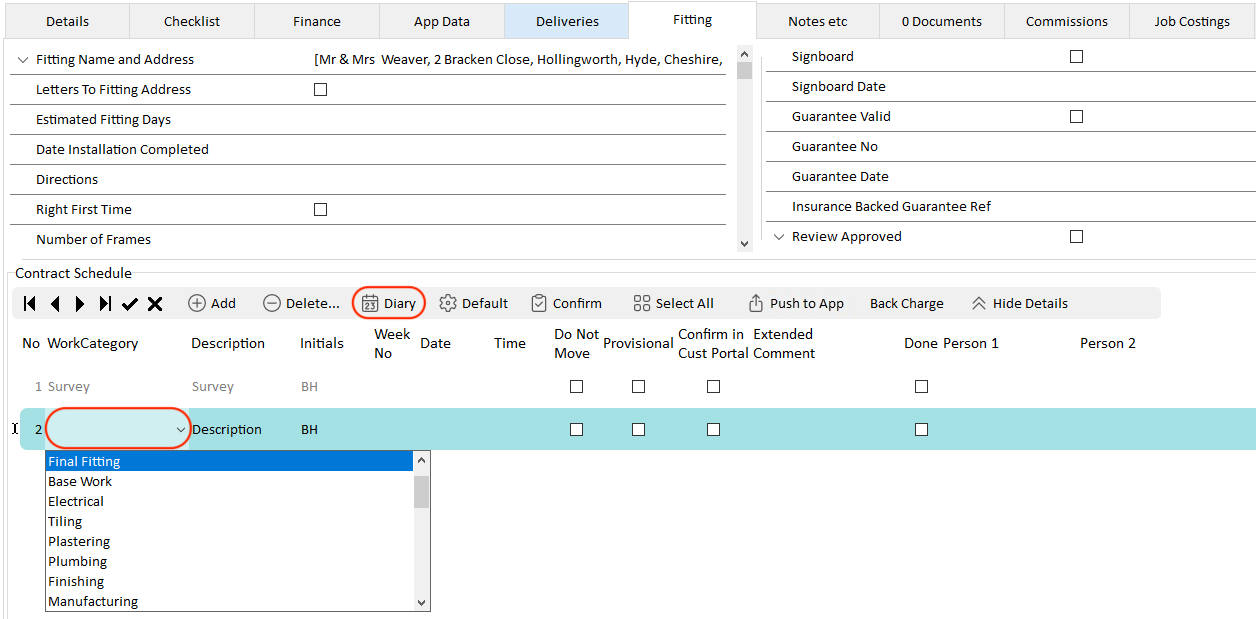
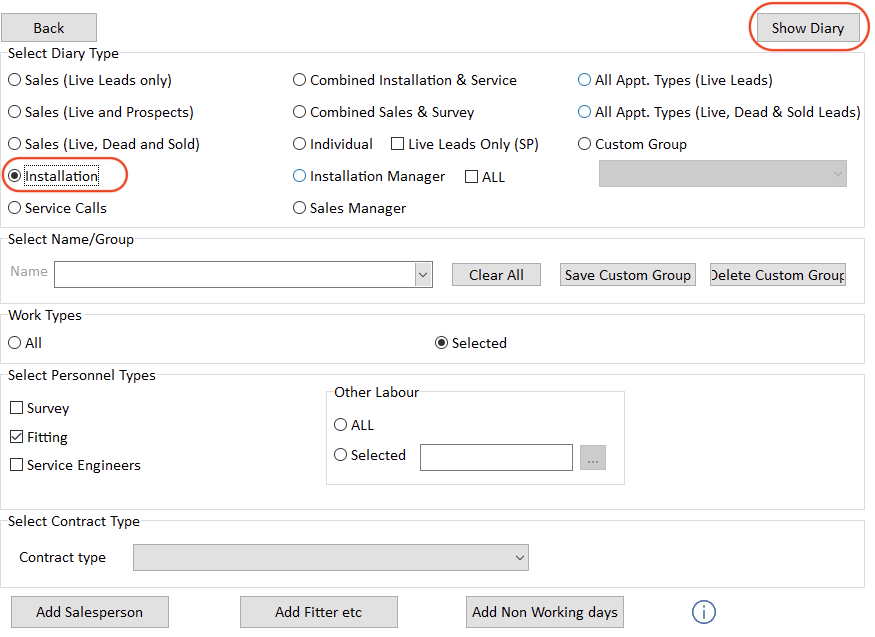
2. Next open the AdminBase diary by left clicking the diary button on the bottom bar of the fitting page (also circled). You will then see the following screen. Using the options displayed here select the type of diary you want to open. Then left click the Show Diary button. The AdminBase diary will open.
NOTE: For full diary instructions please refer to the ‘Diary Instructions’ training notes these give full details of how to customise the diary to your preferences.
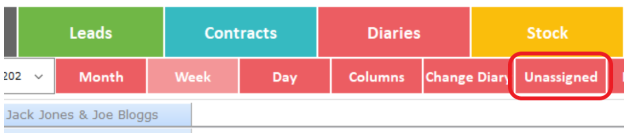
3. To make the appointment left click the Unassigned button on the top toolbar (circled above) and the following window will be shown on top of the diary screen.
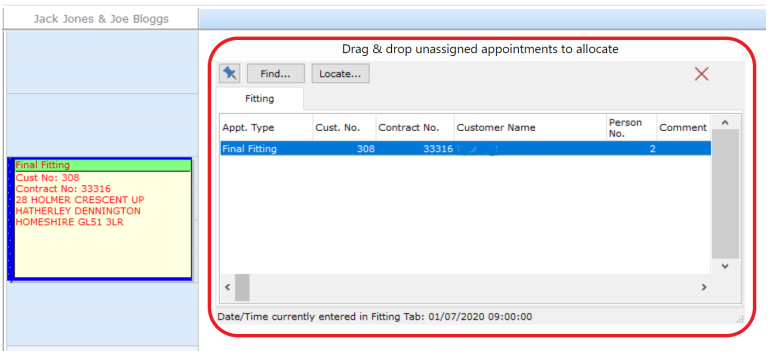
4. To make the appointment left click the line in the window you want to appoint and keeping the left mouse button held down drag the event onto the day and time you require on the diary then let go. The appointment will now have been made and the record will have automatically been updated, with the appointment details.
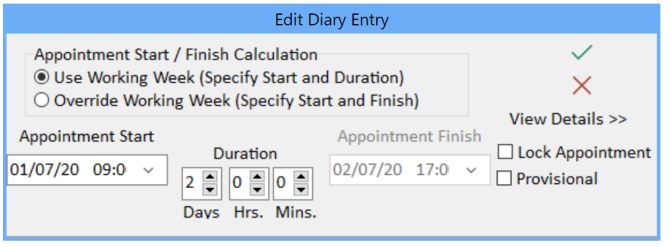
5. If the appointment is either for more or less than one day you can adjust the length by increasing or decreasing the times using the duration fields. Any changes of this sort are also automatically recorded in the contract record. Left click the Ok button to complete the process of making a booking.
In the ‘Contract Schedule’ on the fitting page, you will notice 3 tick boxes. Their functions are as follows:
Do Not Move | When checked the booking in the diary will display a padlock in the top left corner, this indicates that an appointment in the diary is confirmed and should not be moved. Once checked the appointment cannot be changed unless you uncheck the box. |
|---|---|
Provisional | When checked the booking in the diary will display a question mark in the top left corner, this indicates that an appointment has been marked as provisional and is not fully confirmed. A provisional appointment can still be dragged and dropped if it need to be moved |
Done | Should be ticked as soon as each item in the ‘Contract Schedule’ is completed. This action will both act as a visual check to see that an item has been completed & will also remove the item from the ‘Events Outstanding’ report. The ‘Events Outstanding’ report can be run from the reports menu in the main Contracts / Customer browser. |
In the area above the ‘Contract Schedule’ there are a number of other fields these are listed in order below:
Fitting Name & Address | This field will contain a fitting name & address if a fitting address has been entered into the lead prior to the contract record being produced. If you want to view the address in full left click the ‘+’ sign to the left of the field, this will expand the fields to reveal the full address. If you want to add information to these fields they are editable. |
|---|---|
Letters to Fitting Address | This tick box if ticked will ensure that any letters produced from the current record will be addressed with the fitting address contained in the fields described above. |
Estimated Fitting Days | This field can be used to enter an estimated number of days required to fit. |
Guarantee Info | When the ‘+’ sign to the left of this field is clicked it will display the ‘Guarantee Valid’ tick box. For users who have opted to hide the service call tab when the customer has no valid guarantee this tick box when ticked will activate the service calls tab. You can also |
Date Installation Complete | This field is used to mark the contract as complete. This field is the trigger that changes a contracts status from a ‘Current Contract’ to ‘Balance Outstanding’ if any money is owed, or ‘Historical’ if there is no outstanding balance. It is vitally important that this is completed once the fitting work is materially completed. Most users use the Balances Outstanding Report as a means of controlling their incomplete installations & as such will mark a contract as complete even if there is a problem. You should then use the ‘Balance Reason’ field on the Finance page to detail the problem & use the ‘Balances Outstanding’ report and view to ensure that the problem is resolved & payment received. |
Sign Board | This field can be used to indicate that the customer has |
Signboard Date | This field can be used to record the date a signboard is |
Print Button | At the bottom of the fitting screen you will notice a print button this will allow you to print the list of items scheduled for this contract. |
Commissions
The Commissions tab is used to record commissions paid to Sales people, Surveyors & Fitters. If your staff are salaried you should record the costs you incur, rather than just the wage paid to the individuals.
1.ITo record a sales commission click the ‘% Create Sales Commission’ button.
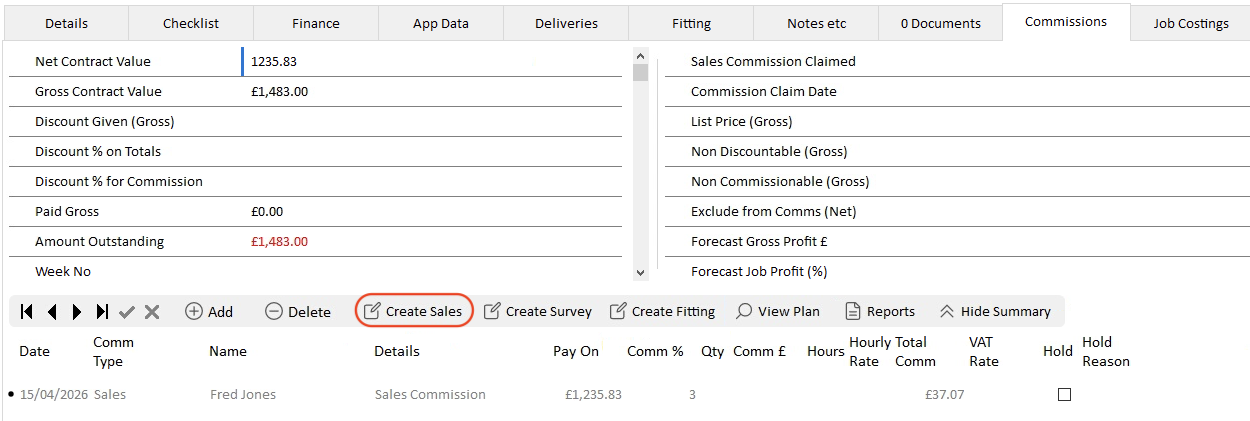
2. As long as there has been a commission plan created, a Salesperson recorded on the ‘Details’ tab and a ‘List Price Gross’ recorded in the ‘Finance’ tab then a commission will be calculated and displayed as shown above. If required, the commission percentage can be manually amended to recalculate the commission.
3. Commissions for survey and fitting can be recorded by left clicking the relevant buttons.
4. Commission statements can be created from the commission reports button.
5. For an explanation of the calculations on this page see Commission Summary Calculations
Job Costings
The job costings tab will allow you to enter details of invoices related to the contract into the record & then produce a job costing report that will allow you to see all of the costs associated with the contract & the margin you have achieved.
1.iFrom within the contract record select the ‘Job costings’ tab the window shown below will be displayed.

2. Enter the details of all invoices that relate to this contract you may choose to include a description as shown above.
3. Enter the Net & Gross values from the invoice press the Return / Enter key Adminbase will now display the difference between the Net & Gross values in the VAT field. You should check this amount against the VAT amount shown on the invoice.
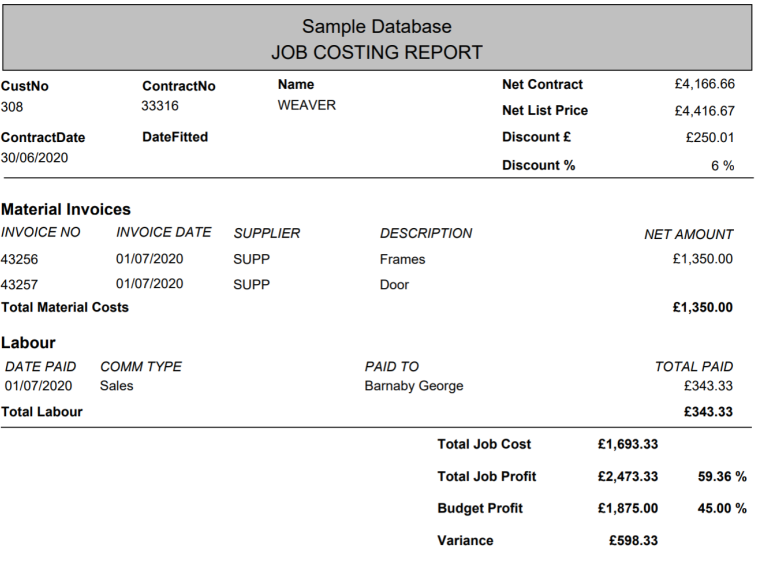
4. Once all of the Invoices that relate to the contract have been entered you can run the job costing report.
5. Click the ‘Reports’ button at the bottom of the job costings page & select ‘Job Costing Report’ then either print or preview. The job costing will include values for all invoice values entered & will use these values to calculate the profit margin achieved.
6. Purchase invoices can also be entered as a batch by using the ‘Export to sage’ option from the contracts browser menu as shown below, or from the ‘Export Data’ button on the bottom toolbar of the Job Costings screen.

If you are intending to export to sage you should contact support for assistance before using this feature.
7. Purchase invoices can also be matched with delivery lines from the same contract either from within the contract record by using the ‘Use Delivery Line’ button on the job costing tab or by using the ‘Delivery Lines’ button on the ‘Purchases’ export batch This is a valuable cross check to ensure the invoices being records relate to the contract you are posting them to.
8. Also included in the job costings window is the ‘Search Invoices’ button that will allow you to search the contract records for purchase invoices by number. Click the ‘Search Invoices’ button & the window shown below will be displayed.

9. Enter the invoice number you require into the ‘Search Characters’ field & AdminBase will find the record. Once you have located the correct invoice click the ‘OK’ button & AdminBase will open the contract record that has the invoice recorded against it.
Service Calls
AdminBase also has a service call management function.
1.IIf you cannot see the service call tab in the contract record (as shown circled below) you will need to validate the guarantee.
2. To validate the guarantee, click the fitting tab & expand the guarantee info fields by clicking the plus sign to the left of the guarantee info field & tick the Guarantee valid checkbox.
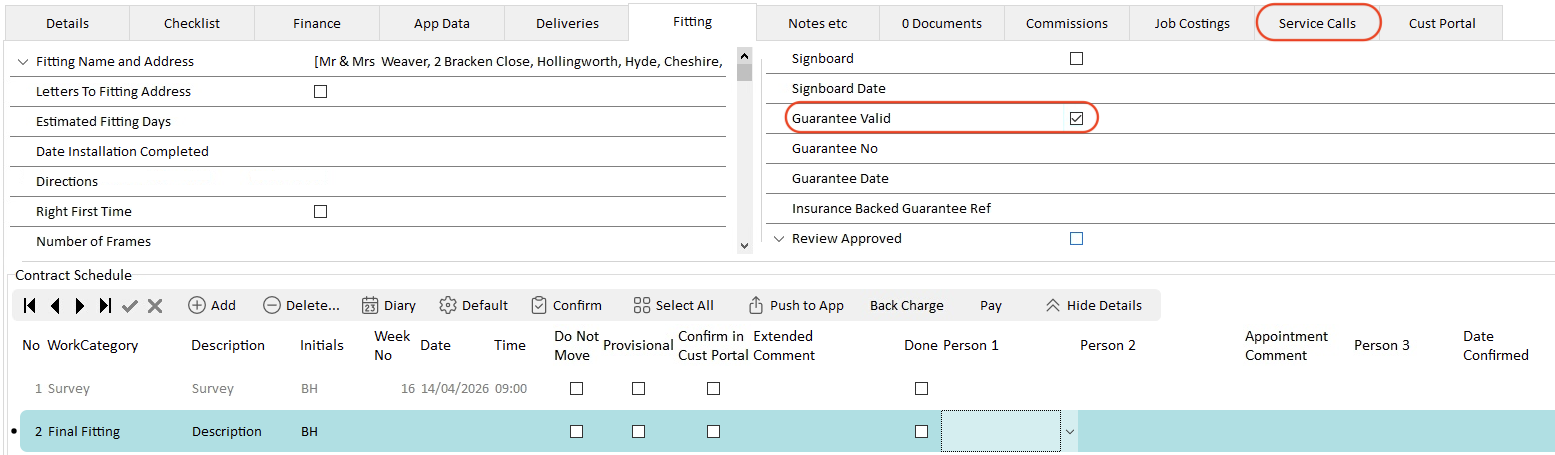
3. This will switch on the service calls tab; left click the tab to open the service call page.
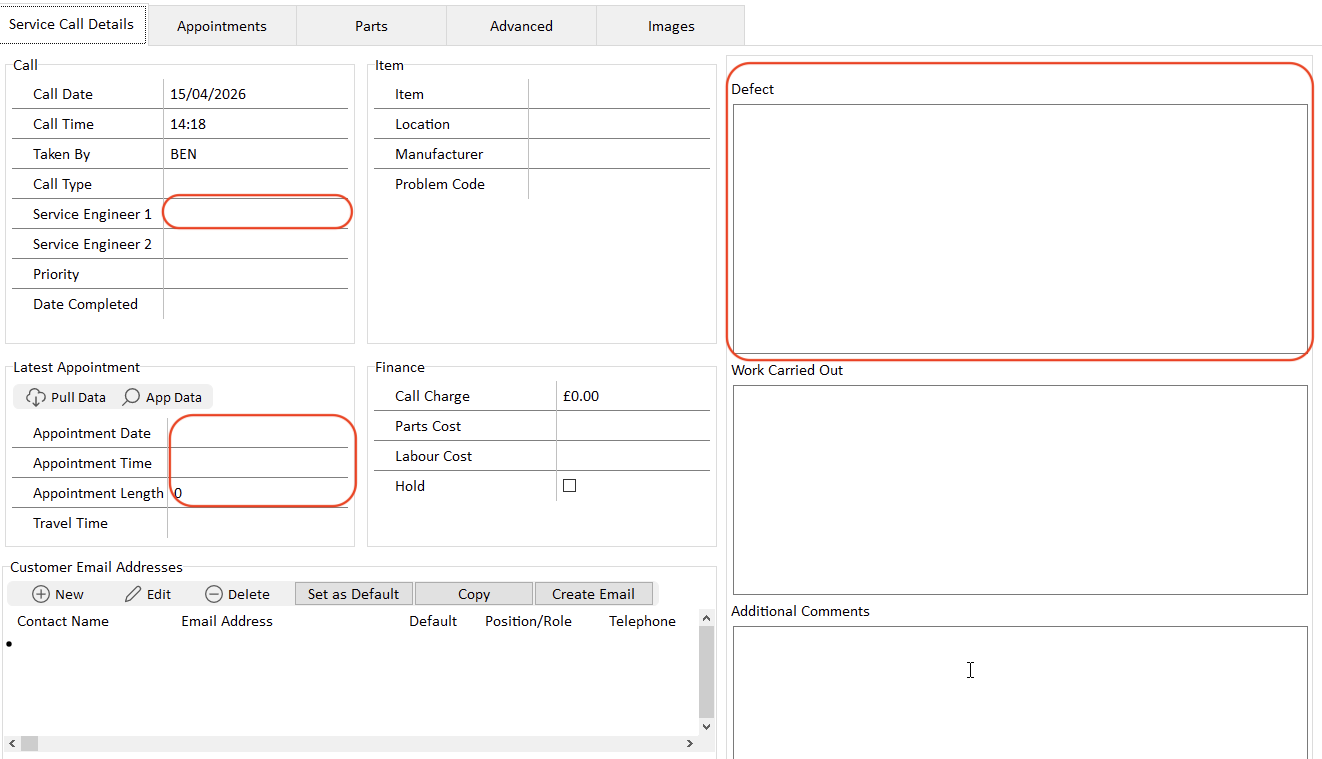
4. From within the service call page, left click the ‘New Call’ button (circled below) record the following information, Note the date and time of the creation of the service call is recorded automatically when the record is created.

5. Information can then be recorded into the service record, you are able to record ‘Type’ ‘Taken By’ ‘Item’ ‘Manufacturer’ etc.
6. The detail of the service call should recorded in the ‘Defect‘ field.
7. The service call can now be booked, either by using the AdminBase diary in the Service call view or by entering defect, date and time detail into the fields circled below, also you should record the name of the service engineer attending the call.
NOTE: Wherever possible the appointments should be booked using the AdminBase diary as all relevant information is entered automatically this way.
8. You are then able to print the remedial request form to issue to the engineer by clicking the ‘Reports’ button just below the service record & selecting ‘Remedial request’ from the reports list & printing it.
NOTE: Also available in the reports list in the service record is a ‘Remedial Letter’ to acknowledge receipt of the call & an ‘Outstanding’ report which will list all outstanding calls.
9. Once the service call has been completed the remaining two fields should be completed.
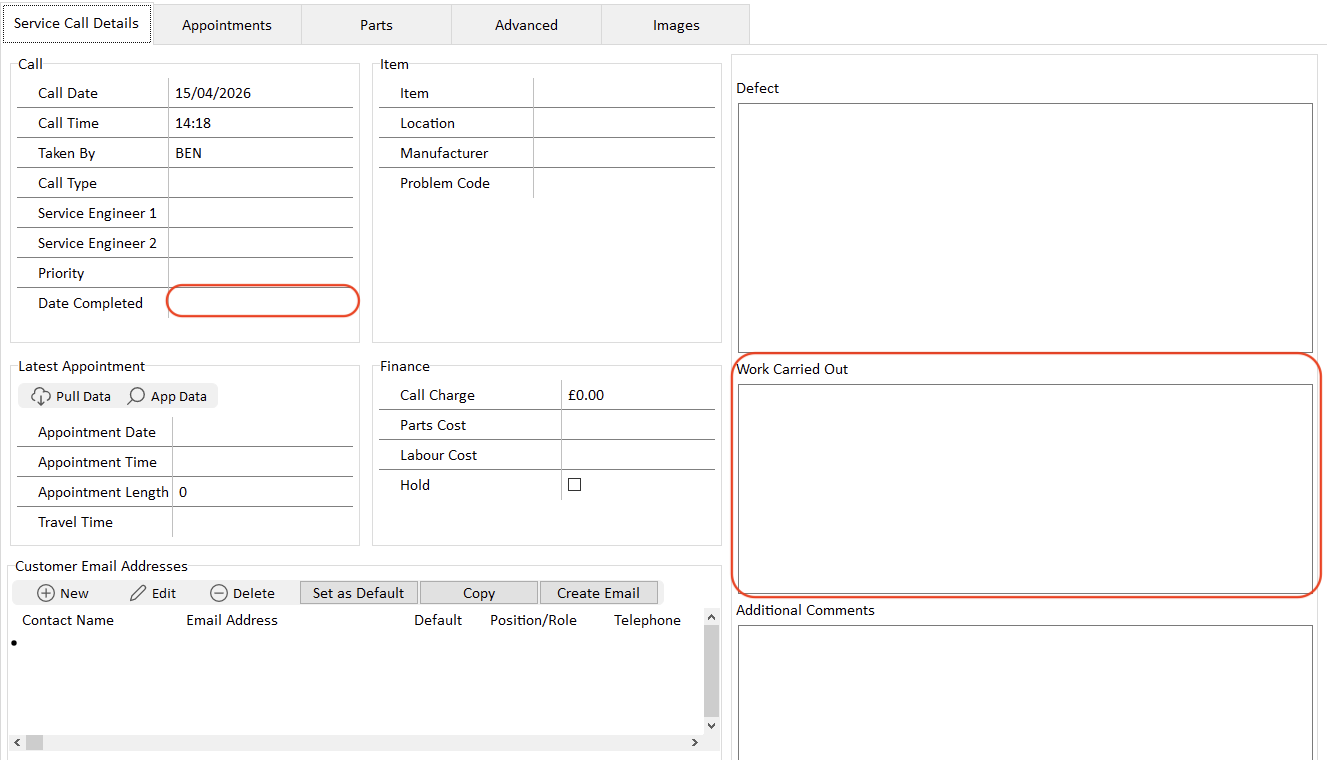
10. The code field should be used to define the nature - cause of the problem & the ‘Date Completed’.
11. Once you enter a ‘Date Completed’ the service call will be completed and will be removed from the ‘Outstanding Remedials’ report, and kept on the contract record as a completed remedial
Notes Tab
The Notes tab in a contract records is where you are able to record information relating to conversation and other communication with customers. Also other information relating to the contract. Notes added will be date and timed automatically and if the LIM is in use initialled by the logged in user.

If required notes can be categorised and viewed by category
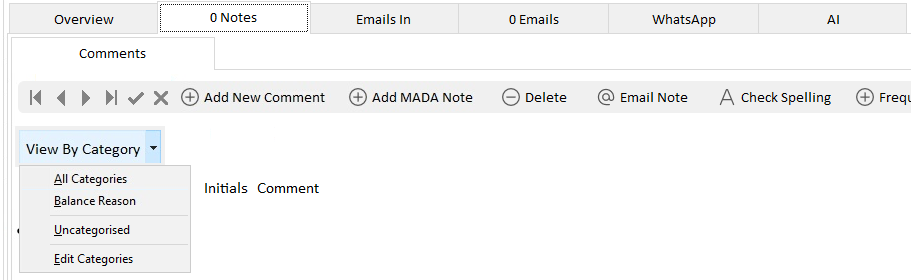
The notes tab also shows reports printed from the contract record , SMS messages and emails sent from both the record and the diary.
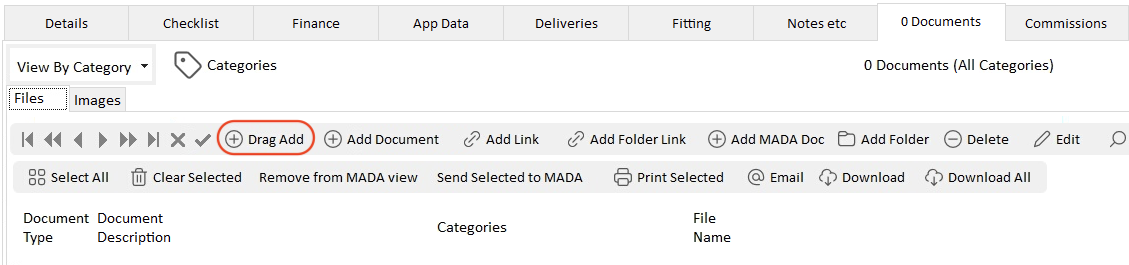
Documents
The Documents tab shows any documents that have been attached to the record. Documents can be attached in a number of ways either individually by browsing or by drag and drop. Via document batching, and also by batching on the support website for users that do not have direct access to Adminbase. Training videos explaining these processes are available on the support web site https://support.abinitiosoftware.co.uk/#!/trainings and also information here Document Uploading