AdminBase Campaigns
Introduction
AdminBase Campaigns is marketing software designed specifically to work with AdminBase, making the job of marketing easier, more efficient and more flexible. Use AdminBase Campaigns to create campaigns, tailor them exactly as desired, distribute directly through the software and finally follow up the campaign, all while keeping in sync with your previous AdminBase records.
You can design, send and follow up email, SMS and letter campaigns. No exporting of information to upload to other providers. Set the criteria you need to select your records from AdminBase. Send and then follow up making notes, resending emails if required and sending leads generated straight back into AdminBase. See who has seen and clicked on your emails.
If you do not have a subscription to AdminBase Campaigns please speak to us on 01283 551005 or email us on sales@abinitiosoftware.co.uk
Getting Started
Logging In
If the application has been configured for multi-company use, a company selection dialog will be the first thing the user sees when running AdminBase Campaigns. After a company has been selected the user will be required to log in with a username and password. When running for the first time, the login interface acts as a user setup dialog. Both the username or password you enter here can be changed later (see the section ‘Creating & Editing Users’ below). Once you’ve logged in or completed the user setup you will be brought straight to the home screen of the application.
Menu and Title bar
Along the top of the application screen is the menu bar. The Home page is the default setting and will be selected automatically on every login. The currently selected page is indicated by both the small white arrow underneath the page button and the text colour of the selected button becoming dark grey instead of white. Access to specific pages is restricted according to the priorities set for the current user. The red ‘X’ at the top right of the menu/title bar will close the application.

Home | The Home page is accessible to all users and features a list of all the individual campaigns in the current database and allows the user to edit and view information about each one. |
Create | The Create page is where the user can create and set up a new campaign, which includes determining exactly which records from AdminBase will receive the campaign. |
Distribute | Distribute is where you can manage the distribution of your campaign; which will change depending on a campaigns format/distribution type. It is from this page that you will be able to send customisable emails, SMS messages or print letters for a postal campaign. This page only displays information for one campaign at a time, which corresponds to the campaign that is currently selected on the grid on the home page. |
Follow Up | Follow Up is designed to be used after distribution and allows the user to record each recipient's response to the campaign, and eventually generate a new AdminBase lead. Like the Distribute page, Follow Up gives the user a list of targeted recipients corresponding to the selected campaign taken from the home page. |
Designs | Designs page is where the user can manage the designs used by the campaigns. Designs determine the appearance and content of the email, SMS or letter sent to your customers. In the case of a telephone campaign, the design is used to write the call script. |
Users | Users is where all user profiles are managed. This screen is available only to users with manager privileges, and allows them to set these privileges and other settings for other users. |
Help | The Help page contains a block of information about the application & Ab Initio, with links to both the main Ab Initio site as well as our customer support website. It is also possible from this page to switch both the user or company that is currently logged in. |
Manager Privileges
The first user of the application will automatically have manager privileges enabled. Managers can access all features of the program, whereas non managers can only use the home, follow-up and help page. Manager access can be changed on the users page, which only managers can access.
The Home Page
The home screen features a list of all the campaigns stored in your AdminBase database, with the newest campaigns at the top. The Distribute and Follow Up page only show data pertaining to the currently selected campaign in this list. There is a colour code to the grid; a grey row means the campaign has no recipient records assigned to it and is therefore not ready for distribution or follow up (See section ‘Criteria’ for more information), and a green row indicates the opposite. The user will not be able to use the Distribution or Follow Up pages unless the row colour of the selected campaign is green.
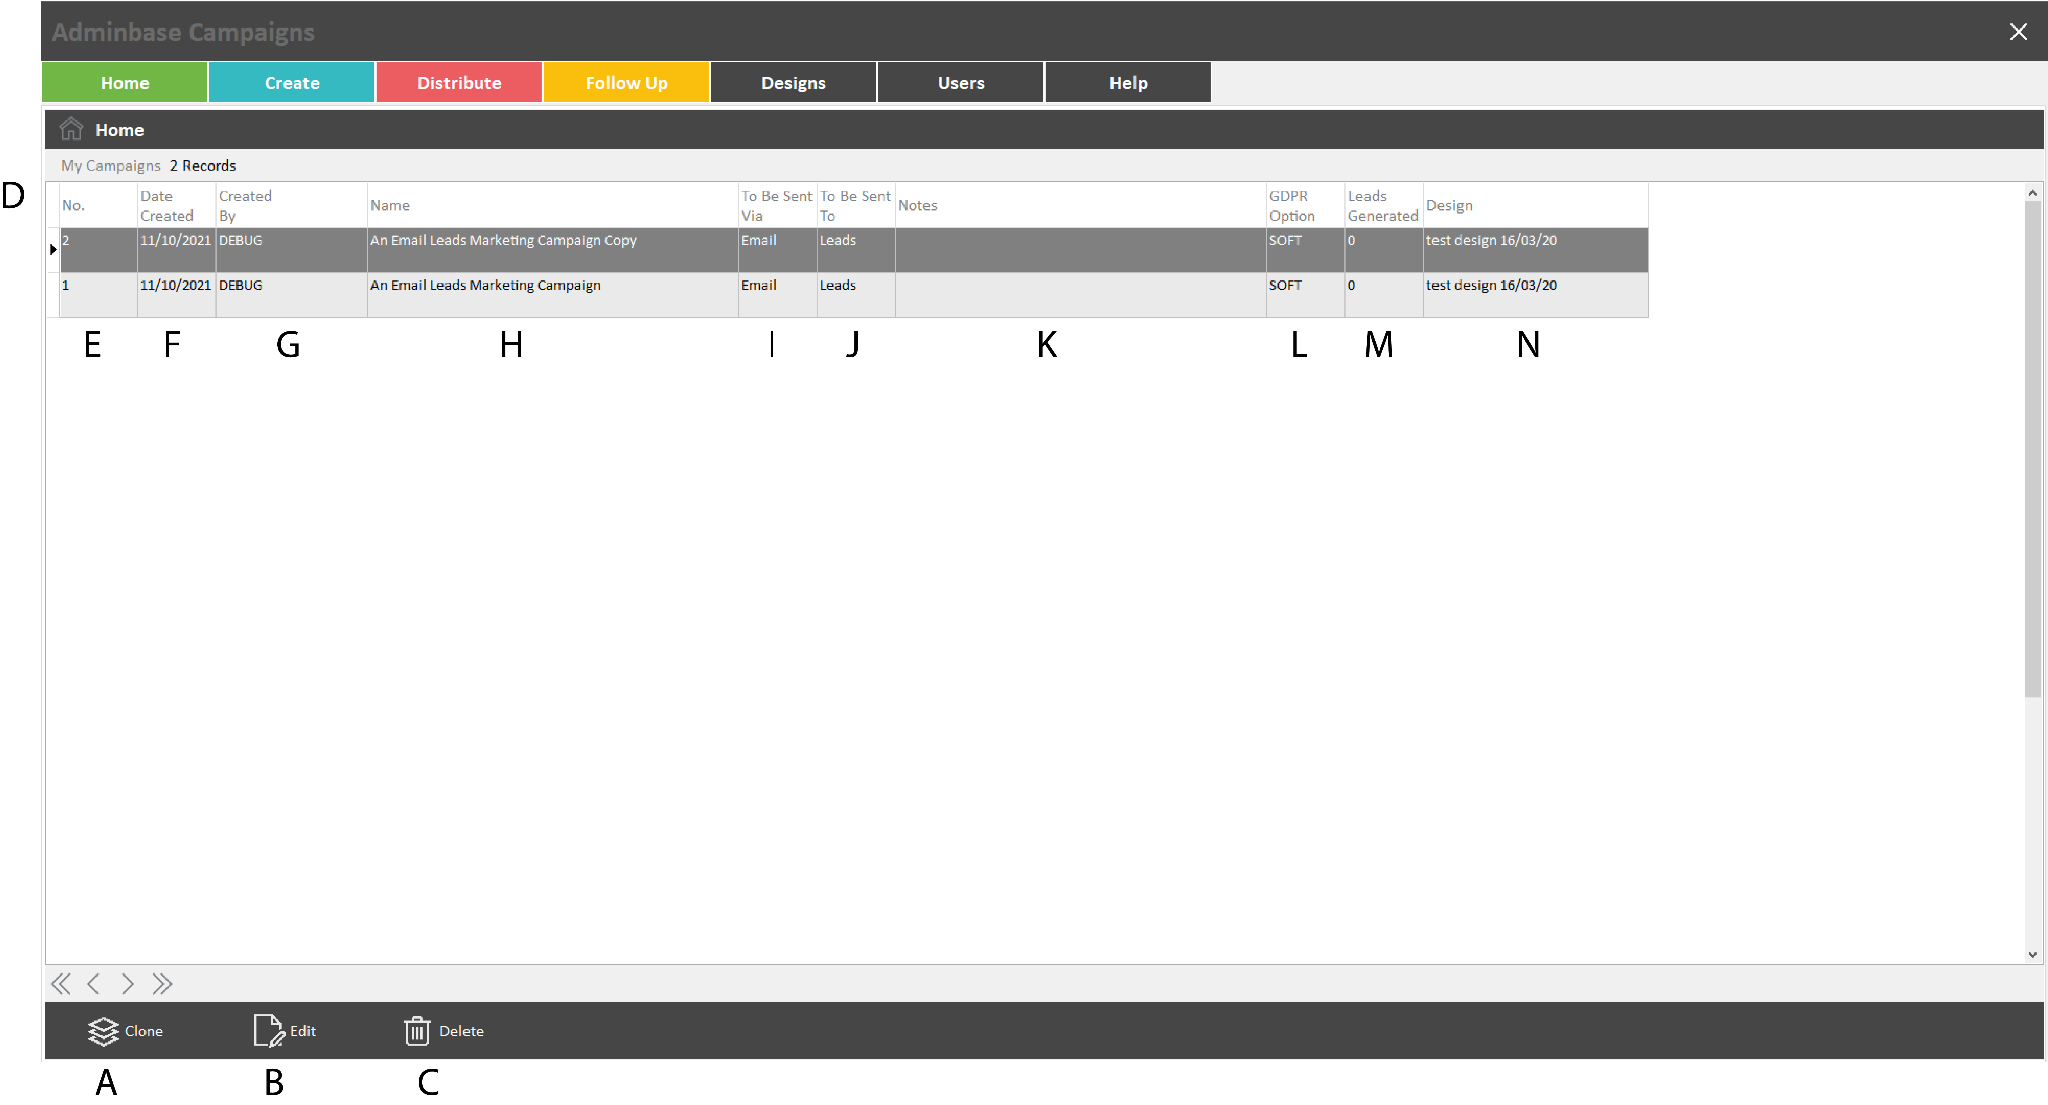
A: Clones selected campaign, copying all pertaining information and records. Cloned campaign however has unconfirmed criteria; meaning the criteria can be edited, even if its parent campaign was ready for distribution & follow-up (See section ‘Criteria’ for more information)
B: Takes the user to the ‘Edit Campaign’ screen
C: After confirmation, deletes the selected campaign and all pertaining records and information
D: Column titles can be clicked to order the records in the grid by the data in that column. Clicking each title multiple times toggles between descending and ascending order
E: Campaign number assigned when created
F: Date campaign created
G: Name of user who created the campaign
H: Campaign name
I: Indicates which format the campaign is to be distributed as, reading one of either SMS, Phone, Email or Postal
J: Indicates which type of records from the AdminBase database will be contacted i.e. Leads or Customers
K: Brief description of campaign
L: GDPR Option. One of either Hard or Soft. Soft will select all lead/customer records, excluding those who have asked not to receive marketing; whereas hard will select only leads/customers who have specifically opted IN to receive marketing
M: Displays count of how many leads have been generated through the follow up page
N: Name of the design assigned to the campaign
The records in the grid can be ordered according to the columns at the top of the grid simply by clicking the desired column title. The grid will adjust to display in order of the column first in ascending order, then in descending order when clicked again. The grid also features a popup menu that can be accessed by right clicking anywhere on the grid. The options on this menu are as follows:
Distribute - Takes the user to the distribute page, has the same effect as clicking ‘Distribute’ on the menu bar.
Follow Up - Takes the user to the follow up page, has the same effect as clicking ‘Follow Up’ on the menu bar.
Go to Design - Takes the user to the edit design page corresponding to the design attributed to the selected campaign.
All features of the popup menu act according to the currently selected campaign in the home page grid.
Editing a Campaign
This page is accessed by either clicking the ‘Edit Campaign’ button on the home page or by double clicking a row in the home page grid. The page allows you to edit details of the campaign and also edit the campaign's criteria selection (See the section ‘Criteria’ for more information).
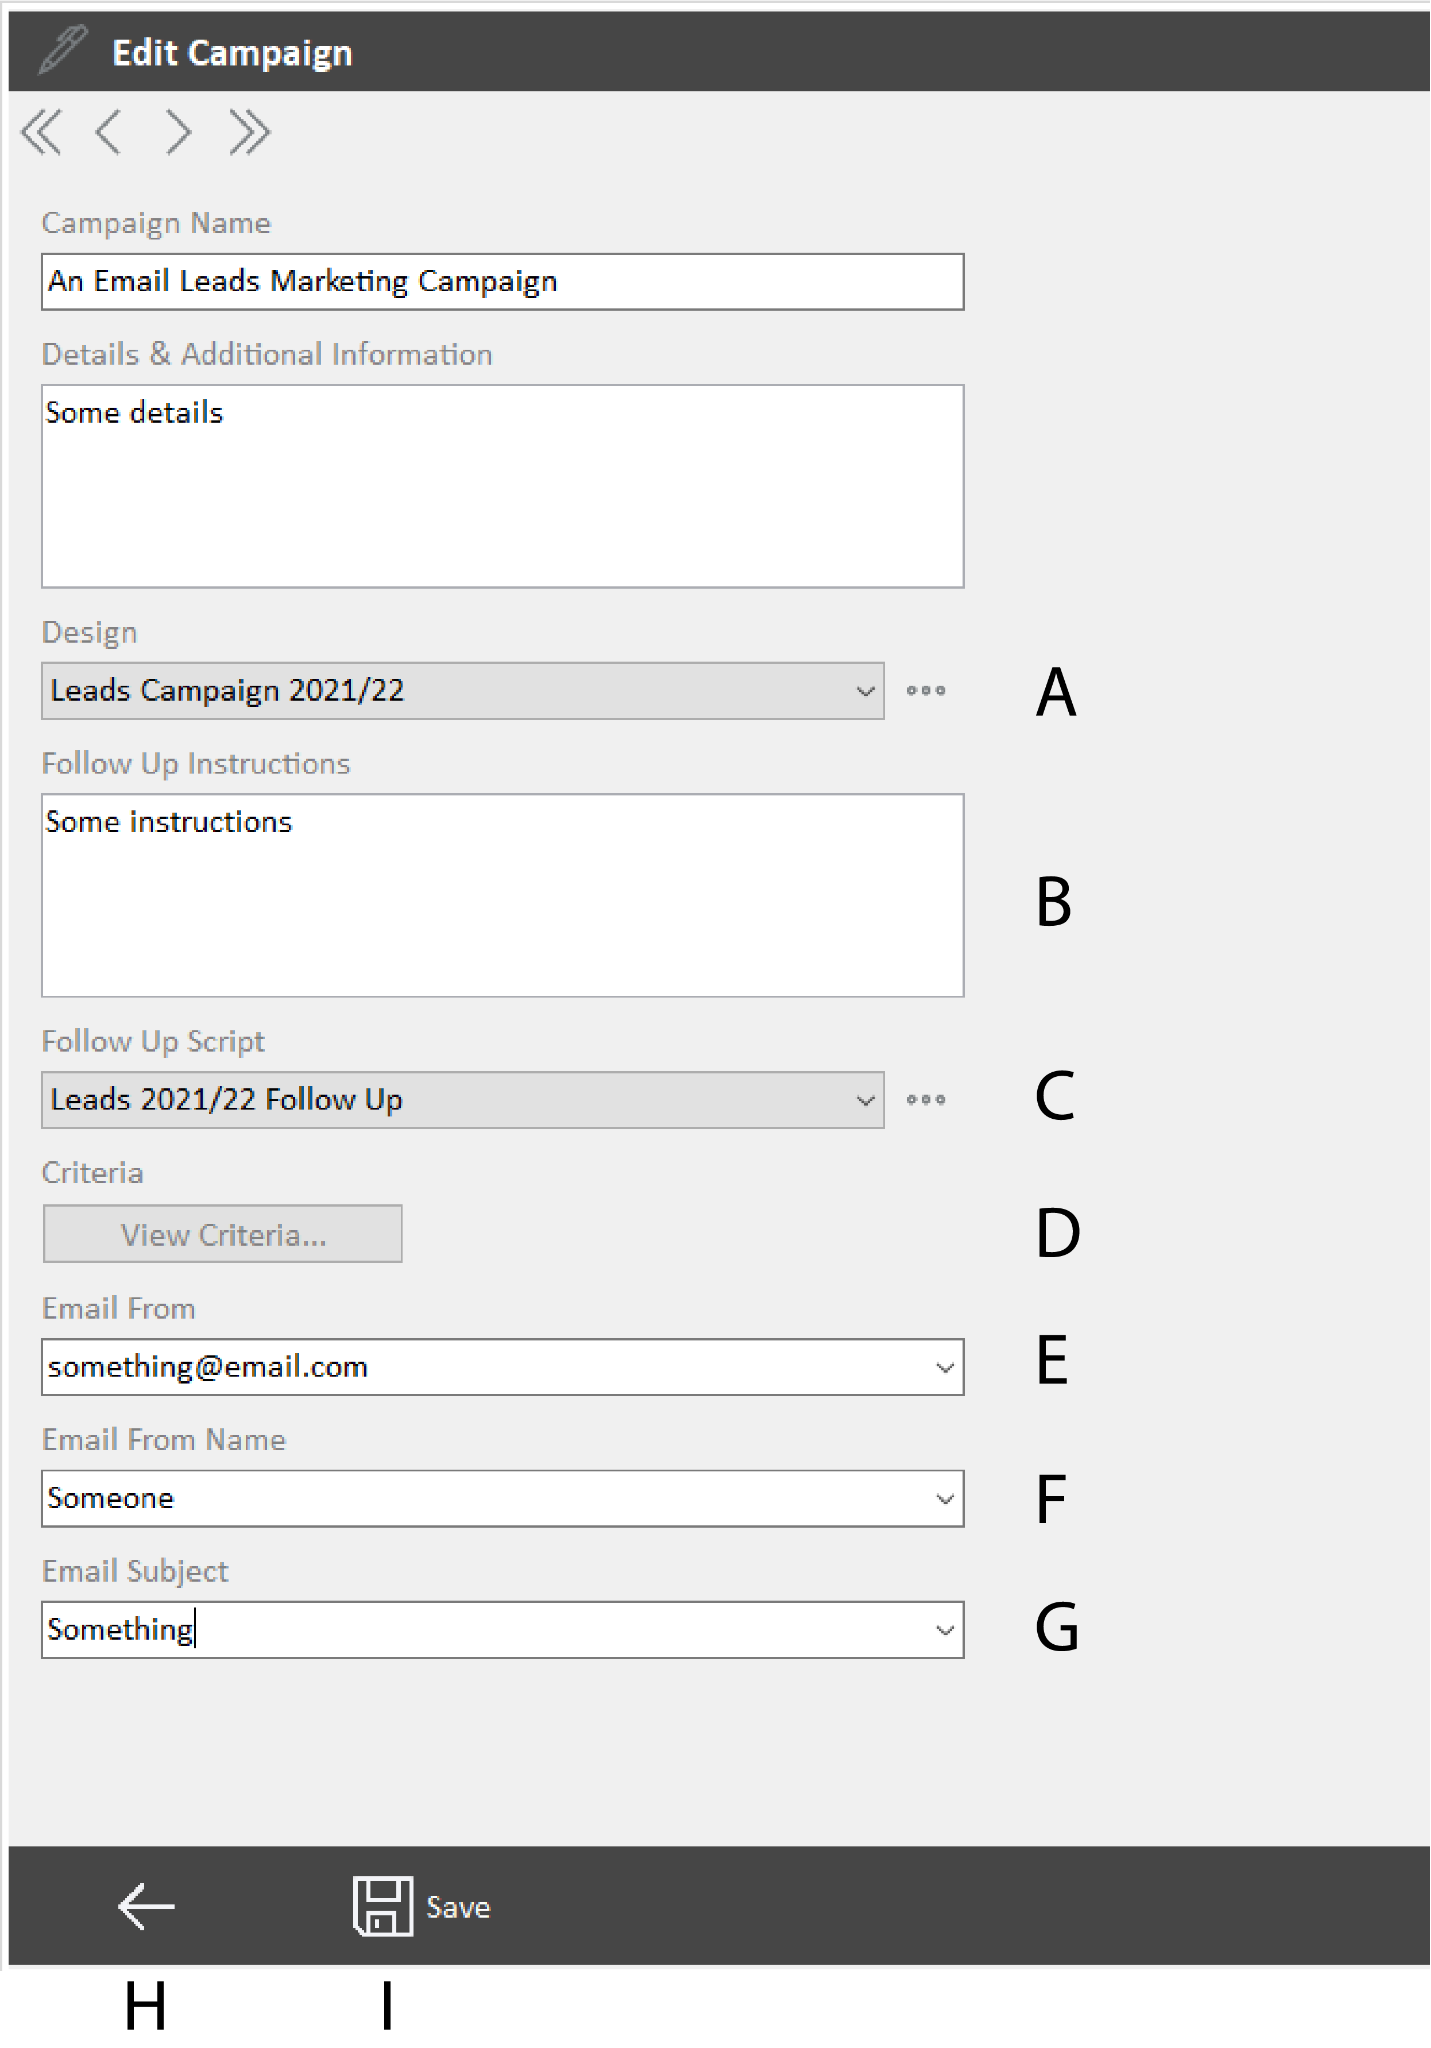
A: Dropdown for selecting design. Only designs available for the campaign are shown, based on distribution format and whether for leads or customers. The design can be changed at any point.
B: Follow up instructions for the user following up the recipients of the campaign. Text entered here will appear on the follow up page when an employee gets to that stage.
C: Dropdown for selecting follow up script design. Gives a list of available phone script designs, and the chosen design will be displayed on the follow up section for the current campaign. Shows only phone script designs as follow-up is done on the phone.
D: Takes the user to the criteria editing page. If the criteria has been confirmed you will be able to view the criteria that’s been set, but not edit it.
E: Hidden for postal and phone campaigns. In the case of an email campaign, edits the email address to send from. In the case of an SMS campaign this allows the message sender name to be edited. You can also use the dropdown to select a previously used value.
F: Hidden for all distribution formats apart from by email. This allows for editing an alias to the email address. For example, ‘john@abinitiosoftware.co.uk’ can appear with the alias ‘John Smith’. Dropdown shows previously used values.
G: Also hidden for all distribution formats except from email. Allows editing of the email subject. Dropdown shows previously used values.
H: Cancel changes and return to home, does not affect changes made with regards to the criteria.
I: Save changes and return to home, does not affect changes made with regards to the criteria.
Creating a Campaign
In order to create a new campaign, click on the ‘Create’ button on the menu bar. This page provides the user with the dialog shown below:
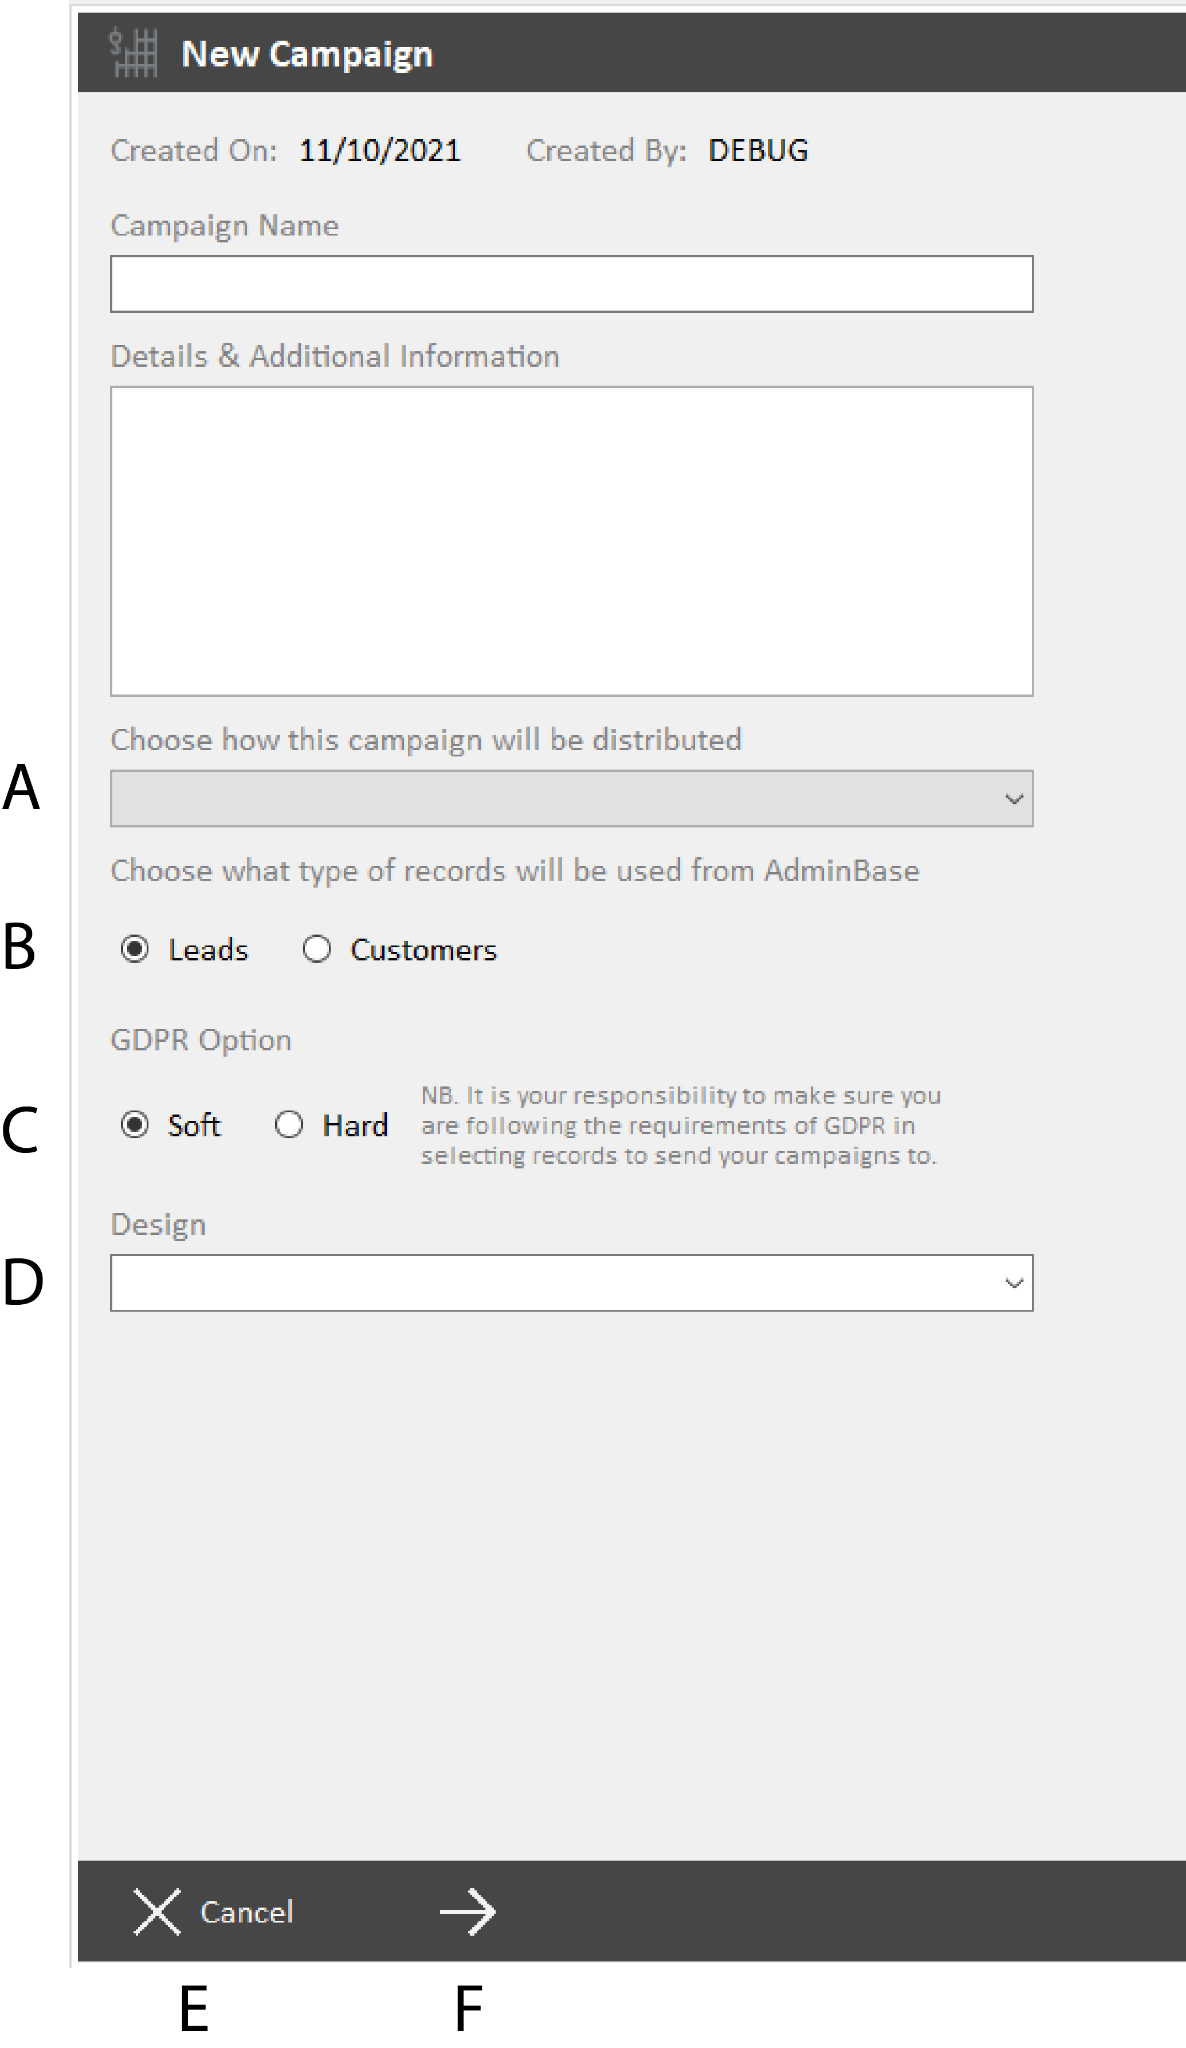
A: Dropdown for selecting the method of distribution. Options are SMS, Phone call, Letter or Email.
B: Choice of creating campaign for leads or customers
C: GDPR Option. Soft will select all lead/customer records, excluding those who have asked not to receive marketing; whereas hard will select only leads/customers who have specifically opted IN to receive marketing.
D: Dropdown that gives a list of all the designs available for the campaign, filtered by the chosen method of distribution and recipient type (either Leads or Customers).
E: Cancels all changes and returns the user to home.
F: Saves all changes and moves the user onto the criteria page, see below section entitled ‘Criteria’ for more information.
Criteria
AdminBase Campaigns features the ability to filter through AdminBase records in order to determine which leads or customers are to receive the campaign; this is done by setting ‘criteria’ in the campaign settings. The criteria that is set for each campaign also determines what is seen on both the distribution and follow up screens, hence why these sections can only be accessed if the criteria for the campaign in question has been confirmed and finalised. When creating a campaign, the user has the option to skip the criteria stage and return to home, allowing for the criteria to be edited and confirmed later. Once confirmed, the criteria for each campaign will be readable but not editable.
Criteria in AdminBase Campaigns operates as definitions for which the Customers or Leads records from AdminBase are filtered and chosen for receiving the campaign, instead of sending it to all records in the database. Criteria can be set that selects all leads having a particular lead source, for example. The options available for use as criteria definitions are also pulled from the data found in the AdminBase database, and therefore are extensive. The user can add multiple definitions that combine to determine as specific a selection as required. If multiple definitions are applied, the program automatically links the two via ‘and’ (filter by definition A AND definition B); however this can be changed to ‘or’ by the user (filter by definition A OR definition B).
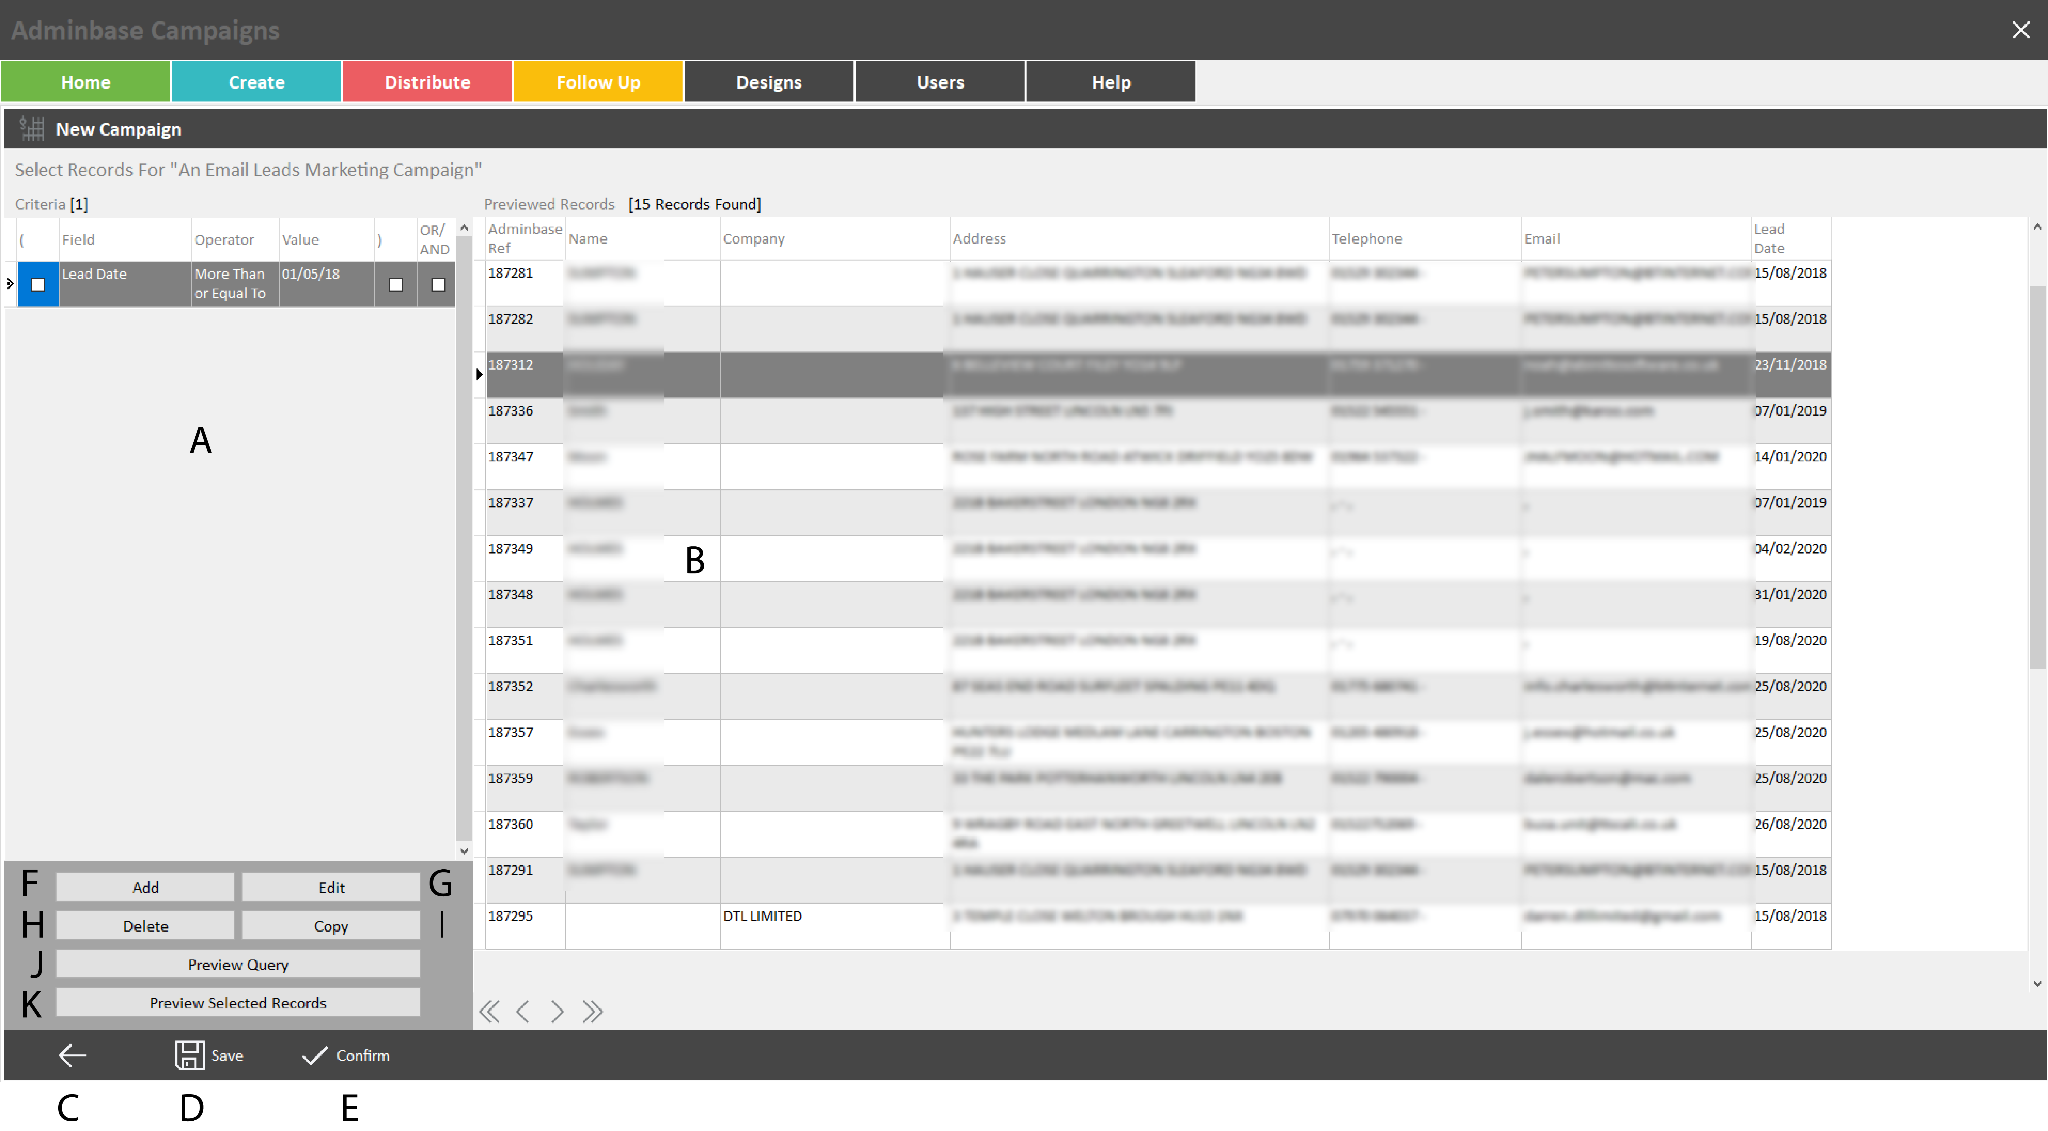
A: Displays a list of all the criteria definitions currently set, the check boxes can be ticked via the grid however the other three fields require the user clicking ‘Edit’ below.
B: Previews the Customers or Leads determined by the criteria.
C: Takes the user back to the previous page.
D: Saves changes to criteria and returns the user to home, however doesn’t confirm the criteria; leaving it available for further editing.
E: Confirms criteria and returns the user either to the home page or campaign edit page.
F: Inserts a new criteria row and displays a dialog for editing the Field, Operator and Value fields for that row.
G: Displays a dialog for editing the Field, Operator and Value fields for the selected row.
H: After confirmation, deletes the selected criteria row.
I: Duplicates selected criteria row
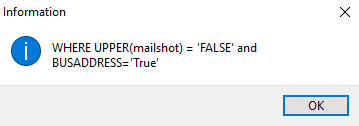
J: Shows a message showing the SQL script based on what has been defined by the criteria list that runs in the background and interacts with the Adminbase database, as seen below. Used for debugging.
K: Updates the preview grid to the right (B).
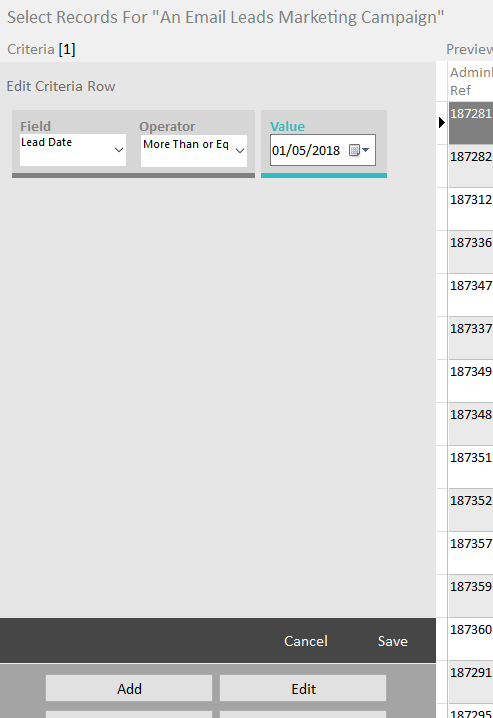
Adding and editing a criteria row
Clicking the buttons entitled ‘Add’ or ‘Edit’ will display the below dialog in place of the criteria row list; as shown by A in the above screenshot. As mentioned before the main three fields of each criteria row can only be edited through this dialog, whereas the other additional options have to be set and changed on the grid itself. The first dropdown box gives the user a list of all the available fields that can be filtered by. The field chosen in this box determines the options given in the next box, labelled ‘Operator’. This field decides the relationship between the ‘Field’ and ‘Value’ definitions and includes options such as ‘equal to’, ‘not equal to’, ‘less than’ and so on. The control given under the ‘Value’ header varies depending on the field the user has opted to filter by. Some fields require a true/false checkbox, as seen below, yet others require a drop down, a text input or a date selection.
Once the user has chosen the appropriate settings, clicking ‘Save’ will save the changes and revert to displaying the list of all criteria rows as was previously visible. Clicking ‘Cancel’ has the same effect only after cancelling the changes made. Clicking ‘Add’ will save the current row and immediately create a new one.
Distribute
Once a campaign contains confirmed criteria, the distribute page will be available for use for that campaign. The distribute page allows the user to send the campaigns content to its designated recipients directly from the application. The layout of the distribute page varies slightly depending on whether the campaign is an SMS, Email, or Postal campaign. This screen is not available for a Telephone campaign. The distribute screen features an information bar at the top of the screen that gives the user information about the current campaign, such as the campaign name, distribution type and so on. Below the information bar is a list of all the campaigns recipients with fields that display information regarding the sending of each recipient the campaign, such as the date sent and whether the recipient is ready to be sent the campaigns content. The list can be filtered based on distribution stats (B on the below screenshot). The filter options are all recipients (default), all recipients who have been sent the campaign and all the remaining recipients who have not. If viewing an email campaign the grid can be filtered based on email response stats. When either an SMS or Email campaign is distributed, the recipients will be sent an SMS/Email straight from the application. If a Postal campaign is distributed, the application will print the individual letters to the chosen printer.

A: Information bar. When looking at either an SMS or Email campaign, either ‘SMS Credit Balance’ or ‘Email Credit Balance’ will display respectively at the far right of the bar.
B: Multiple rows can be selected in grid by holding Ctrl
C: Displays SMS or phone script text for SMS & Phone campaigns, hidden for email and postal.
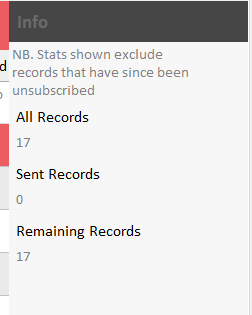
D: Displays distribution stats
E: Refreshes grid to keep information concerning sent/unsent records up to date.
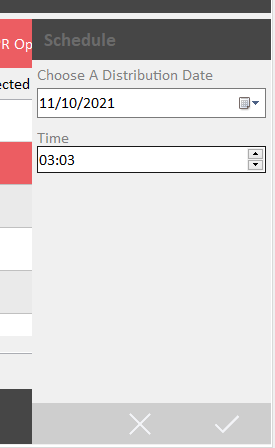
F: Displays dialog for scheduling a distribution date.
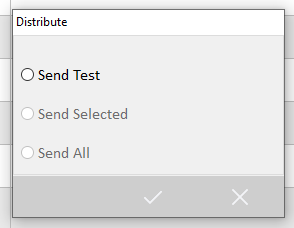
G: Displays options for distribution (send test, send selected, send all), see dialog below
H: Displays search dialog. Searches by ‘AdminBase Ref’ by default, however the search field can be changed by clicking column titles in the grid.
I: Displays filter dialog for filtering based on field values.
J: Buttons for selecting/deselecting all rows in the grid.
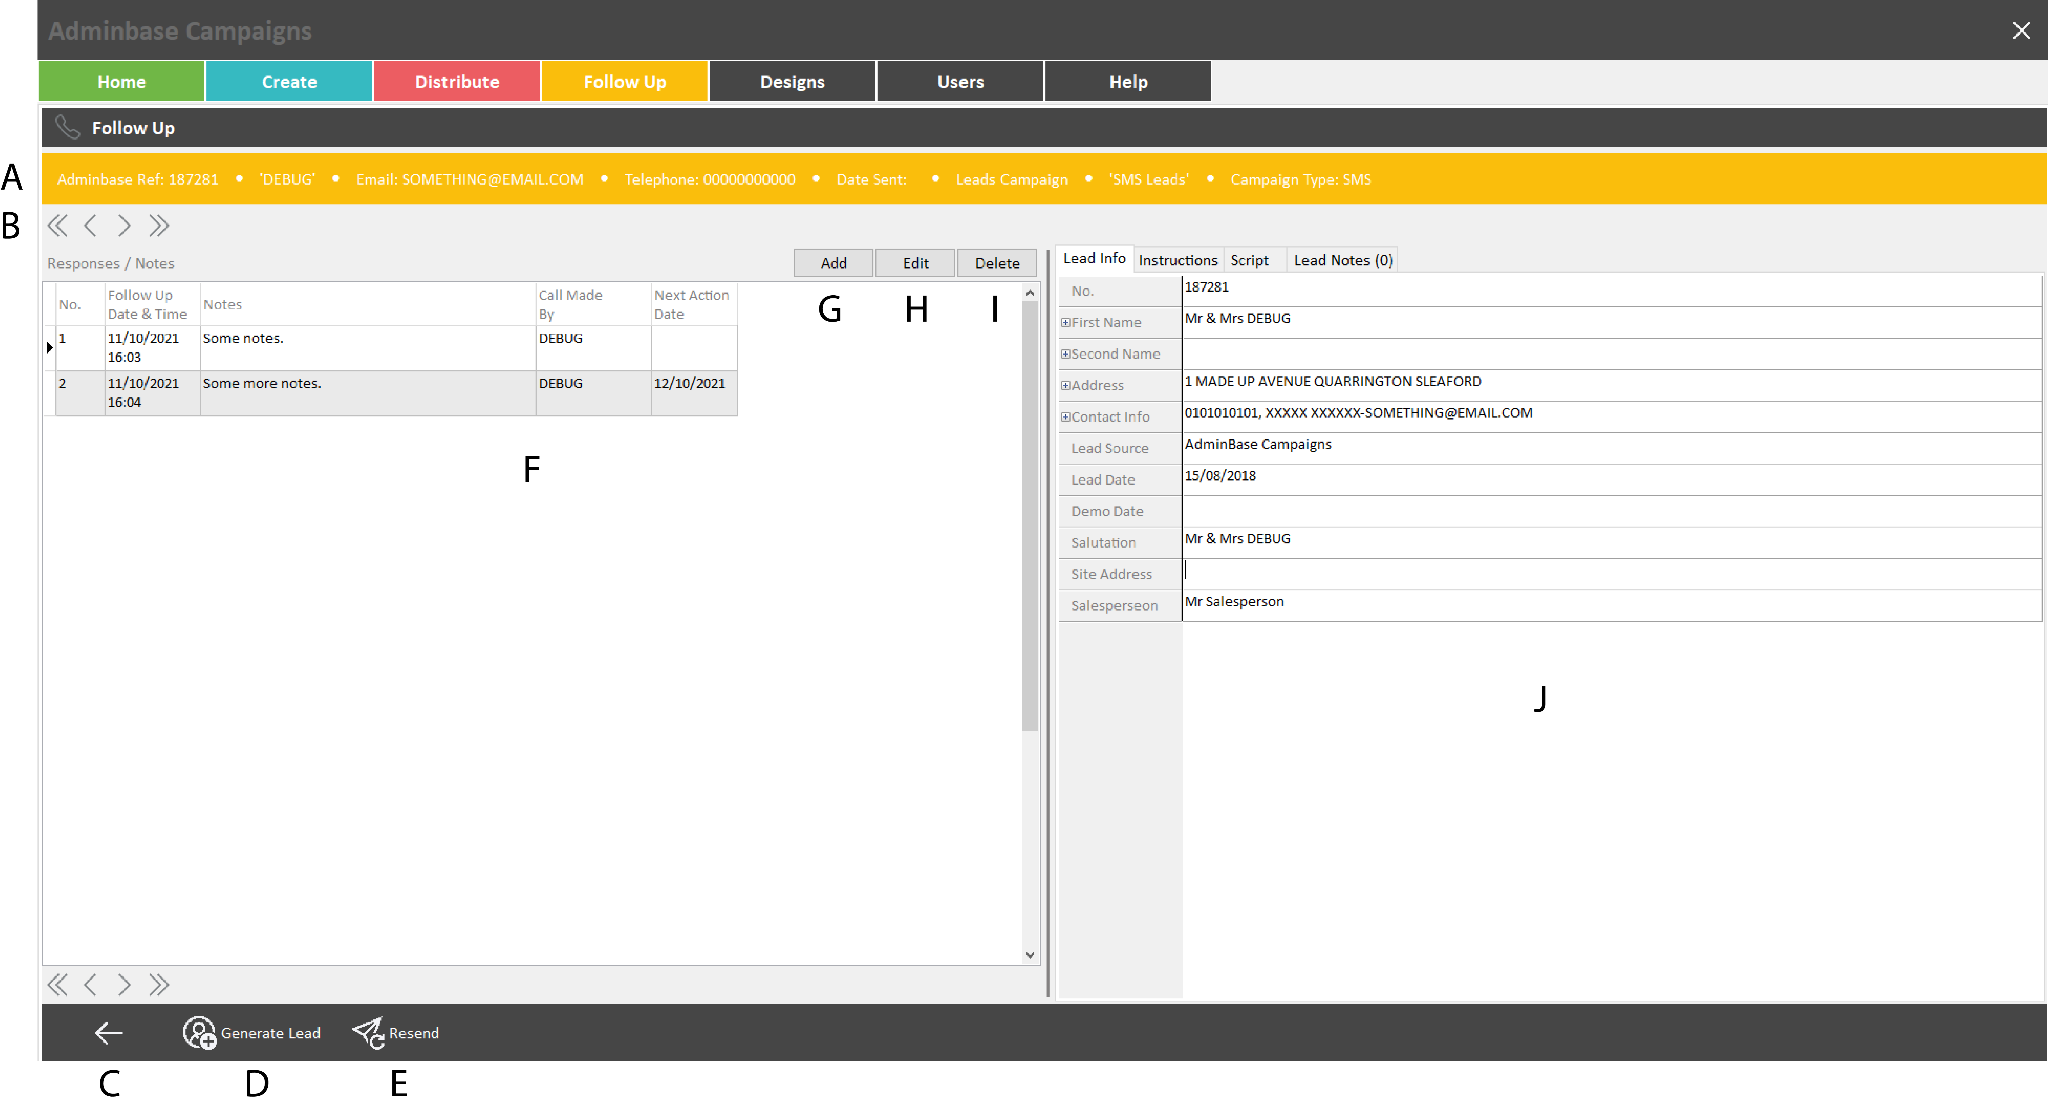
Follow Up
The follow up page is used to monitor the outcome of each campaign, and eventually generate new leads, straight into AdminBase. Like the distribute page, the follow up screen displays a list of all the recipients of the campaign as well as an information bar at the top. An additional page displays information relative to the individual recipient record, and can be accessed by either double clicking on a row or clicking the button in the bottom left-hand corner with the plus sign graphic. This ‘recipient follow up’ page is where the user keeps track of all progress of a campaign pertaining to a specific recipient.
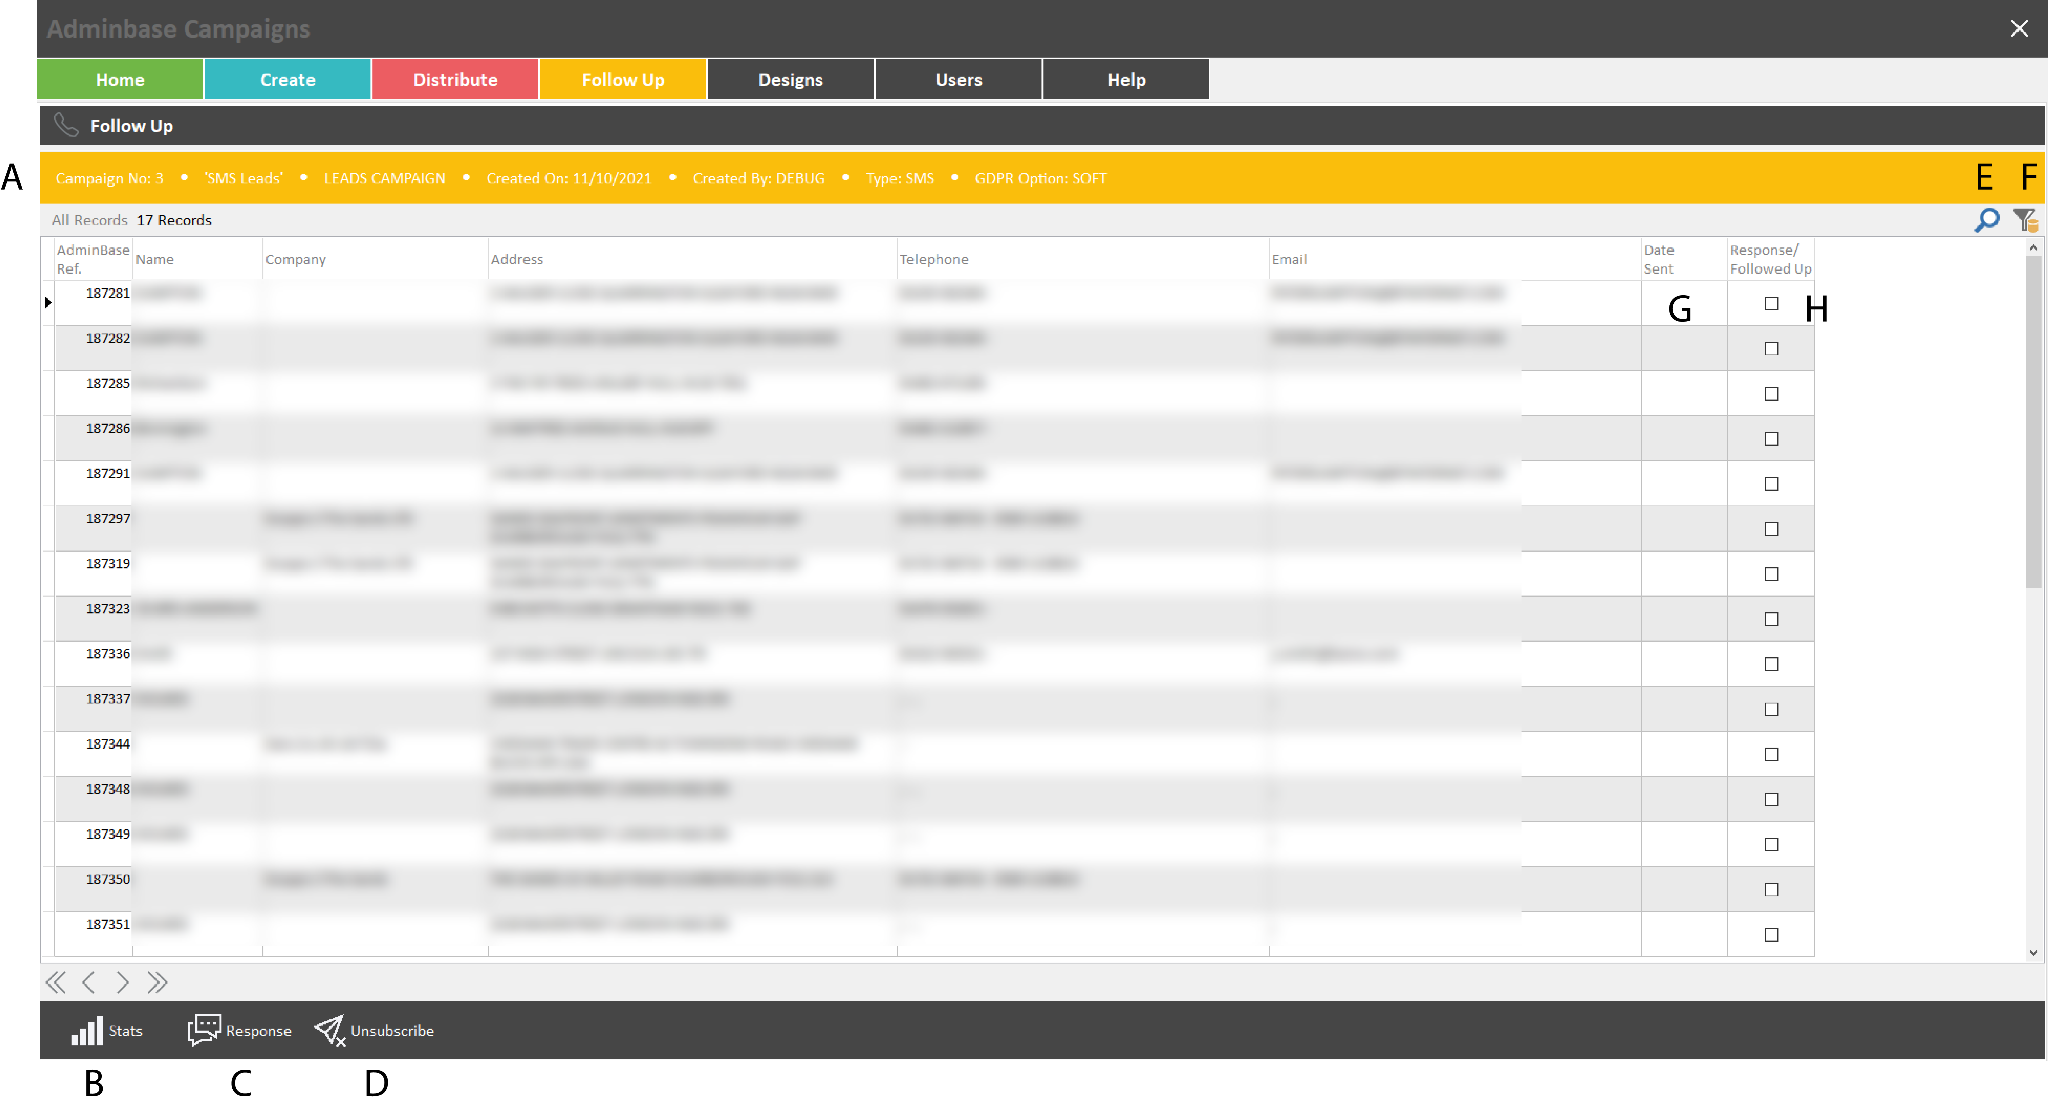
A: Information bar displaying basic information about the current campaign.
B: Displays follow-up stats.
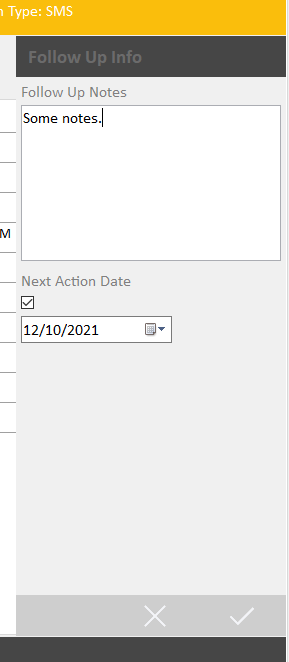
C: Takes the user to the follow up recipient page, which displays more information concerning the specific record selected and is where the user can generate a lead based on the recipient's details. The page is also where the user can record notes on the progress of the response to the campaign. Double clicking on a row in the grid is essentially the same as pressing this button.
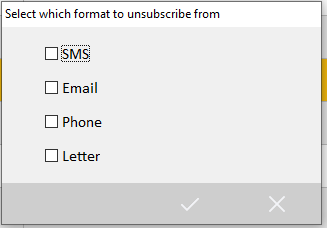
D: Displays dialog for unsubscribing selected lead/customer from chosen distribution method(s). Will remove record from campaigns selected recipients.
E: Displays search dialog. Searches by ‘AdminBase Ref’ by default, however search field can be changed by clicking column titles in the grid.
F: Displays filter dialog for filtering grid based on field values.
G: Shows the date the recipient was sent the campaign and therefore indicates whether the record is ready to be followed up.
H: Indicates whether the recipient record has been followed up i.e. has follow up notes attached to it, which can be seen and edited on the follow up recipient page (accessed through F).
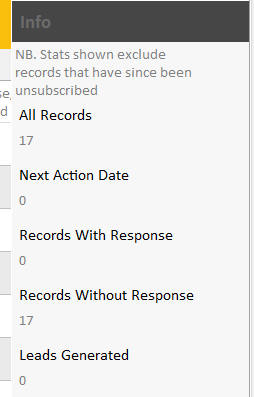
Email Campaign Stats
When an email campaign is being followed up, extra statistics pertaining to interaction with the email are available; allowing detailed tracking of the campaign response. These are displayed on the dialog mentioned above in B. The stats displayed are as follows:
Total Records | Displays all the recipients of the campaign. |
Opened | Displays all recipients who opened the campaign email. |
Opened and Followed Up | All recipients who opened the email and were then followed up. |
Opened and Not Followed Up | Displays all campaign recipients who opened the email however are yet to be followed up. |
Didn’t Open | Displays all recipients who are yet to open the campaign email. |
Clicked | Displays all the recipients who clicked the email after opening, usually hyperlinks etc. |
Clicked and Followed Up | Displays all recipients who clicked the emails content and have been followed up. |
Clicked and Not Followed Up | Displays all recipients who clicked the emails content but have not yet been followed up. |
Delivered | Displays all the recipients of the campaign who received the email distributed by the campaign. |
Bounces | Displays all the recipients of the campaign who didn’t receive the email, due to an error of some description at their end (mailbox full, wrong address etc.). |
Rejects | Displays all the recipients of the campaign who for some reason were not able to receive the email, perhaps because they deleted it. |
Unsubscribes | Displays all the recipients of the campaign who opted to unsubscribe from the mailing list. |
Spam | Displays all recipients who marked the email as spam. |
Recipient Record Screen
This screen is divided into 3 sections, each sizable. The left-hand section contains a collapsible list of lead or customer details such as addresses and contact info. The ‘contact info’ fields are editable for managers. The centre section contains tabbable pages; Follow-up instructions, design script (SMS/Phone campaigns only), comments from AdminBase and in the case of a customer campaign, a list of the customers' contracts. The grid in the right hand section displays the follow-up notes attached to the recipient, as well as buttons to edit them.
A: Campaign/Recipient Information bar.
B: Navigation control allowing the user to scroll through different recipients of the campaign without going back to the main follow up screen.
C: Takes the user back to the previous follow up screen.
D: Displays dialog for generating a new AdminBase lead based on recipients details.
E: Resends campaign to current recipient. Only visible for an SMS or Email Campaign, does exactly the same as the resend feature on the main follow up page. Displays the same dialog shown in Fig 10.
F: Grid of response notes
G: Displays dialog for adding a new follow up note.
H: Displays dialog for editing the current follow up note.
I: Deletes current follow up note.
J: Tabbable pages displaying either lead/customer details, follow up instructions, SMS/Phone text, comments or customer contracts.
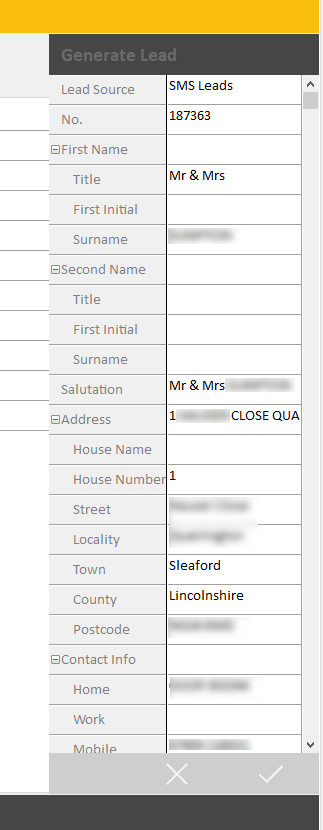
Generating a Lead
AdminBase Campaigns can be used to generate new leads in AdminBase. This is done by clicking the ’Generate Lead’ button, which displays an editable dialog. At the bottom of the dialog is an item entitled ‘Appointment’ which can be used to set the first appointment of the new lead. If the ‘Time’ and ‘Salesperson’ fields are left blank, the lead will be generated without an appointment.
Designs
The designs page is where the user can edit and create global designs available for use in the campaigns. This page is also where report builder can be opened directly from the application in order to edit the aesthetics and data components of either an email or letter campaign. The designs are kept separate from the campaigns allowing for one design to be used multiple times. Each design record is specified as to whether it is for first, either leads or customers AdminBase records and second, either SMS, email, postal or telephone distribution. Once a design has been specified for a particular recipient and distribution, that design will only be available to the campaigns that match those specifications. With either an email or letter design, viewing the file recorded under ‘File Name’ (D in the below screenshot) in ReportBuilder will display what the recipient will see when they receive their email/letter. In the case of an SMS design, the value under ‘Design Text’ (E in the below screenshot) will display the wording of the text message that will be received, and when looking at a telephone campaign will display the phone script to be referred to when in contact with the recipient. Either double clicking or clicking the button labelled B in the below screenshot will take the user to a page for editing the selected design, the features of which vary depending on the distribution specification.
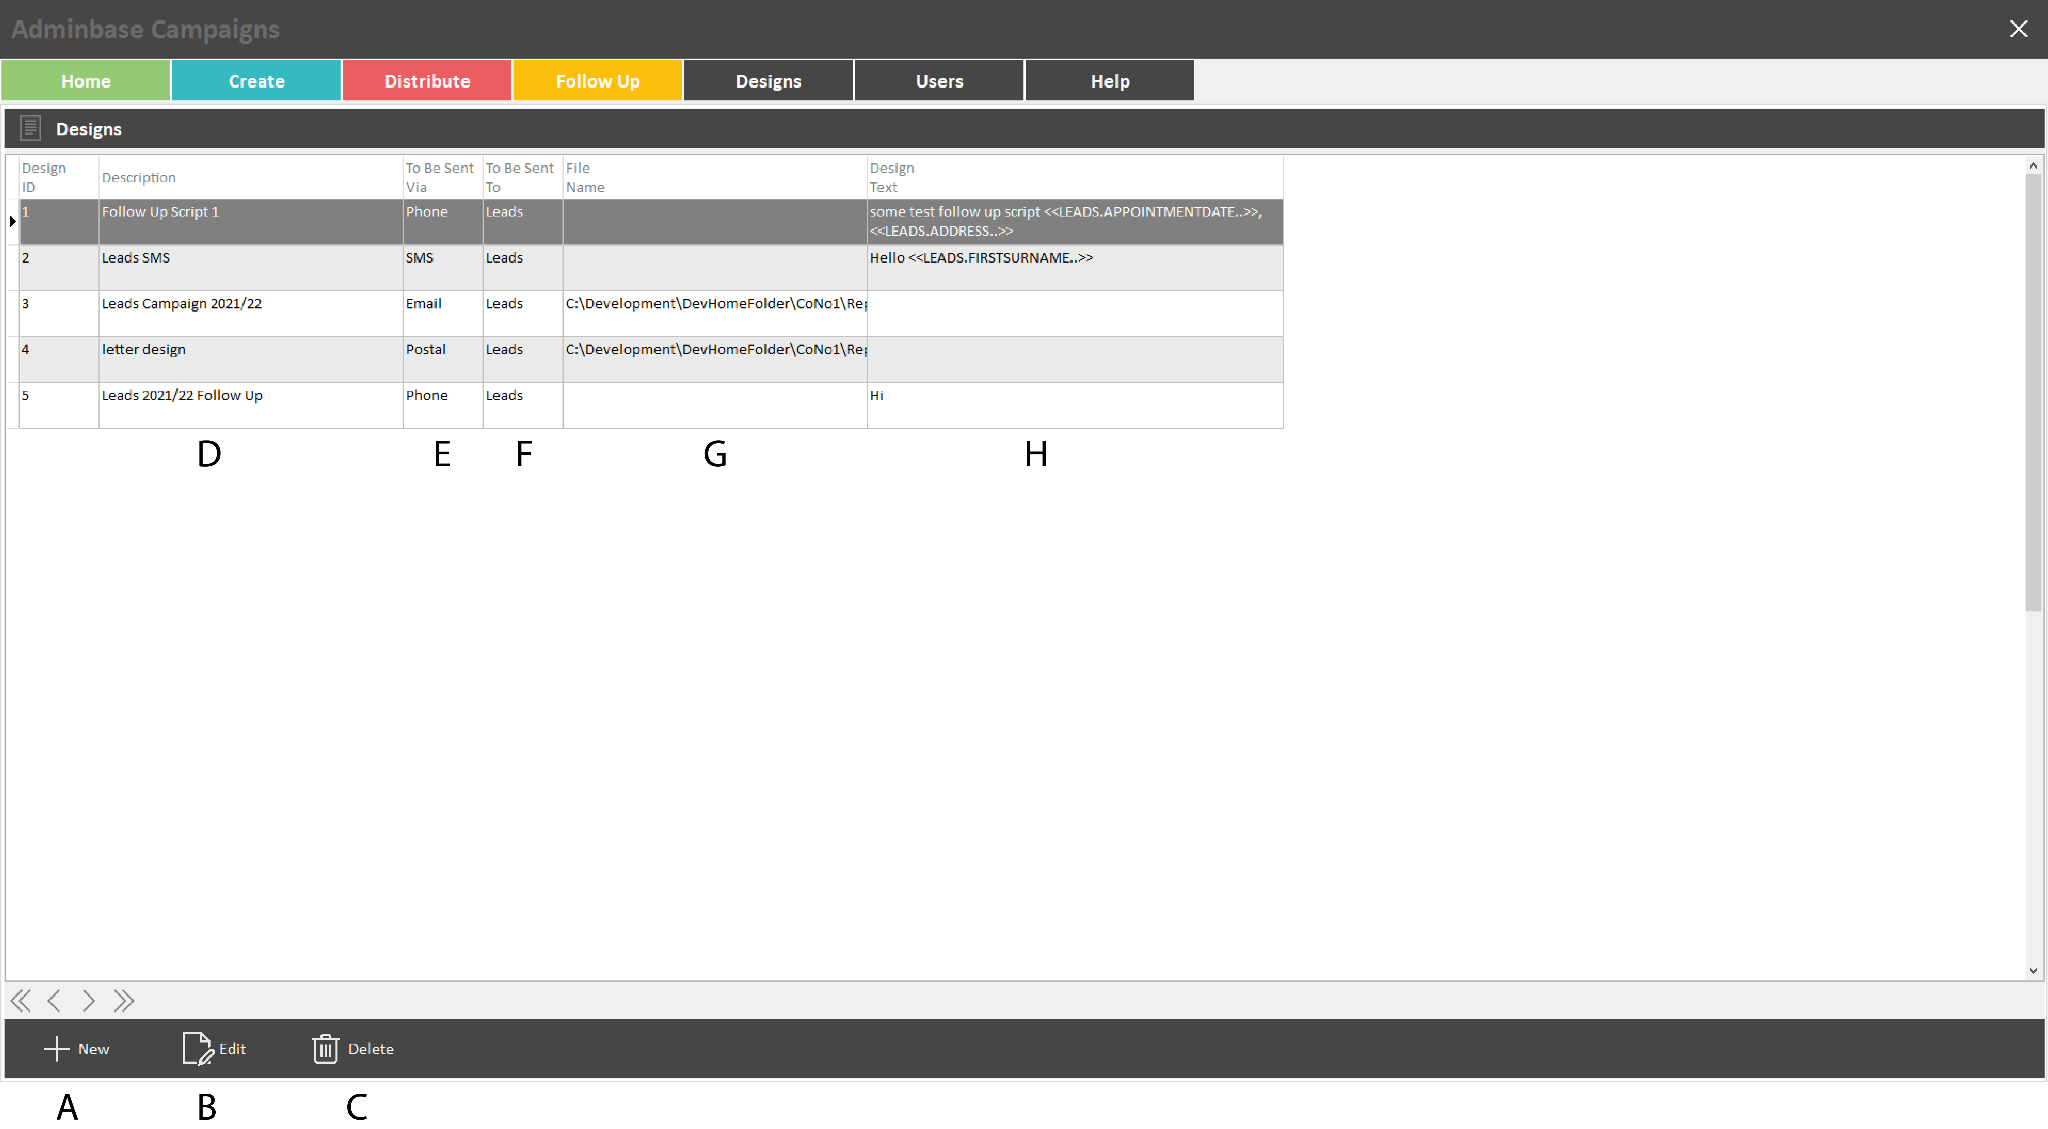
A: Adds a new design and takes the user to a page for editing the details.
B: Takes the user to the ‘Edit Design’ page for the selected record in the grid.
C: After confirmation, deletes the selected design.
D: Design name/description.
E: Design format (email, letter, SMS text or phone script).
F: Displays whether the design is intended for leads or customers.
G: Destination/Name of report builder file attached to email and letter campaigns only.
H: Text attached to an SMS or telephone campaign. Displays either the SMS that will be seen by the recipient or the script of the phone call to be made to the recipient.
Creating & Editing Designs
To create a design, click the ‘New’ Button. A new design will be created and the user brought to a page for creating and editing the details of the new design. Designs can be edited by clicking ‘Edit’ or double clicking a row in the grid.
The layout of the design editing page differs depending on format type:
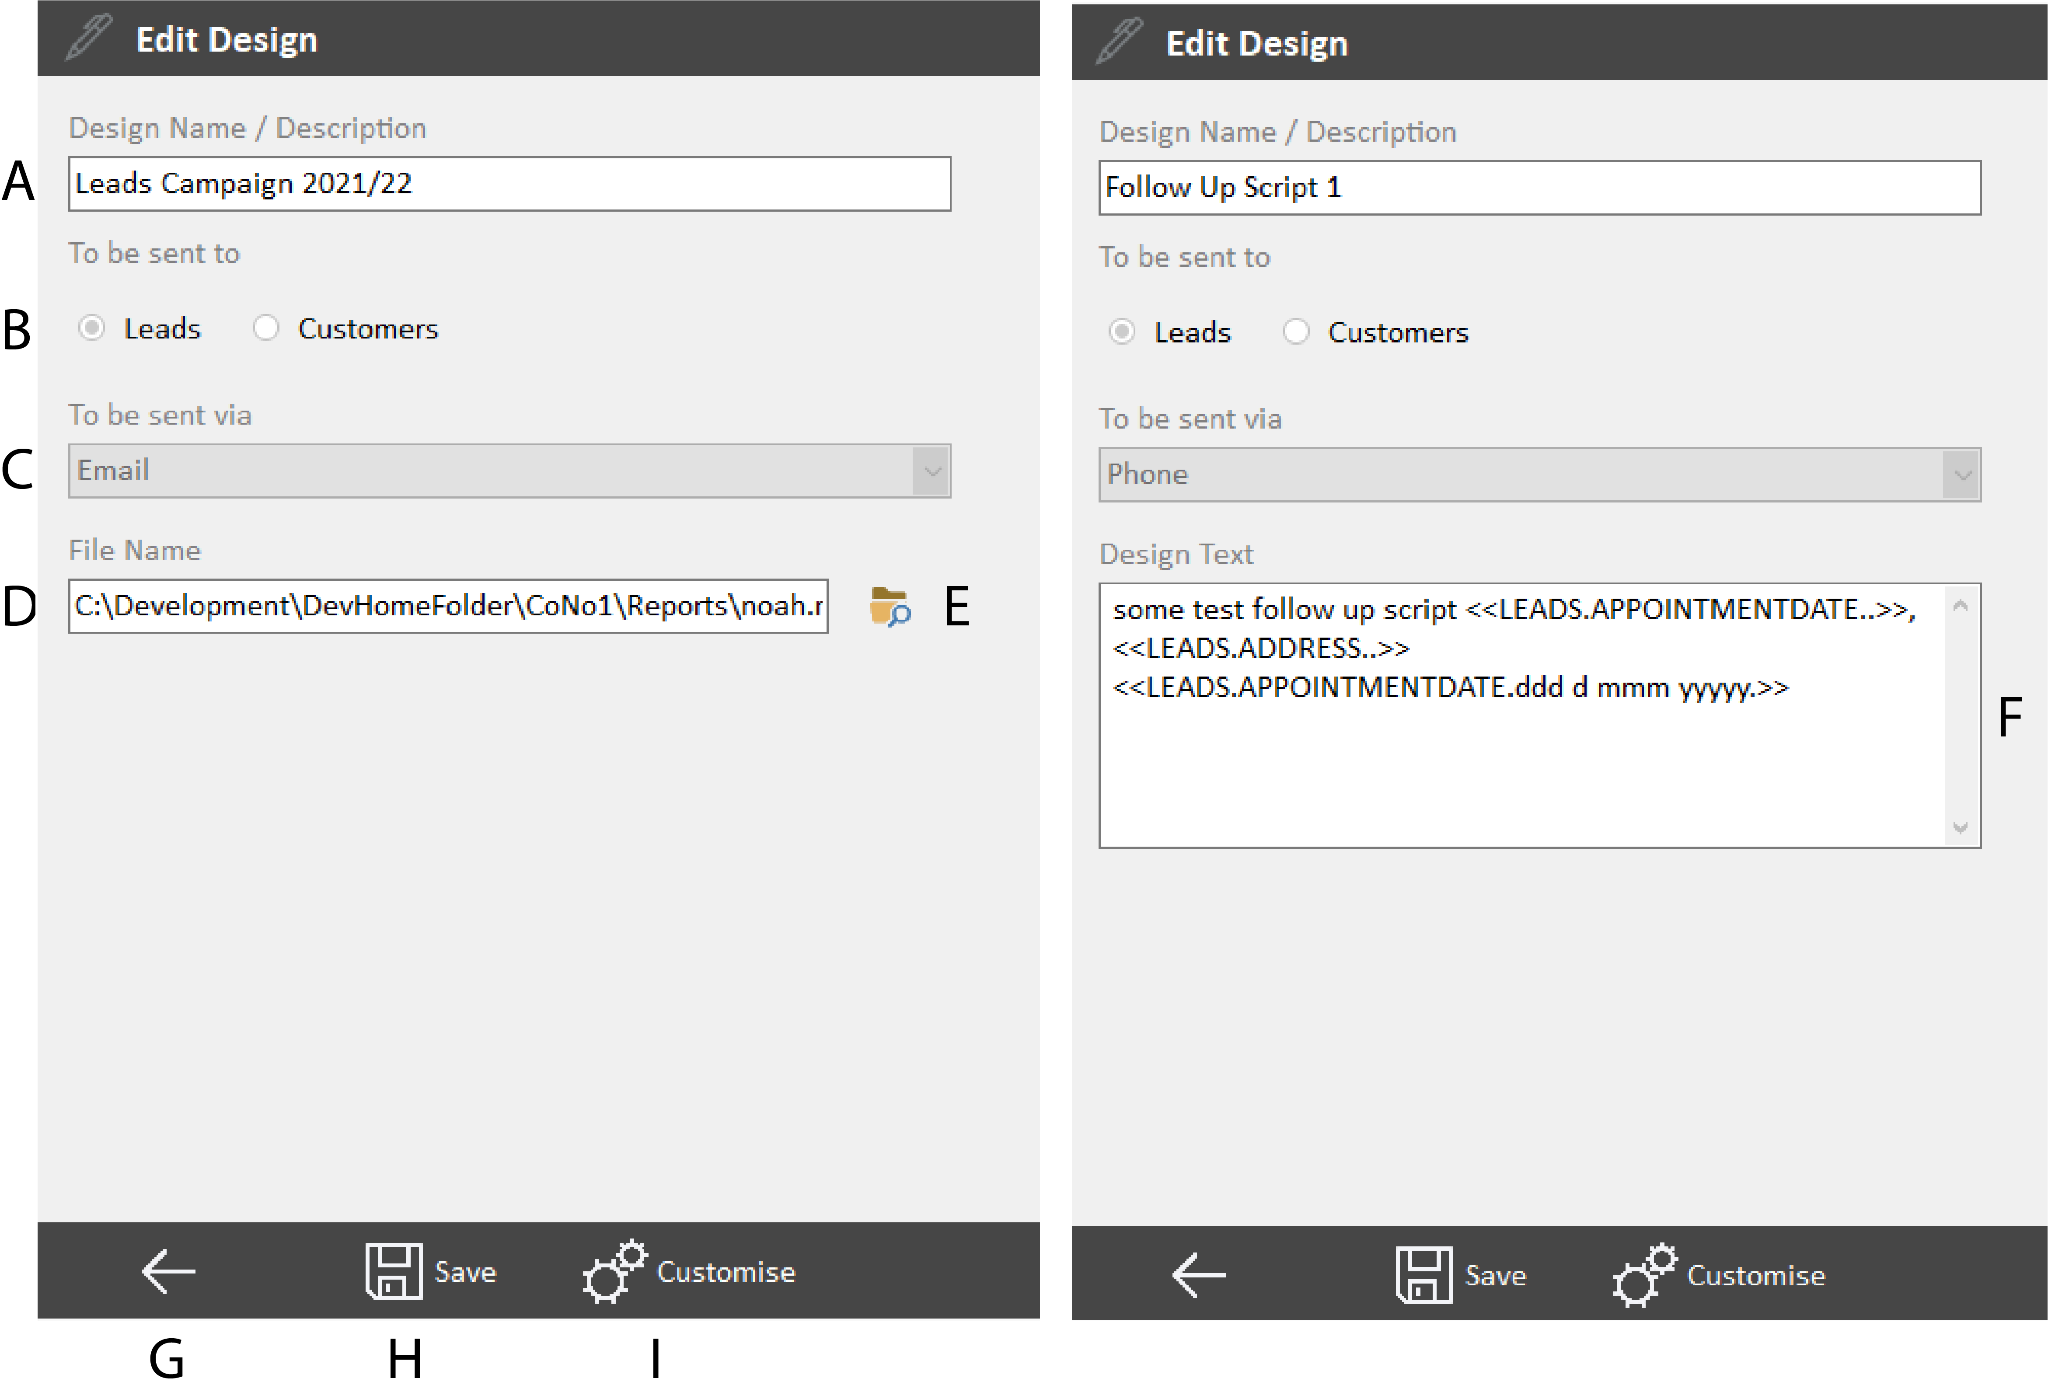
A: Name of the design
B: Specifies whether design is for leads or customers
C: Dropdown for selecting design format
D: Destination on users machine of report builder file (.rtm). Displayed only for email and letter designs
E: Opens file browser for .rtm file. Defaults to /Reports folder in the current company folder (if using multi-company) in your AdminBase folder
F: Template text for SMS and Phone scripts, displayed only for those formats. Contains placeholders that are replaced with record-specific data when the design is used/distributed
G: Cancels all changes and returns user to previous main designs page, does not affect changes made in the report builder application.
H: Saves all changes and returns user to previous main designs page, does not affect changes made in the report builder application.
I: If the design is an email or letter; opens the .rtm file in ReportBuilder. If there’s no .rtm then it opens a blank report. For SMS or phone scripts; opens the script designer (see below).
SMS & Phone Script Designer
The SMS/Script designer is used for editing data aware placeholders in SMS or phone script text, and is accessed by clicking ‘Customise’ when adding or editing an SMS or phone script design. Data placeholders are written as <<Tablename.Fieldname..>> and represent a field in AdminBase data which gets replaced with customer or lead data. To add a placeholder, select a table from the ‘Tablename’ dropdown, then select the desired field from that table from the ‘Fieldname’ dropdown. Depending on the type of field selected, the format of the value can be specified with the ‘Format’ dropdown. When editing a customer's design, an additional dropdown appears when ‘CCREVENTS’ is chosen as the table, giving the user the ability to specify the event category. To insert the placeholder into the text click ‘Insert at cursor’.
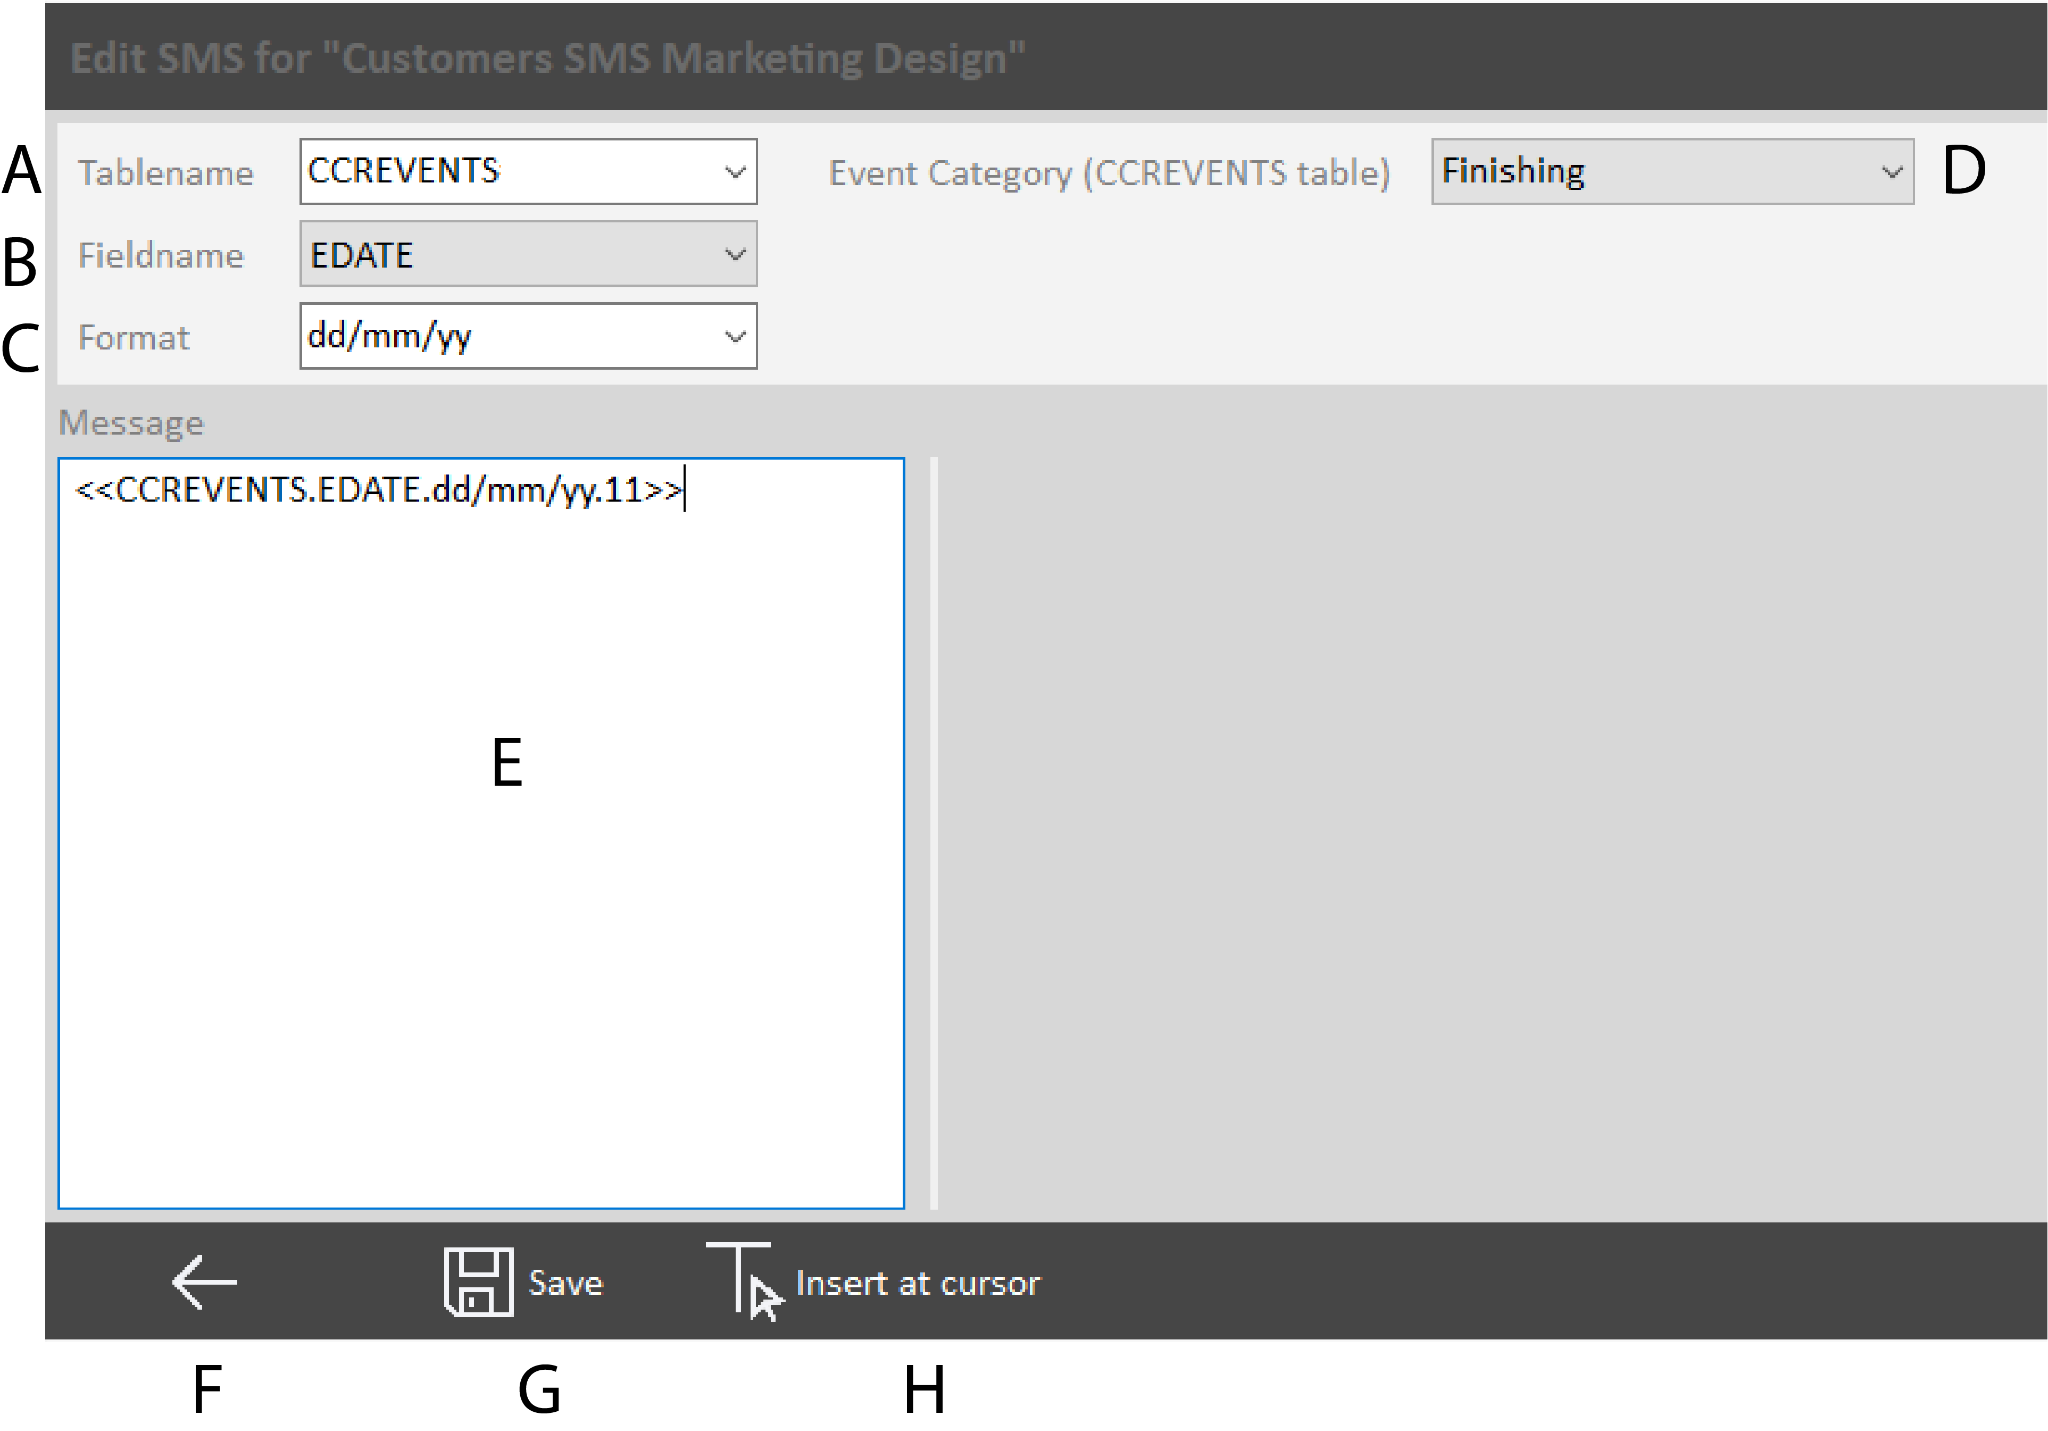
A: Dropdown for selecting AdminBase table to refer to in data placeholder, available tables being different selections for leads and customers.
B: Dropdown displaying fields contained in the selected table.
C: Dropdown displaying formats for the selected field, depending on field type. Primarily for formatting date and time time fields e.g. DD/MM/YYYY or MM/DD/YYYY.
D: Dropdown displaying appointment types from fitting page in AdminBase. Only available if the selected table is ‘CCREVENTS’.
E: Editable field reading design text with chosen data placeholders.
F: Cancels all changes and returns to the previous page.
G: Saves all changes and returns to the previous page.
H: Inserts data placeholder at cursor.
Users
The users page is where all information concerning individual user logins can be monitored and edited. The page is only available to users with manager privileges, and is where the manager privileges are set. A grid displays all the users currently in the database and all the relevant information. Double clicking on a row or clicking the edit button (B on the below screenshot) will display a dialog for editing the information for that user. Upon running the application for the first time and setting up the first user using the login dialog, that user will already be in the list on the users page with the ID as 0, the username and password as was used earlier and with manager privileges checked.
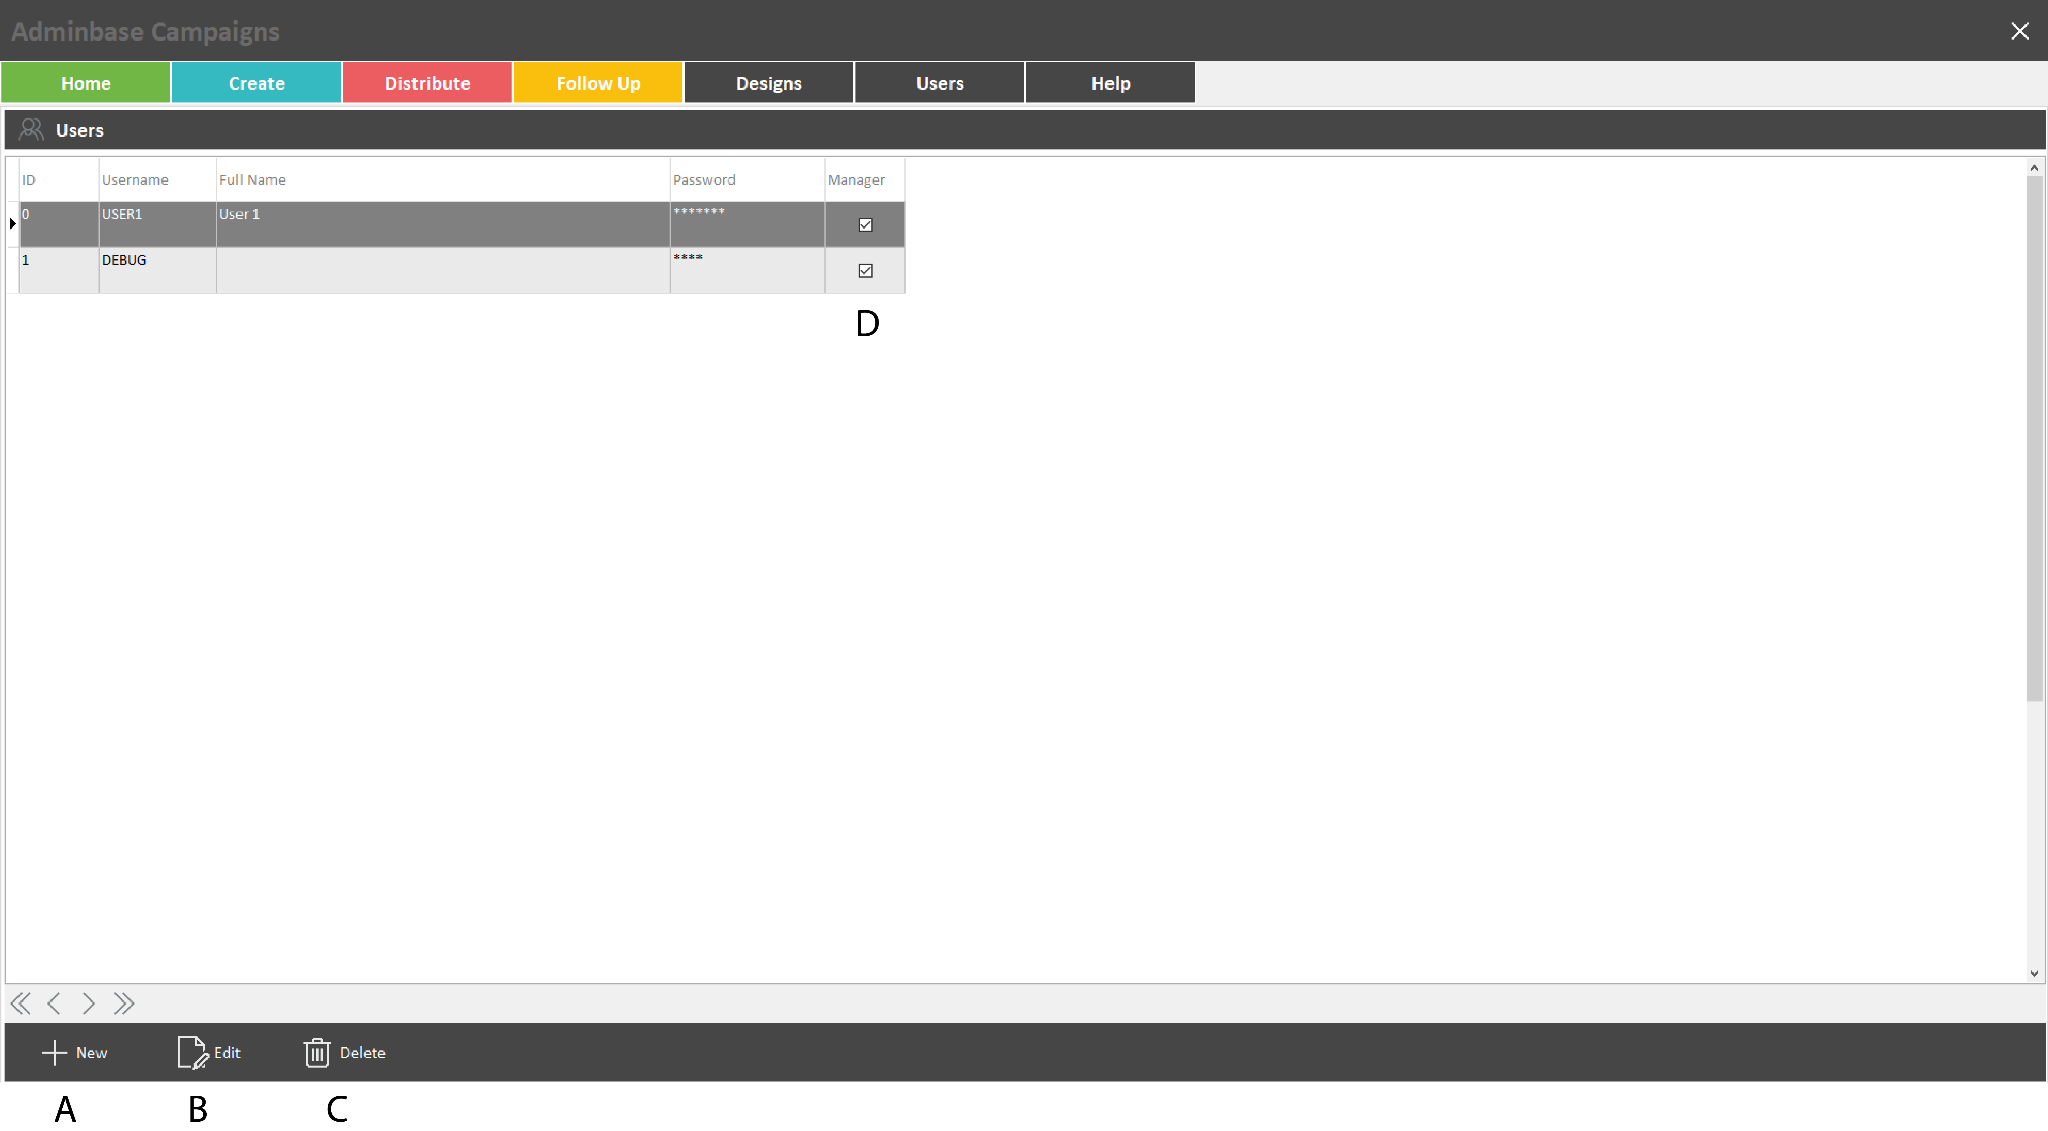
A: Creates a new user and displays dialog to the right of the screen for editing their username, full name, password and choosing whether they are classed as a manager.
B: Displays dialog for editing the current user selected in the grid.
C: After confirmation, deletes the selected user.
D: Checkbox to see which users have manager privileges.
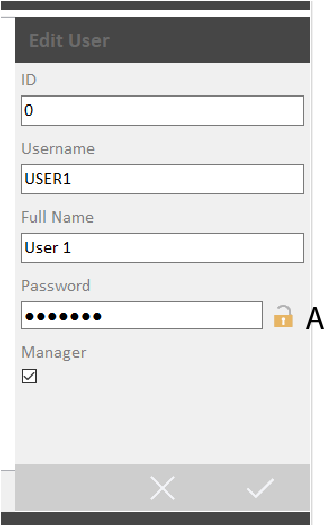
A: Dialog displayed when user either edits or creates row in users grid. Toggles between hiding and showing password.